Chapters
Table of Contents

Related Manuals for Carson 1st Go-Kart RTR electric


Summary of Contents for Carson 1st Go-Kart RTR electric
- Page 1 Instruction Manual Page 2 - 11 Betriebsanleitung Seite 12 - 21 Mode d’emploie Page 22 - 31 Instrucciones Página 32 - 41 Istruzioni d’uso Pagina 42 - 51 CARSON 1st Go-Kart electric RTR 50 040 4013...
-
Page 2: Preface
CARSON store. CARSON will, at its option, • Damage caused by losing control of your car; unless otherwise provided by law: •... -
Page 3: Table Of Contents
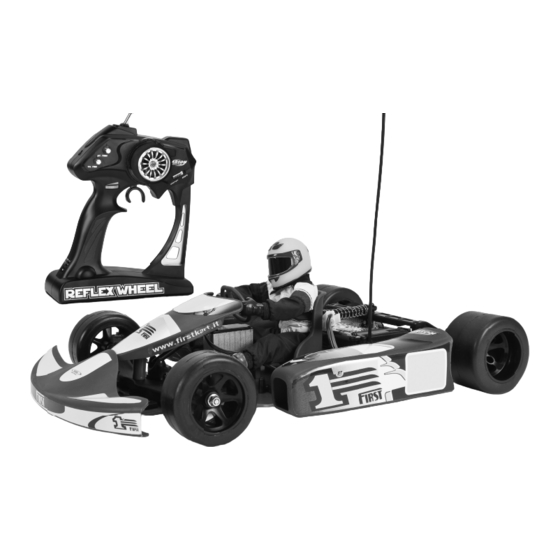
Troubleshooting ..............11 Assembly ................... 52 Spare parts ................. 72 Included Items Transmitter Dummy driver is not included. This can be purchased as an optional extra under Item 50 010 5034. Model CARSON 1st Go-Kart electric RTR 50 040 4013... -
Page 4: Safety Precautions
• Watch your model constantly and do not become distracted. the rechargeable battery for driving has The body shell should be correctly attached to the vehicle to be removed absolutely. before driving. CARSON 1st Go-Kart electric RTR 50 040 4013... -
Page 5: Additional Items Needed For Starting The Model
Finally We wish you great fun with your CARSON model car! Please read the instructions before operating your model. Each time you have finished driving the model, always check the correct operation of the components. A single loose screw can result in a dangerous situation for your model. Maintain your model regularly and replace damaged or worn out parts by genuine spare parts. -
Page 6: Tools Needed For The Assembly
Side cutter 74035 (small and big) 1,5 / 2 / 2,5 mm 74023 a. Chassis Motor Dummy driver Ball differential Drive battery Rear tyre RC pod Steering servo Frontrammer Front axle Front tyre CARSON 1st Go-Kart electric RTR 50 040 4013... -
Page 7: Installation Of Antenna
• Exhausted batteries are to be removed from the toy. • The supply terminals are not to be short-circuited. • Regular examination of transformer or battery charger for any damage to their cord, plug, enclosure and other parts. CARSON 1st Go-Kart electric RTR 50 040 4013... -
Page 8: Insert Drive Battery
Insert Drive Battery 1. Dismantle the shock absorber. 4. Replace the battery holder. 2. Remove the battery holder. 5. Reassemble the shock absorber. 3. Insert the battery 6. And secure it using a splint. CARSON 1st Go-Kart electric RTR 50 040 4013... -
Page 9: Turn The Power Switch On
The range of the remote control is reduced if the antenna is not pulled out completely. CAUTION! Always turn the transmitter’s power switch ON first! 1. Connect the rechargeable battery for the driving. 2. Switch on the receiver. CARSON 1st Go-Kart electric RTR 50 040 4013... -
Page 10: How To Control Your Model
• For regulating the driving speed operate the gas/brake - lever to the rear (driving forward, to give speed) - and/or forward (braking, reverse movement) driving forward, braking, reverse to give speed movement CARSON 1st Go-Kart electric RTR 50 040 4013... -
Page 11: How To Change Frequencies
Motor has lost power Change to spare motor Rear wheel nuts are too loose Tighten wheel nuts Dust or foreign objects are inside gears Turn the power switch „OFF“ and clean out gears CARSON 1st Go-Kart electric RTR 50 040 4013... -
Page 12: Vorwort
Ansprüche abgeleitet werden. Garantiebedingungen Von der Garantie ausgeschlossen sind: Für dieses Produkt leistet CARSON eine Garantie von 24 • Beschädigung oder Ausfall durch Nichtbeachten der Sicher- Monaten betreffend Fehler bei der Herstellung in Bezug auf heitsanweisungen oder der Bedienungsanleitung, höhere Material und Fertigung bei normalem Gebrauch ab dem Kauf Gewalt, Unfall, fehlerhafte oder außergewöhnliche... -
Page 13: Lieferumfang
Steuern des Modells .............. 20 g. Wechseln der Sendefrequenz ..........21 h. Fehlersuchtabelle ..............21 Montageanleitung ............... 52 Ersatzteile ................... 72 Lieferumfang Sender Fahrerfigur optional unter 50 010 5034 erhältlich Modell CARSON 1st Go-Kart electric RTR 50 040 4013... -
Page 14: Sicherheitsanweisungen
Fahren Sie nicht, wenn sie übermüdet oder anderweitig in Bei längerem Nichtgebrauch ist der Fahr- Ihrer Reaktionsfähigkeit beeinträchtigt sind. Akku unbedingt zu entfernen. • Halten Sie immer direkten Sichtkontakt zum Modell. Fahren sie das Modell nur mit ordnungsgemäß angebrachter Karosserie. CARSON 1st Go-Kart electric RTR 50 040 4013... -
Page 15: Zum Betreiben Des Fahrzeugs Erforderliches Zubehör
Oder als Set: N 50 060 7004 Akku-Ladeset 50 060 7005 Akku-Ladeset 2 A „TURBO 6“ mit mit NiMH Akku 3000 mAh NiMH Akku 2000 mAh und und 8 Mignon Batterien 8 Mignon Batterien CARSON 1st Go-Kart electric RTR 50 040 4013... -
Page 16: Für Den Zusammenbau Erforderliches Werkzeug
Kreuzschlitz-Schraubendreher Kreuzschlüssel 13118 Pinzette 74003 Seitenschneider 74035 (klein und groß) und Inbusschlüssel 1,5 / 2 / 2,5 mm 74023 a. Chassis Motor Fahrerfigur Kugeldifferenzial Fahrkku Hinterreifen RC Box Lenkservo Frontrammer Vorderachse Vorderreifen CARSON 1st Go-Kart electric RTR 50 040 4013... -
Page 17: Einbau Der Antenne
• Leere Batterien/ Akkus immer nach Gebrauch aus dem Modell entfernen. • Die Anschlusskabel dürfen nicht kurzgeschlossen werden. • Bitte überprüfen Sie regelmäßig die Elektronik oder Akkus, Ladegerät, Anschlussstecker, Kabel, Gehäuse und andere Teile auf Schäden. CARSON 1st Go-Kart electric RTR 50 040 4013... -
Page 18: Einbau Des Fahrakkus
Einbau des Fahrakkus 1. Stoßdämpfer demontieren. 4. Akkuhalter wieder fixieren. 2. Akkuhalter abnehmen. 5. Stoßdämpfer fixieren. 3. Legen Sie den Akku ein. 6. Und mit Splint sichern. CARSON 1st Go-Kart electric RTR 50 040 4013... -
Page 19: Einschalten Der Rc-Anlage
• Ziehen Sie die Senderantenne ganz heraus Bei nicht vollständig herausgezogener Antenne verringert sich die Reichweite der Fernsteuerung. ACHTUNG! Immer zuerst den Sender einschalten! 1. Schließen Sie den Fahrakku an. 2 . Schalten Sie den Empfänger ein. CARSON 1st Go-Kart electric RTR 50 040 4013... -
Page 20: Steuern Des Modells
Servo-Reverse Schalter (ST in Position REV). Rechts Links Links Rechts • Zum Regeln der Fahrgeschwindigkeit betätigen Sie den Gas/Bremshebel - nach hinten (Vorwärtsfahrt, Gas geben) bzw. - nach vorne (Bremsen, Rückwärtsfahrt). Vorwärtsfahrt/ Bremsen/ Gas geben Rückwärtsfahrt CARSON 1st Go-Kart electric RTR 50 040 4013... -
Page 21: Wechseln Der Sendefrequenz
Tauschen Sie den Motor aus Die hinteren Radmuttern sind lose Ziehen Sie die Radmuttern fest an Staub / Fremdkörper ist in das Getriebe gelangt Schalten Sie das Modell aus und reinigen Sie das Getriebe CARSON 1st Go-Kart electric RTR 50 040 4013... -
Page 22: Préface
Conditions de garantie La garantie ne couvre pas: CARSON vous garantit pour 24 mois à partir de la date d’achat • Tout dommage ou défaillance causé par force majeure, (pièces justificatives à l’appui) que la voiture est exempte de abus, accident, utilisation abusive, erronée ou anormale, non... -
Page 23: Périmètre De Livraison
Tableau de recherche des erreurs ......... 31 Assemblage ................52 Pièces détachées ............... 72 Périmètre de livraison Emetteur La figurine du conducteur n’est pas fournie. Elle peut être achetée en option sous la référence 50 010 5034. Modèle CARSON 1st Go-Kart electric RTR 50 040 4013... -
Page 24: Consignes De Sécurité
être capacités de réaction sont restreintes pour une quelconque retiré. raison. • Gardez toujours le contact visuel avec la maquette. N’utilisez la maquette que si la carrosserie est correctement montée. CARSON 1st Go-Kart electric RTR 50 040 4013... -
Page 25: Articles Nécessaires Au Démarrage Du Modèle
50 060 7005 Kit de recharge d’accu Kit de recharge d’accu « TURBO 6 » 2 A avec accu NiMH avec accu NiMH 2000 mAh et 3000 mAh et 8 piles 8 piles Mignon Mignon CARSON 1st Go-Kart electric RTR 50 040 4013... -
Page 26: Outils Nécessaires Au Montage De La Voiture
à six pas 1,5 / 2 / 2,5 mm 74023 a. Châssis Moteur Figurine du conducteur Différentiel sphérique Accu moteur Pneu arrière Boîtier RC Servo de direction Pare-chocs avant Essieu avant Pneu avant CARSON 1st Go-Kart electric RTR 50 040 4013... -
Page 27: Montage De L'antenne
à cet effet. Cela risquerait sinon d’abîmer votre accu moteur. Nous recommandons le chargeur à fiche CARSON « Turbo 6 » 50 060 6030. La durée de recharge varie selon le chargeur et le type d’accu. -
Page 28: Montage De L'accu Moteur
Montage de l’accu moteur 1. Démonter l’amortisseur. 4. Remettre en place la fixation pour accu. 2. Retirer la fixation pour accu. 5. Fixer l’amortisseur. 3. Insérez l’accu. 6. Et bloquer avec la goupille. CARSON 1st Go-Kart electric RTR 50 040 4013... -
Page 29: Allumer L'émetteur
• Sortir complètement l’antenne de l ’émetteur. La portée de la radiocommande est diminuée lorsque l’antenne n’est pas sortie complètement. ATTENTION ! Toujours allumer l’émetteur en premier ! 1. Raccordez l’accu moteur. 2 . Allumez le récepteur. CARSON 1st Go-Kart electric RTR 50 040 4013... -
Page 30: Conduite De La Voiture
Gauche Droite • Pour régler la vitesse, actionnez le levier des gaz/du frein - vers l’arrière (marche avant, accélération) et - vers l’avant (frein, marche arrière). Marche avant, Frein, accélération marche arrière CARSON 1st Go-Kart electric RTR 50 040 4013... -
Page 31: Changer Les Fréquences
Les écrous arrière des roues ne sont pas bien Resserrez les écrous des roues serrés De la poussière / des corps étrangers ont pénétré Éteignez la maquette et nettoyez l’engrenage dans l’engrenage CARSON 1st Go-Kart electric RTR 50 040 4013... -
Page 32: Prólogo
CARSON. • Cualquier reparación no efectuada por un servicio de CARSON podrá a su elección y salvo que las leyes dispongan reparaciones autorizado CARSON; otra cosa: •... -
Page 33: Contenido Del Kit
Tabla de búsqueda de fallos ..........41 Montaje ..................52 Recambios .................. 72 Contenido del kit Emisora El muñeco del conductor no está incluido en el suministro. Éste se puede adquirir opcionalmente bajo el 50 010 5034. Modelo CARSON 1st Go-Kart electric RTR 50 040 4013... -
Page 34: Precauciones De Seguridad
• Mantenga siempre contacto visual con el modelo. Si no utiliza el modelo por algún tiempo, La carrocería debería estar correctamente fijada al chasis antes de conducirlo. la batería recargable debe ser retirada. CARSON 1st Go-Kart electric RTR 50 040 4013... -
Page 35: Artículos Adicionales Necesarios Para El Arranque Del Modelo
Set de carga de acumuladores 50 060 7004 „TURBO 6“ con 50 060 7005 de 2 A con acumulador NiMH de 2000 mAh y acumulador NiMH de 8 baterías Mignon 3000 mAh y 8 baterías Mignon CARSON 1st Go-Kart electric RTR 50 040 4013... -
Page 36: Herramientas Necesarias Para El Montaje
1,5 / 2 / 2,5 mm 74023 a. Chasis muñeco del Motor conductor Diferencial esférico Acumuladores de marcha Neumático trasero Caja de radiocontrol Servo de dirección Panel frontal Eje delantero Neumático delantero CARSON 1st Go-Kart electric RTR 50 040 4013... -
Page 37: Instalación De La Antena
Para cargar acumuladores NiMH utilice únicamente los cargadores previstos para ello. De lo contrario se puede dañar el acumulador. Recomendamos el cargador de enchufe CARSON „Turbo 6“ N 50 060 6030. El tiempo de carga puede variar según el cargador y el tipo de acumulador. -
Page 38: Colocación De La Batería De Marcha
1. Desmontar el paragolpes. 4. Volver a fijar el soporte del acumulador. 2. Retirar el soporte del acumulador. 5. Fijar el paragolpes. 3. Coloque la batería. 6. Y asegurar con una tablilla. CARSON 1st Go-Kart electric RTR 50 040 4013... -
Page 39: Connecte El Emisora
El radio de acción de la emisora se reducirá si la antena no está completamente desplegada. PRECAUCION ¡Conecte siempre primero la emisora! 1. Conecte la batería recargable para conducir. 2. Conecte el receptor. CARSON 1st Go-Kart electric RTR 50 040 4013... -
Page 40: Volante De Dirección (Controles Básicos)
Derecha Izquierda Izquierda Derecha • Para regular la velocidad presione el gatillo - conduciendo hacia delante, para ganar velocidad o - empújelo (frenos, marcha atrás). Marcha adelante, frenos, ganar velocidad marcha atrás CARSON 1st Go-Kart electric RTR 50 040 4013... -
Page 41: Cómo Cambiar Frecuencias
Sustituya por un motor de recambio. Las ruedas están muy sueltas. Apriete las tuercas de rueda. Han entrado en los engranajes polvo u otros Desconecte el interruptor y limpie los objetos. engranajes. CARSON 1st Go-Kart electric RTR 50 040 4013... -
Page 42: Prefazione
Condizioni di Garanzia Dalla garanzia sono esclusi: Danni o guasti causati da eventi naturali, normale usura, abusi, Questo prodotto è garantito da CARSON, da difetti di incidenti, utilizzo non corretto, inosservanza delle istruzioni, fabbricazione nei materiali e lavorazioni, riscontrati nel normale montaggio non corretto, imperizia dell’utilizzatore, mancanza... -
Page 43: Contenuti Del Kit
Tabella ricerca errore ............. 51 Montaggio ................... 52 Ricambi ..................72 Contenuti del kit Trasmettitore La figura del pilota non è inclusa nella fornitura. È disponibile su richiesta con il N 50 010 5034. Modello CARSON 1st Go-Kart electric RTR 50 040 4013... -
Page 44: Misure Di Sicurezza
• Guardare continuamente il modello e non distrasi. • Non tentare mai di caricare pile a secco. La carrozzeria deve essere fissata correttamente al modello Dopo l’utilizzo rimuovere le batterie dal prima dell’utilizzo. modello. CARSON 1st Go-Kart electric RTR 50 040 4013... -
Page 45: Articoli Necessari Non Compresi Per La Messa In Moto Del Modello
50 060 7004 Set 50 060 7005 Set caricabatterie 2 A caricabatterie „TURBO 6“ con batterie NiMH con batterie NiMH 2000 mAh e 3000 mAh e 8 batterie 8 batterie stilo stilo CARSON 1st Go-Kart electric RTR 50 040 4013... -
Page 46: Utensili Necessari Al Montaggio Del Modello
Tronchesine 74035 1,5 / 2 / 2,5 mm 74023 a. Telaio Figura del pilota Motore Differenziale a sfere Batterie motore Gomme posteriore Scatola RC Servo sterzo Paraurti frontale Assale anteriore Gomme anteriori CARSON 1st Go-Kart electric RTR 50 040 4013... -
Page 47: Montaggio Dell'antenna
Per caricare le batterie Nickel Metal Hydride utilizzare solo gli appositi caricabatterie, altrimenti la batteria motore potrebbe subire dei danni. Consigliamo il caricabatterie a spina CARSON „Turbo 6“ 50 060 6030. Il tempo di carica varia in base all’apparecchio e al tipo di batterie. -
Page 48: Montare La Batteria Motore
Montare la batteria motore 1. Smontare l’ammortizzatore. 4. Fissare nuovamente il supporto dell’accumulatore. 2. Rimuovere il supporto dell’accumulatore. 5. Fissare l’ammortizzatore. 3. Inserire la batteria. 6. Serrarli con una chiave. CARSON 1st Go-Kart electric RTR 50 040 4013... -
Page 49: Accendere Trasmettitore
• Estrarre l’antenna del trasmettitore completamente. La gittata del radiocomando si riduce notevolmente se non estraete completamente l’antenna. ATTENZIONE! Accendere sempre prima il trasmettitore! 1. Collegare le batterie ricaricabili per iniziare a guidare. 2. Accendere la ricevente. CARSON 1st Go-Kart electric RTR 50 040 4013... -
Page 50: Come Controllare Il Vostro Modello
• Per regolare la velocità agire sulla leva del gas/freno - indietro (per andare avanti ed accelerare) e/o - in avanti (per frenare o andare in retromarcia) per andare per frenare avanti ed o andare in accelerare retromarcia CARSON 1st Go-Kart electric RTR 50 040 4013... -
Page 51: Come Cambiare La Frequenza
Sostituire il motore I dadi bloccaggio ruote posteriori sono troppo Stringere con decisione i dadi lenti C’è sporco o corpi estranei negli ingranaggi Spegnere il modello (posizione OFF) e rimuovere lo sporco nel pignone CARSON 1st Go-Kart electric RTR 50 040 4013... -
Page 52: Assembly
• Frenafiletti Grease • Fett • Graisse • Grasa • Grease Silicon Oil • Silikonöl • Huile silcone 50 040 5107 • Aceite de silicona 3 x 6 • Silicon Oil 52 CARSON 1st Go-Kart electric RTR 50 040 4013... - Page 53 • Chassismontage 50 040 5105 • Montage du châssis • Montaje del chasis 50 040 5105 • Montaggio del telaio 50 040 5107 3 x 8 50 040 5107 3 x 8 CARSON 1st Go-Kart electric RTR 50 040 4013...
- Page 54 • Montaje del compartimento de la batería • Montaggio scatola batteria 50 040 5107 3 x 8 50 040 5107 50 040 5107 3 x 8 3 x 8 54 CARSON 1st Go-Kart electric RTR 50 040 4013...
- Page 55 50 010 5245 Sicherungslack 50 010 5245 50 010 5244 50 010 5245 50 010 5244 50 010 5243 50 010 5245 50 010 5245 50 010 5244 50 010 5244 8.0 mm CARSON 1st Go-Kart electric RTR 50 040 4013...
- Page 56 50 040 5107 3 x 12 Steering linkage • Lenkgestänge • Barre de direction • Varillaje de dirección • Collegamenti sterzo 50 010 5262 50 010 5262 50 010 5262 58.5 mm 56 CARSON 1st Go-Kart electric RTR 50 040 4013...
- Page 57 3 x 10 50 040 5107 3 x 10 50 040 5107 3 x 8 50 010 5244 50 010 5262 50 010 5262 50 040 5107 3 x 8 26.5 mm CARSON 1st Go-Kart electric RTR 50 040 4013...
- Page 58 50 010 5260 3 x 10 50 040 5107 50 010 5260 3 x 10 50 010 5260 50 040 5107 3 x 8 50 010 5260 50 040 5107 3 x 8 58 CARSON 1st Go-Kart electric RTR 50 040 4013...
- Page 59 50 040 5107 50 010 5246 3 x 8 CH.2 50 040 5107 CH.1 2.1 x 8 50 040 5107 3 x 8 50 010 5246 Steering servo Lenkservo 50 010 5246 CARSON 1st Go-Kart electric RTR 50 040 4013...
- Page 60 • Montage pièces latérales • Montaje de las piezas laterales • Montaggio componenti laterali 50 040 5107 3 x 8 50 040 5107 3 x 8 50 040 5107 3 x 8 50 040 5107 3 x 8 60 CARSON 1st Go-Kart electric RTR 50 040 4013...
- Page 61 • Montaggio sedile pilota 50 040 5104 50 040 5107 3 x 8 50 010 5242 50 040 5104 3 x 8 50 040 5107 3 x 8 50 040 5107 3 x 8 CARSON 1st Go-Kart electric RTR 50 040 4013...
- Page 62 Le différentiel doit pouvoir être tourné sans frottement après montage. 50 040 5106 50 040 5103 El diferencial debería girar sin fricción después del montaje. 0.6 m x 70 T Dopo il montaggio il differenziale deve girare regolarmente. 62 CARSON 1st Go-Kart electric RTR 50 040 4013...
- Page 63 6 m x 12 T 50 040 5107 50 040 5107 3 x 10 3 x 10 50 040 5106 3 x 3 50 040 5106 50 040 5104 3 x 3 50 040 5106 CARSON 1st Go-Kart electric RTR 50 040 4013...
- Page 64 50 040 5103 50 040 5107 3 x 8 Battery assembly • Montage Akku • Montage accu • Montaje battería 50 040 5105 • Montaggio accumulatore 50 040 5105 50 040 5105 64 CARSON 1st Go-Kart electric RTR 50 040 4013...
- Page 65 50 040 5104 Assembly shocks • Montage Stoßdämpfer • Montage amortisseurs • Montaje de los amortiguadores • Montaggio ammortizzatori 50 040 5104 50 040 5104 2 x 7.6 50 040 5104 50 040 5104 CARSON 1st Go-Kart electric RTR 50 040 4013...
- Page 66 Assembling front panel • Montage Frontverkleidung • Montage habillage avant • Montaje del revestimiento frontal 50 040 5107 • Montaggio rivestimento frontale 50 040 5107 50 010 5246 66 CARSON 1st Go-Kart electric RTR 50 040 4013...
- Page 67 50 040 5107 Assembling frontrammer • Montage Frontrammer 3 x 8 • Montage pare-chocs avant • Montaje del panel frontal • Montaggio paraurti frontale 50 010 5242 50 040 5107 3 x 8 CARSON 1st Go-Kart electric RTR 50 040 4013...
- Page 68 Applicare piccole quantità di colla istantanea in sequenza. ø 4.1 ø 12.0 50 010 5268 50 040 5108 50 040 5108 front rear left rear right vorne hinten links hinten rechts 68 CARSON 1st Go-Kart electric RTR 50 040 4013...
- Page 69 50 010 5250 Rear left, hole ø 4.1 Hinten links, Loch ø 4,1 OPTION 50 010 5267 50 010 5268 50 010 5267 50 010 5244 50 010 5250 50 010 5250 CARSON 1st Go-Kart electric RTR 50 040 4013...
- Page 70 50 090 8116 50 010 5246 70 CARSON 1st Go-Kart electric RTR 50 040 4013...
- Page 71 Driver figure • Fahrerfigur 50 010 5034 3.5 x 16 • Figurine de conducteur • Figura de conductor • Pilota Optional 50 010 5034 50 010 5034 CARSON 1st Go-Kart electric RTR 50 040 4013...
-
Page 72: Spare Parts
50 040 5100 Chassis plate 50 040 5104 Motorplates/shock-set Vorderachse Chassisplatten Motorböcke/Stoßdämpfer 50 010 5244 Steering lever set Lenkhebelset 50 010 5245 Shock absorber set, front Stoßdämpferteile vorne 50 040 5101 Drive shaft Antriebswelle 72 CARSON 1st Go-Kart electric RTR 50 040 4013... - Page 73 50 040 5108 2x Tyre/ wheel rim set, rear 3 x 12 5x 3 x 10 6x Mitnehmerset 2x Räderset hinten M3 1x 3 x 10 2x 50 090 8116 5x Antenna pipe 5x Antennenröhrchen 3 x 8 CARSON 1st Go-Kart electric RTR 50 040 4013...
- Page 74 74 CARSON 1st Go-Kart electric RTR 50 040 4013...
- Page 75 CARSON 1st Go-Kart electric RTR 50 040 4013...
- Page 76 For Germany: CARSON-Model Sport Service-Hotline: Abt. Service Mittlere Motsch 9 Mo - Do 8.00 – 17.00 Uhr 96515 Sonneberg 8.00 – 14.30 Uhr 01805–73 33 00 12 ct/min CARSON-Model Sport Werkstraße 1 • D-90765 Fürth / Germany www.carson-modelsport.de...
Need help?
Do you have a question about the 1st Go-Kart RTR electric and is the answer not in the manual?
Questions and answers