
Related Manuals for Tekvox TEK 1201-N+


Summary of Contents for Tekvox TEK 1201-N+
- Page 1 1201-N+ 79033-N+ User Manual 1201-N+ Seamless Presentation Switcher All Rights Reserved Version: 79033-N+_2020V1.0 www.tekvox.com...
- Page 2 Operation of this equipment in a residential area is likely to cause interference, in which case the user at their own expense will be required to take whatever measures may be necessary to correct the interference. Any changes or modifications not expressly approved by the manufacture would void the user’s authority to operate the equipment. www.tekvox.com...
- Page 3 Do not use liquid or aerosol cleaners to clean this unit. Always unplug power to the device before cleaning. Unplug the power cord when left unused for a long period of time Information on disposal for scrapped devices: do not burn or mix with general household waste. Treat them as normal electrical waste www.tekvox.com...
-
Page 4: Table Of Contents
5.4.1 IR Remote ..........................16 5.4.2 Control of Far-End IR Device from Local ................17 5.4.3 Control Local Device from Remote ..................17 5.5 Operation of CEC Functions ......................18 5.6 RS232 Control ........................... 18 5.6.1 RS232 Communication Protocol .................... 19 www.tekvox.com... - Page 5 5.8.1 Control Menu ..........................34 5.8.2 Configuration Menu ......................... 35 5.8.3 RS232 Control Menu ........................ 36 5.8.4 Password Menu ........................37 5.8.5 GUI Update ..........................37 6. Panel Drawing ..........................38 7. Troubleshooting & Maintenance ....................39 8. After-Sales Service ........................40 www.tekvox.com...
-
Page 6: Product Introduction
Supports CEC transport commands for each HDMI input Supports CEC Display On/Off commands Supports video auto-switching with automatic TV power control Bi-directional IR and RS232 control. Including TEKVOX Macro commands Selectable output resolutions: 1920x1200, 1920x1080, 1600x1200, 1600x900, 1360x768, 1280x800, 1280x720, 1024x768... -
Page 7: Package List
6 x Screws (black color) 4 x Plastic cushions 1 x TEK TPUH411RA HDBaseT Receiver 1 x User Manual Note: Please contact your distributor immediately if any damage or defect in the components is found. www.tekvox.com... -
Page 8: Specifications
Input: 100VAC ~ 240VAC, 50/60Hz Power Supply Output: DC 24V, 2.71A Power Consumption Temperature 14 ~ 104°F (-10 ~ 40°C) Humidity 10% ~ 90% 8.7″(221mm) x 1.73″(44mm) x 9.25″(235mm) Case Dimension 1U Rack Mountable Product Weight 2.1 lbs. (0.95kg) www.tekvox.com... -
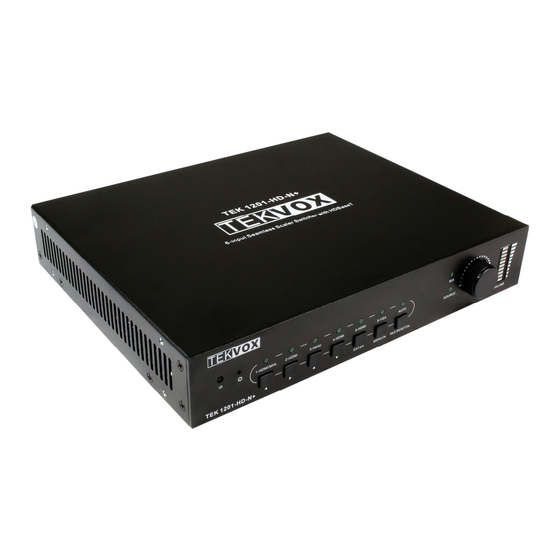
Page 9: Product Appearance
Note: When you set any VGA port to C-video or YPbPr in Manual-switching mode, the system will not be able to enter Auto-switching mode. 10) Volume knob for variable audio control - Push knob in to toggle between ‘MIX’ and ‘Source’ control. www.tekvox.com... -
Page 10: 1201-N+ Rear Panel
SC61TS or other devices connected with HDBaseT Receiver. TCP/IP: Ethernet port - connect with PC to control SC61TS via GUI. 5) AUDIO OUT - Stereo balanced L/R audio output. 6) DC 24V - Locking power port, connect 24V DC power adapter. www.tekvox.com... -
Page 11: Tpuh411Ra Hdbaset Receiver Panels
2) Link status LED - OFF: No Link/GREEN: Link successful. 3) HDCP compliant LED - OFF: No HDMI traffic/GREEN: Traffic with HDCP/Blinking GREEN: Traffic without HDCP. 4) Power LED - RED when the device is powered on and no indicator when there is no power to the device. www.tekvox.com... -
Page 12: Tpuh411Ra Rear Panel
8) HDBT IN - Connects to the HDBT OUT socket on HDBaseT Transmitter or Matrix Switcher via CAT5e/6a/7 cable - supports unidirectional PoH technology. 9) DC 12V Power Port - Connect to 12VDC power adaptor. It can also be powered via the Scaler Switcher by PoH. www.tekvox.com... -
Page 13: System Connection
All of the power switches, plugs, sockets, and power cords should be installed according to safety standards. All cables should be properly terminated and tested before connecting to the unit. All devices should be connected before powering the unit on. 4.2 System Diagram www.tekvox.com... -
Page 14: Connection Procedure Steps
It can also be easily mounted into a rack with its rack-mount ears. When used with a TEKVOX Drop-In™ system, a low cost and complete mediated classroom system can be created. Placing the switcher in “Auto-Switching” and enabling the “Output CEC Auto Power”... -
Page 15: Front Panel Control
5.3 Volume Adjustment Press the “Volume” knob to select “MIX” or “Source” audio to adjust. The corresponding LED will turn green and remain on. Move the volume knob in clockwise or counter-clockwise direction to turn the volume up or down. www.tekvox.com... -
Page 16: Operations Of Ir
6) Menu Operation Buttons OK: confirm button. ,,, : UP/DWON/LEFT/RIGHT button, for value setting or page-turn. 7) Exit Press to exit the OSD menu. 8) Menu Enter OSD menu or return to the previous menu. www.tekvox.com... -
Page 17: Control Of Far-End Ir Device From Local
Connect an IR emitter to IR OUT port on the Compact Scaler Switcher and connect IR receiver to the IR IN port on the HDBaseT Receiver. The source devices can be controlled by their IR remote from the receiver. www.tekvox.com... -
Page 18: Operation Of Cec Functions
Hercules or CommWatch. Do not terminate with Carriage Return. These same commands are used with TCP/IP port 4001. For feedback, the same command is used with terminating <CR><LF>. Hercules from HW Group: http://new.hwg.cz/files/download/sw/version/hercules_3-2-8.exe HDBaseT Baud rates supported 2400, 4800, 9600 (default), 19200, 38400, 57600, or 115200. www.tekvox.com... -
Page 19: Rs232 Communication Protocol
Set MIX volume (xx = 00 to 60) 508xx (xx=00~60) 50726% Disable VGA audio. 50726<CR><LF> 50727% Enable VGA audio. 50727<CR><LF> 50660% Disable 1-HDMI audio. 50660<CR><LF> 50661% Enable 1-HDMI audio. 50661<CR><LF> 50662% Disable 2-HDMI audio. 50662<CR><LF> 50663% Enable 2-HDMI audio. 50663<CR><LF> 50664% Disable 3-HDMI audio. 50664<CR><LF> www.tekvox.com... - Page 20 505xx<CR><LF> 50698% Software update. 50698<CR><LF> 50617% Restore to factory defaults. Factory Reset Auto-adjust the color temperature to (xx=01 Cool/02 50607% 50607:xx<CR><LF> Medium/03 Warm/ 04 User) Set the aspect ratio to xx (xx= 01 16:9/02 4:3/ 03 50608% 50608:xx<CR><LF> auto) www.tekvox.com...
- Page 21 Stretch upwards from top side (increase image 50676:xx<CR><LF> 50676% height) Stretch downwards from bottom side (increase image 50677% 50677:xx<CR><LF> height) OSD Menu Control 50616% MENU button (enter OSD) 50616<CR><LF> 50609% OK for OSD selection 50609<CR><LF> LEFT button 50610<CR><LF> 50610% www.tekvox.com...
- Page 22 When in switcher is in auto and video detection is 50920% 50920<CR><LF> detected, CEC power on command is sent to display. After 3 minutes of no video input, CEC power-off command is sent to display. 50921% Disable output CEC auto power. 50921<CR><LF> www.tekvox.com...
- Page 23 50794% Enable VTC Mode. Set best for Seamless 50794<CR><LF> Auto Power-off Setup Auto Switch Mode: Disable the auto power-off 50714% 50714<CR><LF> function. Auto Switch Mode: Set the auto power-off time to 1 50715% 50715<CR><LF> minute when No signal input. www.tekvox.com...
- Page 24 Check the auto power-off time. 50773/50774/50775 <CR><LF> 50701<CR><LF>/ 50702<CR><LF>/ 50703<CR><LF>/ Get the input source (xx= HDMI1/ HDMI2/ HDMI3/ 50631% HDMI4/HDMI5/(VGA/ YPbPr/ AV)) 50704<CR><LF>/ 50705<CR><LF>/ 50706<CR><LF> 50619<CR><LF>/ 50626<CR><LF>/ 50627<CR><LF>/ output resolution(xx=1920×1200/ 50628<CR><LF>/ 50632% 1920×1080/ 1600×1200/ 1360×768/ 1280×800/ 50629<CR><LF>/ 1280×720/ 1024×768/1600x900) 50620<CR><LF>/ 50621<CR><LF>/ 50622<CR><LF> www.tekvox.com...
- Page 25 HDMI audio status 50664/50665<CR><LF> 50666/50667<CR><LF> 50668/50669<CR><LF> 51730 (Signal Off) None Video Detection Feedback 51731(Signal On) 50791<CR><LF>/ 50792<CR><LF>/ 50795% Get HDCP status. 50793<CR><LF>/ 50794<CR><LF> 50765<CR><LF>/ 50766<CR><LF>/ 50650% Get the Icon status. 50644<CR><LF>/ 50645<CR><LF> 50699% Get the system version Version Vx.x.x www.tekvox.com...
- Page 26 (Line Mute) 50785/50786<CR><LF> (Switching mode) 50726/50727<CR><LF> (VGA MUTE) 50797/50697<CR><LF> (Standby/On) TEKVOX Commands TekMonitor Macro Command 521xx% CMD:01 - 99 (xx= 01-99) Note: Turn on/off HDCP auto-management by sending serial commands. When HDCP is set to active, whether or not the output source has HDCP depends on the input source.
-
Page 27: Rs232 Control Modes
1) Connect the RS232 port of TEK 1201-N+ to RS232 port of PC. 2) Send the command 50787% via RS232 communication software. 3) Send the right command of TEK 1201-N+ or other remote RS232 device connected in present system. Connection is shown below: Control 1201-N+ and Display from Local www.tekvox.com... -
Page 28: Control Tek 1201-N+ From Local And Remote
2) Send the command 50788% (serial control mode 1, factory default) via RS232 communication software. 3) Send any control command for the TEK 1201-N+ from either RS232 port on unit or HDBaseT receiver. Connection is shown below: Control 1201-N+ using TEKVOX Equipment www.tekvox.com... -
Page 29: Operations In Osd Menu
IR remote to confirm the selection. Press on the IR remote to exit OSD menu. 5.7.1 Options Includes Output Adjust, Input 6 Selection, Baud rate, User EDID Load (USB), Resolution, Audio Mute Setup, IP Address, and Software Update (USB). www.tekvox.com... -
Page 30: Instructions For Vga Converting Cable
Send command 50684% to switch to YPbPr source. 2) Via IR remote & OSD: Press the MENU button on the IR remote to enter into OSD and enter into the OPTION setting menu, set “INPUT 5 Select” to YPbPr source. www.tekvox.com... - Page 31 Send command 50685% to switch to YPbPr source. 2) Via IR remote & OSD: Press MENU button on IR remote to enter into OSD and in the OPTION setting menu: set “INPUT 5 Select” to AV source. B. Connecting the VGA converting cable as pictured below: www.tekvox.com...
-
Page 32: Picture
Color Temperature: Includes Cool, Medium, Warm, and User. User mode sets values for Red, Green, and Blue (RGB). Aspect Ratio: Includes Native, 4:3, 16:9, Zoom1, Zoom2, Just Scan, and Panorama. VGA format only supports 4:3, 16:9, and Panorama. www.tekvox.com... -
Page 33: Setup
Switcher can be controlled via GUI. It allows users to interact with the Switcher through graphical icons and visual indicators. Type 192.168.0.178 into your browser, it will enter the log-in interface shown as below: Default User name: user Default Password: user www.tekvox.com... -
Page 34: Control Menu
Embedded Audio: Click 1-Audio to select embedded audio for 1-HDMI input, and click 2-Audio to select embedded audio for 2-HDMI input. Volume: Click the corresponding positive/negative button or move the scroll bar to turn up/down the MIX/Source audio volume. Click the corresponding Mute button to mute/unmute Mix/Source audio input. www.tekvox.com... -
Page 35: Configuration Menu
2) Click Network to enter network setting menu shown as below: In this interface, you can select Dynamic or static IP. Under static IP mode, the IP address, Subnet Mask, and Gateway can be set and make sure the IP addresses are different to avoid IP conflict. www.tekvox.com... -
Page 36: Rs232 Control Menu
2400, 4800, 9600, 19200, 38400, 57600, and 115200. Command: Typing commands in this box controls the Scaler Switcher or the far-end device which is connected to HDBaseT Receiver. If you select the “Hex”, you can enter a hexadecimal value in the “Command” box. www.tekvox.com... -
Page 37: Password Menu
(the same as the GUI log-in settings. A modified password will be available only after rebooting) to log into the configuration interface. After that, click “Administration” at the source menu to get to “Upload Program” as shown below: Select the desired update file and then press “Apply”. It will then start updating. www.tekvox.com... -
Page 38: Panel Drawing
4-HDMI 5-HDMI 6-VGA 6-AUD IO H DMI H DBT TEK 1201-HD-N+ 6-input Seamless Scaler Switcher with HDBaseT 250.0 mm 1-HDMI/MHL 2-HDMI 3-HDMI 4-HDMI 5-HDMI 6-VGA AUTO SOURC E ENTE R MEN U/3s R ES RES ET/3s VOLUME TEK 1201-HD-N+ www.tekvox.com... -
Page 39: Troubleshooting & Maintenance
8) If the scaler-switcher cannot be controlled by the buttons on the front panel, RS232 port, or IR remote, the switcher may be broken. If your problem persists after following the above troubleshooting steps, seek further help from authorized dealer or our technical support at support@tekvox.com. www.tekvox.com... -
Page 40: After-Sales Service
Technical Support: When contacting us in regards to repairs or replacement, please provide the following information: Product version and name Detailed failure situations The formation of the cases For further questions or concerns, contact your local distributor or email us at support@tekvox.com. www.tekvox.com...
Need help?
Do you have a question about the TEK 1201-N+ and is the answer not in the manual?
Questions and answers