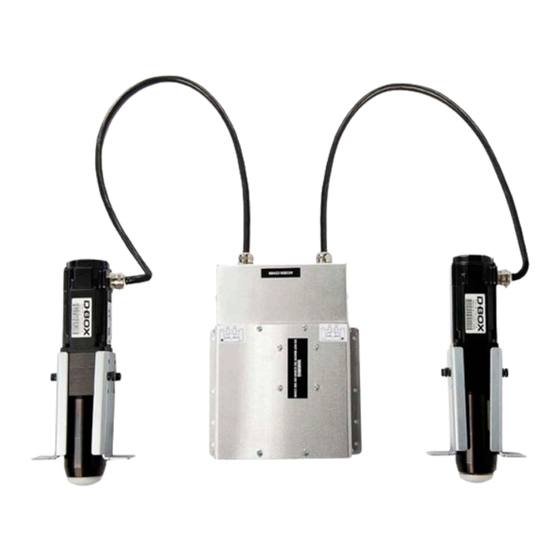
Summary of Contents for D-Box 2250i
- Page 1 2250i/2400i ACTUATORS (2 actuators, 2 axis system) INSTALLATION GUIDE Technical Support : 1-888-442-3269 ext. 264 Fax : 450-442-3230 E-mail : techsupport@d-box.com Visit us at: www.d-box.com 150-914-0001-EN2...
-
Page 2: Table Of Contents
9- Pictures of D-BOX 2250i/2400i installation Appendix 1 - Installation of the ACM bracket The 2250i/2400i may be installed in a single seat and loveseat only. WARNING: DO NOT USE ANY ATTACHMENTS THAT ARE NOT RECOMMENDED BY THE MANUFACTURER, AS THEY MAY CAUSE DAMAGE OR MALFUNCTIONS. -
Page 3: Important Safety Instructions
IMPORTANT SAFETY INSTRUCTIONS Read these instructions. Keep these instructions. Heed all warnings. Follow all instructions. Do not use this apparatus near water. Clean only with dry cloth. Do not block any ventilation openings. Install in accordance with the manufacturer's instructions. Do not install near any heat sources such as radiators, heat registers, stoves, or other apparatus (including amplifiers) that produce heat. -
Page 4: 1- D-Box 2250I/2400I, 2 Axis Actuators System Overview
1- D-BOX 2250i/2400i, 2 axis actuators system overview The D-BOX 2250i/2400i actuators system is designed to be installed into the armrest of qualified home theater seating. When properly installed the system will give you a two (2) axis motion simulator designed for home entertainment. - Page 5 The D-BOX 2250i/2400i, 2 axis motion system consists of: Description Quantity ACM unit (Actuator Control Module) Actuator (max. capacity 250 lbs each 2250i and 400 lbs each 2400i) Power Cable, 6 feet (000-090-0010-Z00) Single Cup, Aluminum (810-0002) Screw, Bolt, Hex, Cap, 1/4-20 X 3/4, Black (100-0551) Washer, Lock, 1/4, Black (102-0051) Included with the L bracket option –...
- Page 6 We suggest that the ACM unit be mounted on the back wood panel of the seat as the connections to each actuator will be easier and because each actuator is supplied with a 51” cable. Below you will find the dimensions of the 2250i/2400i actuators and the ACM unit. D-BOX 2250i/2400i actuators dimensions (.75” to 2.25” Bracket)
-
Page 7: 3- Positioning The Components
3- Positioning the components The D-BOX 2250i/2400i actuators system have been designed to be installed into armrest of qualified home theater seating. Each Actuator must be inserted into the armrest hole especially made for that purpose. Please see drawing below. Also refer to armrest hole specifications in the present document. -
Page 8: 4- Positioning The Actuators (Bottom View Of Seating)
4- Positioning the actuators (Bottom view of seating) Each actuator should be mounted at the bottom rear end of each armrest. For that purpose an actuator mounting hole and an actuator cable access hole should be provided. See drawing below for more details; Typical Dual Recliner with middle armrest Installation (bottom view) 8 of 17... -
Page 9: 5- Arm Rest Mounting Hole Dimensions
5- Arm Rest mounting hole dimensions In the drawings below you will find the dimensions of the hole needed to mount the actuator and be able to screw it in place using four (4) 1/4-20 screws. You will also find the dimensions of the cutout hole for the actuator’s cable assembly. -
Page 10: 7- Connecting The Actuators To The Acm (Actuator Control Module)
7- Connecting the actuators to the ACM (Actuator Control Module) IMPORTANT NOTICE : Before doing any connection into the ACM unit make sure there is no power by detaching the A/C cord. There is high voltage inside the ACM unit, and only service qualified technician are allowed to do the connections. -
Page 11: 8- D-Box 2250I/2400I Electrical Diagram
(1) screw on each side and two (2) screws on the rear. Note that the screws attaching the rear cover passes through the actuator metal door. 8- D-BOX 2250i/2400i Electrical diagramm Note: Each time you will power-up the motion seat you will hear the motors locking themselves up. -
Page 12: 9- Pictures Of D-Box 2250I/2400I Installation
9- Pictures of D-BOX 2250i/2400i installation (in a loveseat) When you have finished installing the actuators and the ACM in the seat, make sure that all the cables (motor cables, power cables and Cat-5 cables) are properly secured. Also make sure that none of the cables can rub against a moving part (such as the reclining mechanism) because it may damage the insulation and make the product unsafe for use. - Page 13 Pictures of D-BOX 2250i/2400i installation (in a loveseat) NOTE: Cables must be positioned so they won’t interfere with the recliner’s mechanism. 13 of 17...
- Page 14 Pictures of D-BOX 2250i/2400i installation (in a loveseat) NOTE: Cables must be positioned so they won’t interfere with the recliner’s mechanism. 14 of 17...
- Page 15 Pictures of D-BOX 2250i/2400i installation (in a single electrical reclining seat) NOTE: Cables must be positioned so they won’t interfere with the recliner’s mechanism. 15 of 17...
- Page 16 Pictures of D-BOX 2250i/2400i installation (in a single electrical reclining seat) 16 of 17...
-
Page 17: Appendix 1 - Installation Of The Acm Bracket
Appendix 1 Installation of the ACM bracket 17 of 17...


Need help?
Do you have a question about the 2250i and is the answer not in the manual?
Questions and answers