Table of Contents
Advertisement
INSTALLATION INSTRUCTIONS
PACKAGE GAS ELECTRIC
RKNL-B/RKNL-C/RKNL-H SERIES 15, 17.5, 20 & 25 TON
[52.8, 61.5, 70.3, 87.9 kW]
RKNL-B: ASHRAE 90.1 2007 COMPLIANT
RKNL-C: ASHRAE 90.1 2007 COMPLIANT, WITH CLEAR CONTROL
RKNL-H: ASHRAE 90.1 2013 COMPLIANT, WITH CLEAR CONTROL AND VFD
!
92-23577-84-08
[ ] INDICATES METRIC CONVERSIONS
SUPERSEDES 92-23577-84-07
Advertisement
Table of Contents
Troubleshooting

Related Manuals for Rheem RKNL-B Series


Summary of Contents for Rheem RKNL-B Series
- Page 1 INSTALLATION INSTRUCTIONS PACKAGE GAS ELECTRIC RKNL-B/RKNL-C/RKNL-H SERIES 15, 17.5, 20 & 25 TON [52.8, 61.5, 70.3, 87.9 kW] RKNL-B: ASHRAE 90.1 2007 COMPLIANT RKNL-C: ASHRAE 90.1 2007 COMPLIANT, WITH CLEAR CONTROL RKNL-H: ASHRAE 90.1 2013 COMPLIANT, WITH CLEAR CONTROL AND VFD 92-23577-84-08 [ ] INDICATES METRIC CONVERSIONS SUPERSEDES 92-23577-84-07...
-
Page 2: Table Of Contents
TABLE OF CONTENTS I. SPECIFICATIONS ......... 3 General . -
Page 3: Specifications
CHECKING PRODUCT RECEIVED Recognize this symbol as an This booklet contains the installation and operating instructions for your combination indication of Important Safety gas heating/electric cooling unit. There are some precautions that should be taken to Information! derive maximum satisfaction from it. Improper installation can result in unsatisfactory operation or dangerous conditions. - Page 4 • R-410A systems are to be charged with liquid refrigerants. Prior to March 1999, R-410A refrigerant cylinders had a dip tube. These cylinders should be kept upright for equipment charging. Post March 1999 cylinders do not have a dip tube and should be inverted to ensure liquid charging of the equipment.
-
Page 5: Safety Information
SAFETY INFORMATION WARNING WARNING USE ONLY WITH TYPE OF GAS NEVER TEST FOR GAS LEAKS WITH AN OPEN FLAME. USE A COMMER- APPROVED FOR THIS UNIT. REFER CIALLY AVAILABLE SOAP SOLUTION MADE SPECIFICALLY FOR THE TO THE UNIT RATING PLATE. DETECTION OF LEAKS TO CHECK ALL CONNECTIONS, AS SPECIFIED IN GAS SUPPLY AND PIPING SECTION OF THESE INSTRUCTIONS. -
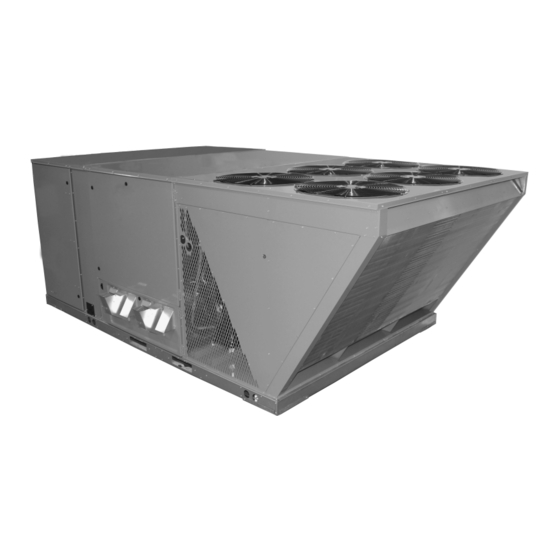
Page 6: Unit Dimensions
Unit FIGURE 1 Dimensions BOTTOM VIEW FOR CLEARANCES SEE PAGE 12, FIGURE 12. IMPORTANT: THIS CONDENSER COIL #1 UNIT MUST BE (RIGHT SIDE) MOUNTED LEVEL IN BLOWER BOTH DIRECTIONS ACCESS TO ALLOW WATER TO DRAIN FROM THE CONDENSER CONTROLS & FILTER SECTION AND ACCESS... - Page 7 FIGURE 3 (FRONT SIDE) COMPONENT LOCATIONS & DIMENSIONS FRONT VIEW Condenser Coil (RIGHT SIDE) Typical Dimensions Shown in Inches ST-A1125-06A FIGURE 4 COMPONENT LOCATIONS & DIMENSIONS FURNACE ACCESS POWER ENTRY CONTROL/FILTER ACCESS ST-A1125-01A FIGURE 5 OUTDOOR FAN #6 COMPONENT LOCATIONS OUTDOOR FAN #5 OUTDOOR FAN #3 OUTDOOR FAN #4...
- Page 8 FIGURE 6 (REAR SIDE) DIMENSIONS *RECOMMENDED DUCT CONNECTION SIZE SUPPLY: 24 x 40.8 INCHES ST-A1125-08A RETURN: 47 x 20 INCHES FIGURE 7 COMPONENT ACCESS LOCATIONS & DIMENSIONS ST-A1125-03 FIGURE 8 OUTDOOR FAN #4 COMPONENT LOCATIONS OUTDOOR FAN #5 OUTDOOR FAN #1 OUTDOOR FAN #6 OUTDOOR FAN #2 OUTDOOR FAN #3...
-
Page 9: General Data
GENERAL DATA - RKNL Model RKNL- Series (B/C)180CL25E (B/C)180CL35E (B/C)180CM25E (B/C)180CM35E (B/C)180DL25E (B/C)180DL35E (B/C)180DM25E (B/C)180DM35E Model RKNL- Series (with VFD) H180CR25E H180CR35E H180CS25E H180CS35E H180DR25E H180DR35E H180DS25E H180DS35E Weights Net Weight lbs. [kg] 1958 [888] 1971 [894] 1987 [901] 2000 [907] 1958 [888] 1971 [894] 1987 [901]... -
Page 10: Installation
II. INSTALLATION A. GENERAL 1. INSTALLATION — Install this unit in accordance with The American National Standard Z223.1-latest edition booklet entitled “National Fuel Gas Code,” and the requirements or codes of the local utility or other authority having jurisdiction. Additional helpful publications available from the “National Fire Protection Association”... -
Page 11: Outside Installation
B. OUTSIDE INSTALLATION (Typical outdoor slab installation is shown in Figure 9.) WARNING 1. Select a location where external water drainage cannot collect around unit. 2. Provide a level slab sufficiently high enough above grade to prevent surface water THESE UNITS ARE DESIGNED from entering the unit CERTIFIED FOR OUTDOOR 3. -
Page 12: Cover Panel Installation
D. COVER PANEL INSTALLATION / CONVERSION PROCEDURE DOWNFLOW TO HORIZONTAL 1. Remove the screws and covers from the outside of the supply and return sec- tions. See Figure 7. 2. Install the covers over the bottom supply and return openings, painted side up, inserting the leading flange under the bracket provided. -
Page 13: Clearances
F. CLEARANCES The following minimum clearances must be observed for proper unit performance and serviceability. Reference Figure 12. FIGURE 12 CLEARANCES VERTICAL CLEARANCE RECOMMENDED LOCATION CLEARANCE A – FRONT 80” B – CONDENSER COIL 18” +C – DUCT SIDE 18”/42” *D –... -
Page 14: Rooftop Installation
G. ROOFTOP INSTALLATION 1. Before locating the unit on the roof, make sure that the roof structure is adequate to support the weight involved. (See Electrical & Physical Tables in this manual.) THIS IS VERY IMPORTANT AND THE INSTALLER’S RESPONSIBILITY. 2. -
Page 15: Return Air
RETURN AIR WARNING NEVER ALLOW PRODUCTS OF COMBUSTION OR THE FLUE PRODUCTS TO ENTER THE RETURN AIR DUCTWORK, OR THE CIRCULATING AIR SUPPLY. ALL RETURN DUCTWORK MUST BE ADEQUATELY SEALED AND SECURED TO THE FURNACE WITH SHEET METAL SCREWS, AND JOINTS TAPED. ALL OTHER DUCT JOINTS MUST BE SECURED WITH APPROVED CONNECTIONS AND SEALED AIRTIGHT. -
Page 16: Gas Supply, Condensate Drain And Piping
III. GAS SUPPLY, CONDENSATE DRAIN AND III. PIPING A. GAS CONNECTION IMPORTANT: Connect this unit only to gas supplied by a commercial utility. 1. Install gas piping in accordance with local codes and regulations of the local util- ity company. In the absence of local codes, the installation must conform to the specifications of the National Fuel Gas Code, ANSI Z223.1 - latest edition. -
Page 17: Lp Conversion
TO CHECK FOR GAS LEAKS, USE A SOAP AND WATER SOLUTION OR OTHER WARNING APPROVED METHOD. DO NOT USE AN OPEN FLAME. IMPORTANT: Check the rating plate to make certain the appliance is equipped to burn DO NOT USE AN OPEN FLAME the type of gas supplied. -
Page 18: Adjusting Or Checking Furnace Input
FIGURE 18B HONEYWELL VR8305Q4120 TWO STAGE GAS VALVE TABLE 2 LP GAS PIPE CAPACITY TABLE (CU. FT./HR.) Maximum capacity of pipe in thousands of BTU per hour of undiluted liquefied petroleum gases (at 11 inches water column inlet pressure). (Based on a Pressure Drop of 0.5 Inch Water Column) Nominal Length of Pipe, Feet Iron Pipe... -
Page 19: Condensate Drain
Heating Value of Gas (BTU/Cu. Ft.) × 3600 Cu. Ft. Per Hr. Required = Time in Seconds (for 1 Cu. Ft.) of Gas Start the furnace and measure the time required to burn one cubic foot of gas. Prior to checking the furnace input, make certain that all other gas appliances are shut off, with the exception of pilot burners. - Page 20 the unit’s RATED VOLTAGE REQUIREMENT. Install a branch circuit disconnect near the rooftop, in accordance with the N.E.C., C.E.C. or local codes. 2. It is important that proper electrical power is available at the unit. Voltage should not vary more than 10% from that stamped on the unit nameplate. On three phase units, phases must be balanced within 3%.
-
Page 21: Hook-Up
Select the equivalent aluminum wire size from the tabulation below: Splice copper wire pigtails to aluminum wire with U.L. recognized connectors for cop- per-aluminum splices. Please exercise the following instructions very carefully to obtain a positive and lasting connection: 1. Strip insulation from aluminum conductor. 2. -
Page 22: Internal Wiring
between separate devices which are field installed and located, shall conform with the temperature limitation for Type T wire [63°F rise (35°C)] when installed in accor- dance with the manufacturer’s instructions. C. INTERNAL WIRING A diagram of the internal wiring of this unit is located on the inside of control access panel and in this manual. - Page 23 FIGURE 23 ST-A1125-13 B. Call For Second Stage, After First Stage Established; Starting from A.11: 1. If a call for second stage (high fire) is initiated after a call for first stage heat is estab- lished, the control energizes the W2 inducer assures the high-fire pressure switch is closed and energizes the second stage of the gas valve.
-
Page 24: Operating Instructions
the thermostat to the “OFF” position or interrupting the electrical power to the unit for 3 seconds or longer. The induced draft blower and main burner will shut off when the thermostat is satisfied. The circulating air blower will start and run on the heating speed if the thermostat fan switch is in the “ON”... -
Page 25: Burners
WARNING SHOULD OVERHEATING OCCUR OR THE GAS SUPPLY FAIL TO SHUT OFF, SHUT OFF THE MANUAL GAS VALVE TO THE APPLIANCE BEFORE SHUT- TING OFF THE ELECTRICAL SUPPLY. FAILURE TO DO SO CAN RESULT IN AN EXPLOSION OR FIRE CAUSING PROPERTY DAMAGE, SEVERE PERSONAL INJURY OR DEATH! BURNERS Burners for these units have been designed so that field adjustment is not required. -
Page 26: Continuous Fan Mode
B. Call for second stage cooling. After first stage cooling established: starting from A4. 1. If a call for second stage cooling is initiated after a call for first stage cooling is established, the control energizes Y2 and energizes the second stage compressor. 2. -
Page 27: Furnace Section Maintenance
6. Except for the mounting platform, keep all combustible articles three feet from the unit and exhaust system. 7. IMPORTANT: Replace all blower doors and compartment cover after servicing the unit. Do not operate the unit without all panels and doors securely in place. 8. -
Page 28: Replacement Parts
To inspect the evaporator coil: 1. Open the control/filter access panel and remove filters. Also, remove blower access panel. In downflow applications remove the horizontal return to gain access. 2. Shine a flashlight on the evaporator coil (both sides) and inspect for accumula- tion of lint, insulation, etc. -
Page 29: Airflow Performance
VIII. AIRFLOW PERFORMANCE... - Page 34 IX. ELECTRICAL DATA - RKNL ELECTRICAL DATA - RKNL SERIES B180CL/ B180CM/ B180DL/ B180DM/ B180YL/ B180YM/ B210CL/ B210CM/ B210DL/ B210DM/ C180CL/ C180CM/ C180DL/ C180DM/ C180YL C180YM C210CL/ C210CM/ C210DL/ C210DM/ H180CR H180CS H180DR H180DS H210CR H210CS H210DR H210DS Unit Operating Voltage 187-253 187-253 414-506...
-
Page 35: Electrical Data
ELECTRICAL DATA - RKNL (continued) ELECTRICAL DATA - RKNL SERIES B210YL/ B210YM/ B240CL/ B240CM/ B240CN/ B240DL/ B240DM/ B240DN/ B240YL/ B240YM/ C210YL C210YM C240CL/ C240CM/ C240CN/ C240DL/ C240DM/ C240DN/ C240YL C240YM H240CR H240CS H240CT H240DR H240DS H240DT Unit Operating Voltage 518-632 518-632 187-253 187-253... - Page 36 ELECTRICAL DATA - RKNL (continued) ELECTRICAL DATA - RLNL SERIES B241DM/ B241CM/ B241YM/ C241DM/ B240YN/ B241CL/ C241CM/ B241DL/ B241YL/ C241YM/ C240YN C241CL B241CN/ C241DL/ C241YL B241YN/ B241DN/ C241CN/ C241YN/ C241DN/ Unit Operating Voltage 518-632 187-253 187-253 414-506 414-506 518-632 518-632 Range 208/230 208/230...
- Page 37 ELECTRICAL DATA - RKNL (continued) ELECTRICAL DATA - RLNL SERIES B300CL/ B300CM/ B300DL/ B300DM/ B300YL/ B300YM/ C300CL/ C300CM/ C300DL/ C300DM/ C300YL C300YM H300CR H300CS H300DR H300DS Unit Operating Voltage 187-253 187-253 414-506 414-506 518-632 518-632 Range 208/230 208/230 Volts Minimum Circuit 147/147 149/149 Ampacity...
-
Page 38: Troubleshooting Chart
X. TROUBLESHOOTING FIGURE 24 COOLING TROUBLESHOOTING CHART WARNING DISCONNECT ALL POWER TO UNIT BEFORE SERVICING. CONTACTOR MAY BREAK ONLY ONE SIDE. FAIL- URE TO SHUT OFF POWER CAN CAUSE ELECTRICAL SHOCK RESULTING IN PERSONAL INJURY OR DEATH. SYMPTOM POSSIBLE CAUSE REMEDY Unit will not run •... - Page 39 FIGURE 25 FURNACE TROUBLESHOOTING GUIDE (COMBINATION HEATING AND COOLING UNITS WITH DIRECT SPARK IGNITION) WARNING HAZARDOUS VOLTAGE DISCONNECT POWER BEFORE LINE VOLTAGE SERVICING. CONNECTIONS SERVICE MUST BE BY A TRAINED, QUALIFIED SERVICE TECHNICIAN. START SET THERMOSTAT TO CALL FOR HEAT SET FAN SWITCH TO AUTO •...
- Page 40 NOTE: IF THE SYSTEM GOES INTO LOCKOUT, WAIT 30 SECONDS AND RESET THE SYSTEM. REPLACE SENSOR MAIN BURNER FLAME SUSTAINED • CHECK FLAME SENSOR POSITION AND CONDITION • CLEAN FLAME SENSOR WITH STEEL WOOL • CHECK FLAME SENSOR WIRES AND CONNECTIONS REPLACE IGNITION CONTROL •...
-
Page 41: Wiring Diagrams
R-1075S000 08-08-18 FIGURE 26 REVISED TITLE BLOCK TO INCLUDE 380V 3 PH 60 HZ. REVISED NOTE 3 TO INCLUDE RKNL-B SERIES (ALL NON-DDC EXCEPT B241 MODELS) Y-0693S001 UNIT VOLTAGE - TRANSFORMER TERM TABLE. 02-20-17 ADDED RED 208V LEAD TO IDM’S, ADDED NOTE 15. - Page 42 FIGURE 27 RKNL-B SERIES (ALL NON-DDC EXCEPT B241 MODELS) REVISED TITLE TO DELETE RKNL-B180/210/240/300 R-1075S000 08-08-18 ADDED RED 208V LEAD TO IDM’S. Y-0655S251 04-09-18 208V 208V 208V 208V...
- Page 43 FIGURE 28 RKNL-B SERIES (ALL NON-DDC EXCEPT B241 MODELS) REVISED TITLE TO DELETE RKNL-B180/210/240/300 R-1075S000 08-08-18...
- Page 44 FIGURE 29 RKNL-B SERIES (ALL NON-DDC EXCEPT B241 MODELS) REVISED TITLE TO DELETE RKNL-B180/210/240/300 R-1075S000 08-08-18...
- Page 45 FIGURE 30 RKNL-B SERIES (B-241 MODELS) WIRE COLOR CODE BK..BLACK O..ORANGE BR..BROWN PR..PURPLE BL..BLUE R..RED G..GREEN W..WHITE GY..GRAY Y..YELLOW COMPONENT CODES 208V 208V 208V 208V PRESSURE CONTROL BOARD NOTES CONNECTORS SUITABLE FOR USE WITH COPPER CONDUCTORS ONLY COMPRESSOR MOTOR THERMALLY PROTECTED.
- Page 46 FIGURE 31 RKNL-B SERIES (B-241 MODELS) 208V 208V 208V 208V PRESSURE CONTROL BOARD RKNL - B241 10-5-18 90-42517-55...
- Page 47 FIGURE 32 RKNL-B SERIES (B-241 MODELS) WIRE COLOR CODE BK..BLACK O..ORANGE BR..BROWN PR..PURPLE BL..BLUE R..RED G..GREEN W..WHITE GY..GRAY Y..YELLOW CONTROL BOX BLACK COMPONENT CODES BLUE 230 V 575V BLACK W/ BLACK 460V RED STRIPE BLACK BLUE 230 V 575V BLACK...
- Page 48 FIGURE 33 RKNL-B SERIES (B-241 MODELS) PRESSURE CONTROL BOARD RKNL - B241 90-42517-56 10-5-18...
- Page 49 FIGURE 34 RKNL-C SERIES WIRE COLOR CODE BK..BLACK O..ORANGE BR..BROWN PR..PURPLE BL..BLUE R..RED G..GREEN W..WHITE GY..GRAY Y..YELLOW COMPONENT CODES 208V 208V 208V 208V NOTES TRANSFORMER AND INDUCERS FACTORY WIRED FOR 230 VOLTS. INDUCER VOLTAGE CHANGE (208/240V): UPLUG BLACK WIRE FROM INDUCER. MOVE INSULATED PLUG FROM (RED) WIRE TO (BLK) WIRE.
- Page 50 FIGURE 35 RKNL-C SERIES 208V 208V 208V 208V...
- Page 51 FIGURE 36 RKNL-C SERIES WIRE COLOR CODE BK..BLACK O..ORANGE BR..BROWN PR..PURPLE BL..BLUE R..RED G..GREEN W..WHITE GY..GRAY Y..YELLOW COMPONENT CODES NOTES WIRING INFORMATION LINE VOLTAGE -FACTORY STANDARD -FACTORY OPTION -FIELD INSTALLED LOW VOLTAGE -FACTORY STANDARD -FACTORY OPTION -FIELD INSTALLED REPLACEMENT WIRE -MUST BE THE SAME SIZE AND TYPE OF INSULATION AS ORIGINAL (105C.
- Page 52 FIGURE 37 RKNL-C SERIES R-1075S000 REVISED TITLE TO DELETE (-)KNL-C180/210/240/300 08-08-18 AND (-)KRL-C240...
- Page 53 FIGURE 38 RKNL-H SERIES Y-0655S251 ADDED RED 208V LEAD TO IDM’S, REVISED NOTE 3, ADDED NOTE 15. 04-04-18 208V 208V 208V 208V TRANSFORMER AND INDUCERS FACTORY WIRED FOR 230 VOLTS. INDUCER VOLTAGE CHANGE (208/240V): UPLUG BLACK WIRE FROM INDUCER. MOVE INSULATED PLUG FROM (RED) WIRE TO (BLK) WIRE.
- Page 54 FIGURE 39 RKNL-H SERIES Y-0655S251 ADDED RED 208V LEAD TO IDM’S. 04-04-18 208V 208V 208V 208V...
-
Page 55: Charge Charts
XII. CHARGE CHARTS FIGURE 40: 15 TON RKNL SYSTEM CHARGE CHARTS CIRCUIT 1 CIRCUIT 2 92-102778-01-02... - Page 56 FIGURE 41: 17.5 TON RKNL SYSTEM CHARGE CHARTS CIRCUIT 1 CIRCUIT 2 92-102778-02-02...
- Page 57 FIGURE 42: 20 TON (240) RKNL SYSTEM CHARGE CHARTS CIRCUIT 1 CIRCUIT 2 92-102778-03-02...
- Page 58 FIGURE 43: 20 TON (241) RKNL SYSTEM CHARGE CHARTS SYSTEM CHARGE CHART - REFRIGERANT 410A 20 TON, CIRCUITS 1 & 2 CAU TIO N : BO TH CO M PRESSO RS M U ST BE O PERATIN G BEFO RE CH ECKIN G REFRIGERAN T CH ARGE.
- Page 59 FIGURE 44: 25 TON RKNL SYSTEM CHARGE CHARTS CIRCUIT 1 CIRCUIT 2 92-102778-04-02...
- Page 60 97B0055N24 | CM 0418 *97B0055N24*...
Need help?
Do you have a question about the RKNL-B Series and is the answer not in the manual?
Questions and answers