Advertisement
Quick Links
Advertisement

Related Manuals for gorilla sports 100896


Summary of Contents for gorilla sports 100896
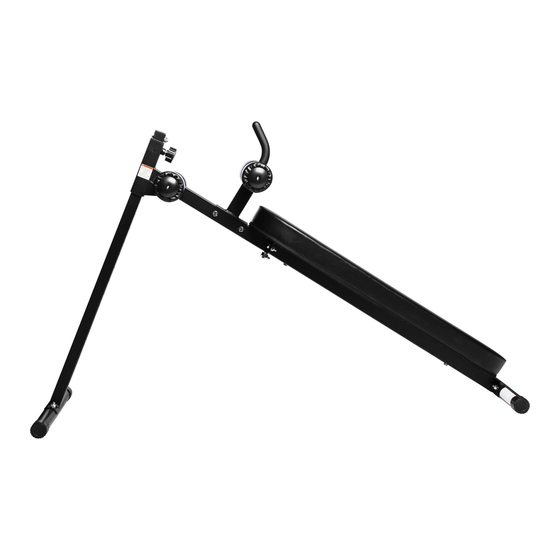
- Page 1 ADJUSTABLE ABDOMINAL BENCH (100896)
-
Page 2: Table Of Contents
Table of Contents Parametric Diagram......................3 Product load-bearing instructions..................4 Spare parts list ........................5 Fasteners drawing ....................... 6 Assembly step(1)......................7-8 Assembly step(2)......................9-10 Assembly step(3)......................11-12 Assembly step(4)......................13-14... -
Page 3: Parametric Diagram
Parametric Diagram The highest position 100° 最大角度 33.92° 1692.86 The lowest position 100° 4.75° 最小角度 1644.70 25*T2.0*200 25*T2.0*208 50*50*T2.0*200 50*50*T2.0*240 50*50*T2.0*980 40*40*T2.0*1050 50*50*T2.0*980 50*T1.5*537 50*T1.5*537... -
Page 4: Product Load-Bearing Instructions
Maximum load 200KG Maximum user load 180KG... -
Page 5: Spare Parts List
Spare parts list Description Note Qty. ground frame main frame long handle grip sponge rod main frame short adjustable tube hexagon socket button head bolt M10x60 hexagon bolt M10x70 hexagon bolt M8x65 hexagon bolt M10x55 hexagon bolt M10x30 back cushion 1070x320x60 lock nut curved washer... -
Page 6: Fasteners Drawing
Fasteners drawing M10 4 PCS φ8 2 PCS M8*65 2 PCS M10*70 4 PCS 17-19 1 PC... -
Page 7: Assembly Step(1)
Assembly step(1)explosion drawing No. Description Note Qty. ground frame adjustable tube hexagon socket button head bolt M10x60 lock nut curved washer Φ10... - Page 8 Assembly step(1)drawing Assembly step(1)assembly instruction Fix adjustable tube-6 fastening on ground frame-1 using M10x60 hexagon socket button head bolt-7, Φ10 curved washer-14, M10 lock nut-13...
-
Page 9: Assembly Step(2)
Assembly step(2)explosion drawing No. Description Note Qty. ground frame main frame long main frame short hexagon socket button head bolt M10x60 hexagon bolt M10x30 lock nut curved washer Φ10 washer Φ10... - Page 10 Assembly step(2)drawing Assembly step(2)assembly instruction Fix main frame long-2 fastening on ground frame-1 using M10x60 hexagon socket button head bolt-7, Φ10 curved washer-14, M10 lock nut-13 Fix main frame short-5 fastening on main frame long-2 using M10x30 hexagon bolt-11, Φ10 washer-16, M10 lock nut-13...
-
Page 11: Assembly Step(3)
Assembly step(3)explosion drawing 16 13 No. Description Note Qty. handle grip hexagon bolt M10x70 hexagon bolt M10x55 lock nut washer Φ10 locking spring knob M18x1.5... -
Page 12: Assembly Step(4)
Assembly step(3)drawing Assembly step(3)assembly instruction 1.Put main frame short-5 into adjustable tube-6 using locking spring knob-17 lock 2.Put M10x55 hexagon bolt-10, Φ10 washer-16, M10 lock nut-13 into the topmost hole of main frame long-6 3.Fix handle grip-3 fastening on main frame using M10x75 hexagon bolt-8, Φ10 washer-16, M10 lock nut-13... - Page 13 Assembly step(4)explosion drawing No. Description Note Qty. sponge rod hexagon bolt M8x65 back cushion 1070x320x60 washer Φ8 sponge sponge inner cap sponge outer cap...
- Page 14 Assembly step(4)drawing Assembly step(3)assembly instruction 1.Fix back cushion-12 fastening on main frame using M10x65 hexagon bolt-9, Φ8 washer-15 2.Remove the bolt on sponge rod, sponge rod through handle grip-3 and main frame-5, in turn put sponge inner cap-19, sponge-18, sponge outer cap-20 3.
Need help?
Do you have a question about the 100896 and is the answer not in the manual?
Questions and answers