Table of Contents
Advertisement
Advertisement
Table of Contents
Troubleshooting

Subscribe to Our Youtube Channel
Related Manuals for CYBEX 70T Console


Summary of Contents for CYBEX 70T Console
- Page 1 Cybex 70T Console Owner's Manual Part Number 1008851-0001 AC...
- Page 3 United Kingdom All Other EMEA Countries and Distributor Business EMEA* North America Life Fitness UK LTD Bijdorpplein 25-31 2992 LB Barendrecht Cybex International Inc. Queen Adelaide THE NETHERLANDS Ely, Cambs, CB7 4UB Columbia Centre III Telephone: (+31) 180 646 644 Telephone: General Office (+44) 1353.666017...
-
Page 4: Table Of Contents
Cybex logo are registered trademarks of Cybex International, Inc. DISCLAIMER: Cybex International, Inc. makes no representations or warranties regarding the contents of this manual. We reserve the right to revise this document at any time or to make changes to the product described within it without notice or obligation to notify any person of such revisions or changes. -
Page 5: Safety Instructions
Safety Safety Instructions Read all instructions before using. All Products CAUTION: Any changes or modifications to this equipment could void the product warranty. WARNING: To reduce the risk of burns, fire, electric shock, or injury, it is imperative to connect each product to a properly grounded electrical outlet. - Page 6 Treadmill CAUTION: Risk of injury to persons – to avoid injury, use extreme caution when stepping onto or off of a moving belt. Read assembly instruction manual before using. WARNING: Keep the area 6.5 ft. (2 m) by 3 ft. (0.9 m) behind the treadmill clear of any obstructions, including walls, furniture, and other equipment.
-
Page 7: Consignes De Sécurité
Consignes de Sécurité Veuillez lire toutes les instructions avant d'utiliser les produits . Tous les équipements ATTENTION : Toute modification apportée à cet équipement pourrait en annuler la garantie. AVERTISSEMENT : Pour réduire les risques de brûlures, d’incendies, de décharges électriques ou de blessures, il est essentiel de brancher chaque appareil sur une prise électrique correctement mise à... - Page 8 Tapis de course ATTENTION : Risque de blessures - pour éviter toute blessure, faire preuve d’extrême prudence pour monter sur un tapis en mouvement, ou pour en descendre. Lisez les instructions d’assemblage avant toute utilisation. AVERTISSEMENT : Laissez un espace de 2 m sur 0,9 m (6,5 pi. sur 3 pi.) autour de la machine. Ne placez pas cette dernière près de murs, meubles ou autres équipements qui pourraient en obstruer l’accès.
-
Page 9: Before Use
The Cybex Arc Trainer is a non-impact, weight bearing cross trainer, used by applying force to the foot pedals. • The Cybex Bike is a machine that simulates the movements of riding a bicycle indoors at various speeds and levels of resistance. WARNING: Health-related injuries may result from incorrect or excessive use of exercise equipment. Life Fitness STRONGLY... -
Page 10: Immobilization Method
Immobilization Method The purpose of immobilizing the treadmill is to prevent unauthorized use. The system causes immobilization of the treadmill when activated. 1. Tap the LANGUAGE icon to access the SELECT LANGUAGE screen. 2. Tap the lower part of the screen in the following sequence: Lower-Left, Lower-Right, Lower-Left, and Lower-Right. 3. -
Page 11: Icons Used In This Manual
Icons Used in this Manual The 70T manual covers information for multiple cardio products. To help differentiate we use the following icons. Treadmill-Only Feature Bike-Only Feature Arc Trainer-Only Feature Page 9 of 80... -
Page 12: Getting Started
Getting Started Log In To Customize Log in to the console to track and save your workouts to the LFconnect app. 1. Bluetooth / NFC • On an Apple mobile device, enable Bluetooth, open the LFconnect app and turn on Bluetooth proximity login feature. •... -
Page 13: Select Language
6. Press the X to exit the Log In Manually screen and return to the Home screen. 7. Exit the Log In screen and return to the Home screen. Select Language 1. Language Options Users can select a language to use during a workout. NOTE: Only the specific languages enabled by the manager will be displayed. -
Page 14: Connects To Apple Watch
Connects to Apple Watch ® 1. Connect to Apple Watch: Press to learn more about connecting your Apple Watch device. 2. At any time prior to the workout summary screen, place your Apple Watch at the bottom right-hand corner of the tablet holder where it reads NFC. -
Page 15: Connects To Samsung Galaxy Watch
Connects to Samsung Galaxy Watch ® 1. Samsung Galaxy Watch: Press to learn more about connecting your Samsung Galaxy watch device. 2. At any time prior to the workout summary screen, place your Samsung Galaxy Watch at the bottom right-hand corner of the tablet holder where it reads NFC. -
Page 16: Specifications
Specifications Console Screen Type: LCD surface capacitive touch screen 70T HD LCD Touch Screen Size: 16” diagonal for all bases (Treadmill, Bikes, Arc Trainer) LCD Touch Screen Power 20.5 -25.5 VDC @ 3.5 A Requirement: Ports: Type RJ45, interchangeable Network ready connection and Fitness Entertainment port (power compliant with FitLinxx CSAFE specification dated August 4, 2004: 4.75VDC to 10VDC;... -
Page 17: Overview
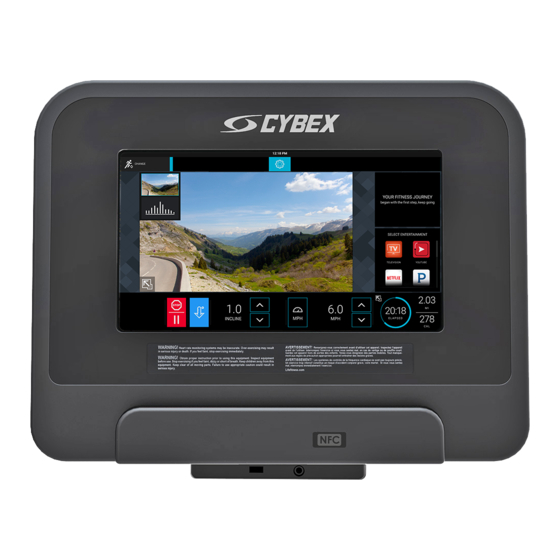
Overview Console Overview Treadmill shown 1. Touch Screen Display • Use to select, set up, monitor and save workouts. • Access entertainment options. 2. Optional RFID (Radio Frequency Identification): Fitness facility owners can order this option for their users allowing them to swipe their facility identification card on the console. -
Page 18: Touch Screen Overview
Touch Screen Overview 1. Choose Workout: Select a workout from the following categories: • Interactive Terrains • Standard Goals • Fitness Tests • Quick Start 2. Log In: Press to log in to your LFconnect or Halo account. 3. Language: Select a language to use during a workout. 4. -
Page 19: Operation
Operation Choose Your Workout Scroll the Choose Workout screen to view available workout options. Workouts include: • Interactive Terrains - Select an interactive terrain and work out with friends or other exercisers anywhere in the world in real time. • Standard Goals - Choose a workout based on desired goal. - Page 20 Interactive Terrains The Interactive Terrains are video courses, shot in first person perspective through landscapes, cityscapes, and events from around the world. This feature interacts with the fitness equipment to provide an immersive experience. NOTE: The incline of the treadmill automatically increases or decreases to correspond with the virtual hills on the course. •...
- Page 21 Workout Setup - Interactive Terrains 1. Choose Goal • Time • Distance 2. Back Arrow Press to return to previous screen. 3. Preset Time Values Choose from default values. 4. Time Keypad Press to use a numeric keypad to input a workout time value. 5.
- Page 22 Standard Goals Goals vary depending on base type. Workout Type Description Base Type Time Choose your terrain and the total time of your workout. Treadmill, Bikes, Arc Trainer Distance Pick a distance goal. Choose terrain and total distance of workout. Treadmill, Bikes, Arc Trainer Calories Choose terrain and how many calories you want to burn.
- Page 23 Data Entry Options Reference the charts on the following pages for a list user inputs required for each workout category and workout type. Arc Trainer Standard Goals Workout User Input Time • 3 preset values or use keypad to input desired time •...
- Page 24 Standard Goal Workout User Input Aerobics • Goal (Time, Distance, Calories) • Level • Weight (enter at bottom left of screen) Watts • 3 preset values or use keypad to input desired time • Watts • Weight Mets • 3 preset values or use keypad to input desired time •...
- Page 25 User Input Ranges Time 1 - 60 minutes Weight 75 - 400 lbs. (34 -181 kg) Incline 0.0 - 15.0 Speed 0.5 - 14.0 MPH 10 - 99 years Height 36 - 90 inches Average Level 1 - 20 Level refers to a range of incline percentages. Level % Incline Level...
- Page 26 Set Up Your Workout - Terrain 1. Choose Terrain • Flat is a constant effort workout in which the user can change incline, level or speed at any time. • Hill involves increasing resistance until halfway through the workout, then decreases the remainder of the workout. •...
- Page 27 Performance Run Only available on treadmills. This workout is intended to help exercisers shape their own interval training by selecting the incline, speed, and time. The user defines a low speed and a high speed and can manually toggle between them via buttons. 1.
- Page 28 Heart Rate Goals Workouts Research shows that maintaining a specific heart rate while exercising is the optimal way to monitor the intensity of a workout and to achieve maximum results. Zone Training identifies an exerciser’s ideal heart rate range, or zone, for burning fat or increasing cardiovascular fitness.
- Page 29 Set Up Your Workout - Heart Rate 1. Time Press to use numeric keypad to enter a workout time value. 2. Age Press to use the numeric keypad to enter an age value. 3. Heart Rate Workout • Moderate Burn is a low-intensity cardio workout. The program adjusts the intensity level through changing the incline (elevation), based on the actual heart rate, to maintain the rate at 65% of the theoretical maximum.
- Page 30 The Lifepulse ™ System The patented Lifepulse system sensors (B) are the built-in heart rate monitoring system on this product. For the most accurate reading possible, during a workout: • Grasp the sensors firmly. • Hold each sensors at the midpoint. •...
- Page 31 Fitness Tests Choose desired fitness test. • Life Fitness Fit Test estimates cardiovascular fitness and can be used to monitor improvements in endurance every 4 - 6 weeks. • U.S. Navy Physical Readiness Test (PRT) is a 5-minute distance goal test based on the time needed to complete the required distance and is used by the U.S.
- Page 32 Life Fitness Fit Test • The Life Fitness Fit Test estimates cardiovascular activity and can be used to monitor improvements in endurance every 4 - 6 weeks. • The Fit Test is considered to be a submax VO2 (volume or oxygen) test and gauges how well the heart supplies oxygenated blood to the exercising muscles and how efficiently those muscles receive oxygen from the blood.
- Page 33 Relative Fitness Classification for MEN Rating Elite Excellent Very Good Above Average Below Very Low Average Average Estimated V02 Max (ml/kg/min) per Age category 20 - 29 years 53 - 54 50 - 52 45 - 49 40 - 44 38 - 39 35 - 37 <35...
- Page 34 Quick Start Press the Green Arrow Quick Start button at the top of the Choose Workout screen. • A workout countdown 3, 2, 1 screen appears. • Users can make adjustments to the workout after starting a workout. • A Quick Start workout begins at a speed of 0.5 Miles Per Hour (MPH) / 0.8 Kilometers Per Hour (KPH) and an incline of 0.0%. •...
-
Page 35: Workout Mode
Workout Mode 1. Workout Profile • Choose the TV view or Classic view. • A colored frame surrounding a workout profile view represents the current view. 2. Current Workout Profile NOTE: TV view is shown. 3. Screen Size • Press the icon to toggle between Standard view screen (shown) and Full Workout view screen sizes. 4. - Page 36 9. Expanded Stats • Press to show real-time workout stats. 10. Primary Goal Workout Stats • Primary workout goal stat is displayed. 11. Select Television Station • Use the to select an available channel. 12. Menu • Press the gear to log in to LFconnect or to see the My Stats screen if logged in. •...
-
Page 37: My Stats
My Stats 1. Logged In / Profile Menu Press Logged In / Profile icon to do the following: • Log in to LFconnect. • View previously saved stats (if logged in). 2. Stats View previous saved workout stats and averages. 3. -
Page 38: Bluetooth ® Devices
Bluetooth ® Devices Bluetooth Device menu offers two scanning options: • Headphone • Heart rate chest strap 1. Headphone Press to scan for available Bluetooth Devices. NOTE: Make sure your headphones are in pairing mode. Headphones using a low energy Bluetooth signal or single ear headphones are not compatible. -
Page 39: Select Entertainment
Select Entertainment NOTE: This feature is only available in Workout Mode. Select Entertainment Option Watch traditional TV or log into your personal Netflix account. The following apps are integrated into the console: • • Spotify • Economist • Internet Browser •... -
Page 40: Select Entertainment - Dtv And Stb Iptv
Select Entertainment - DTV and STB IPTV Full screen with channel list NOTE: This feature is only available in Workout Mode 1. TV Option Press to watch TV during a workout session. • Press to select a channel. • Press to select a channel. -
Page 41: Settings
Settings Press the Settings icon anytime during a workout. 1. Language Selected language is shown. 2. Choose Measurement Unit • Imperial • Metric 3. Enter Weight Use numeric keypad to input a weight value. 4. Clear Press the icon to clear an incorrectly entered weight value. 5. -
Page 42: Expanded Stats
Expanded Stats Treadmill shown 1. Expanded Stats • Press during a workout to view real-time workout stats. • Press in Expanded Stats view to go back to Workout Mode view. 2. Primary Goal Primary Goal is shown in the dial. 3. -
Page 43: Pause Workout Screen
Pause Workout screen Press the Pause / Stop button to pause a workout. Choose one of the following options while in Pause mode: 1. Cool Down Press to enter a cool down mode. 2. Resume Press to continue current workout. 3. -
Page 44: Cool Down Screen
Cool Down Screen Press the Cool Down button anytime during a workout to start a Cool Down mode (displayed). 1. Time Display • Time will change to Cool Down when the Cool Down mode is entered. • The time display initially shows the amount of time in minutes that a specific workout is required to be in Cool Down mode. •... -
Page 45: Workout Results
Workout Results The Workout Results screen is displayed once the workout session ends or is terminated by the user. 1. Summary of Workout Parameters • Data for workout parameters is displayed for 60 seconds. • The data displayed depends on the selected workout / goal. 2. -
Page 46: Manager Configuration
Manager Configuration Accessing System Options 1. Tap the LANGUAGE icon to access the SELECT LANGAUGE screen. 2. The touch sequence is LOWER-LEFT, LOWER-RIGHT, LOWER-LEFT, and LOWER-RIGHT. Systems Options • System Test • Information • Configuration • Maintenance • Software Updates •... -
Page 47: Configuration Menu
Configuration Menu The Configuration menu allows fitness facility managers to configure basic functionality of the product as well as network and media settings. The button of the selected option is blue. When a selection is made, the System option menu screen appears to the right. Manager Set unit defaults. -
Page 48: Manager - Default Settings
Manager - Default Settings 70T Console Cardio Products Setting Default Description Default Language English US This option sets a new default language. Choices include: English, Spanish, and French. User Language English US This option sets the language of user messages and service messages. Choices... - Page 49 Setting Default Description System Sounds This option controls whether the system speaker beep is generated on key presses. Marathon Mode Enabled This option allows the user to workout indefinitely. Telemetry Enabled Switching on the telemetry feature makes it possible to use the Polar ®...
-
Page 50: Media Center
Media Center 1. Select Tuner Type. • DTV is the default selection for ATSC, PRO:IDIOM, DVB and ISDB configurations. • USBTV is default selection for ATSC and DVB-T2 USB tuner configurations. • STB SYNC is the default selection for STB SYNC, STB Connector Kit, and Legacy PRO:IDIOM configurations. •... - Page 51 PMode Set Picture Mode. Press + and - to change channels. Zoom Picture Size. Display Current channel information is shown. EPG (if Lists current and upcoming programs for selected Press to navigate the TV Setup menu options. available) channels. Mute Silence TV audio.
- Page 52 TV Channel Scan for ATSC Tuner 1. Press to navigate to Channel. 2. Press to navigate to Air/Cable, and press to select your configuration. 3. Press to navigate to Auto Scan, and press or Enter to scan for channels. 4. Press to select No or Yes, and press Enter.
- Page 53 TV Channel Scan for Pro:Idiom Tuner 1. Press to navigate to Channel. 2. Press to navigate to Air/Cable, and press to select your configuration. NOTE: • Cable scans for Pro:Idiom encrypted digital, clear digital, and analog channels. • Air scans for digital channels from local terrestrial antenna. •...
- Page 54 TV Channel Scan for Legacy DVB Tuner 1. Press to navigate to Channel. 2. Press to navigate to Auto Tuning. 3. Press Enter. 4. Press to navigate to Country, then press to select your country. 5. Press to navigate to Digital Type, then press to select your digital TV standard.
- Page 55 TV Channel Scan for DVB Tuner 1. Press to navigate to Channel. 2. Press to navigate to Auto Tuning. 3. Press Enter. 4. Press to navigate to Country, then press to select your country. 5. Press to navigate to Digital Type, then press to select your digital TV standard.
- Page 56 TV Channel Scan for ISDB-T Tuner Select Scan from the TV Setup Menu options. 1. Select All Regions to pull up a list of regions. Choose applicable region. 2. Set the CATV Pass Through Option to OFF. 3. Choose Auto for Scan Type selection. 4.
- Page 57 Channel List Management for ISDB-T Tuner Select Channel List from the TV Setup Menu options. 1. Select Upload Channel List to upload a channel list to Halo Fitness Cloud (if connected). Page 55 of 80...
- Page 58 2. Select Edit to edit the channel list. Uncheck channels to hide the channels from the user. Hidden channels will not be options during workouts. Page 56 of 80...
- Page 59 USB TV USB TV Setup for ATSC Tuner 1. Menu • Playback (Default) • Scan • Channel List 2. Playback Menu • Signal Info (provides current signal status) • CC (On / Off) • SAP (toggles between audio sources when multiple are available) 3.
- Page 60 USB TV Setup for DVB Tuner Pressing the button in the Menu field will display the following options: • Playback • Scan • Channel List 1. Select Scan. 2. Select Auto or Manual. 3. Select Air or Cable. 4. Select your country. 5.
- Page 61 STB SYNC NOTE: Select the IPTV Setting at installation to match the Set Top Box (STB) brand / model in the facility’s AV closet. Page 59 of 80...
- Page 62 These commands are sent to the corresponding STB. The STB determine the actions. See the STB manufacturer’s documentation for detailed functionality and descriptions. 1. IPTV Setting Select Change. Search for the STB brand and model. a. Scroll through the list of brands and models, or type the name of the brand or model in the Search Brand or Model box. b.
- Page 63 Legacy Pro:Idiom To access the Pro:Idiom TV Setup menu, use tuner type STB IPTV. 1. EPG Press to access the Electronic Program Guide (EPG). 2. Subtitles Press to turn Subtitles On / Off. 3. Channel keys Use to move channels up (+) or down (-). 4.
- Page 64 Channel Scan These commands are sent to the corresponding Set-Top Boxes. The Set-Top-Boxes determine the actions. See the Set-Top-Box manufacturer’s documentation for detailed functionality descriptions. 1. Menu Press to access TV Setup menu. 2. Channel Scan to scroll to the Channel Scan option. Press Ok to enter the selection. 3.
- Page 65 Open Channel Setup After scanning for channels or installing a STB, press Open Channel Setup to customize your channel list for the Workout Screen. The Open Channel Setup menu has four options: • Edit Current - Edit titles, add titles, remove titles, and save titles. •...
- Page 66 Edit Current Press Edit Current to access the following menu options: • Add Channel - Add one or many channels and edit channel titles. • Remove - Remove unwanted channels. Add Channel 1. Press Add Channel. Page 64 of 80...
- Page 67 2. Type the channel number in the Major number* box. 3. Type the channel sub-number or program number in the Minor number box. 4. Type the channel name in the Channel name* box. 5. Choose one of the following: • Press Add + New if you have more channels to add to your channel list.
- Page 68 Reorder Selected Channel 1. Press on the channel you want to reorder on your channel list. NOTE: The order of the channel list that you create will appear within the workout menu. 2. Press to rearrange the channel on your channel list. 1.
- Page 69 Remove 1. Press on the channel you want to remove from your channel list. 2. Press Remove. 1. Press Save when you are finished removing channels. 2. Press Close Channel Setup if you are finished with your channel list. Page 67 of 80...
- Page 70 Clear Current Press Clear Current to delete an existing list of channels, and create a new list of channels. Import New The Import New feature requires a channel list on a different unit and a USB flash drive. You will use the Export Current feature on another unit before using the Import New feature.
- Page 71 6. Press Import New. 7. Verify that your unit has imported the channel list from the other unit. Export Current The Export Current feature is used when you want to save your current channel list on multiple machines. You will use the Import New feature after using the Export Current feature.
- Page 72 Open IPTV Open IPTV allows custom channel creation. 1. Tuner Type The Open IPTV tuner type only shows when the console is configured for Open IPTV. 2. TV Setup Press to access the Open IPTV TV Setup menu. 3. Custom Channel •...
- Page 73 9. Export Channels Export channel list to an inserted USB stick. 10. Upload Channel List Uploads your channel list to Halo Fitness Cloud (if connected) and instantly to all units in the facility if units are connected to the internet. 11.
-
Page 74: Wireless Connectivity
Wireless Connectivity NOTE: If your equipment is connected to the internet with an Ethernet cable, please see the Ethernet section in the Configuration Menu. 1. Press Enable/Disable to activate or deactivate wireless abilities. 2. Press Scan to scan for wireless networks in your area. 3. - Page 75 Internet Requirements Minimum download bandwidth requirements for 1-16 units: • 2.5 mbps • +0.25 mbps for more than 16 units. Minimum upload bandwidth requirements for 1-20 units: • 0.5 mbps • +0.25 mbps for more than 20 units. Wired Local Area Network (LAN) requirements: You will need to provide the DHCP addresses for all of your units if your units are wired to the internet using an Ethernet cable.
-
Page 76: Maintenance And Troubleshooting
Maintenance and Troubleshooting NOTE: Safety of the equipment can be maintained only if the equipment is examined regularly for damage or wear. Keep the equipment out of use until defective parts are repaired or replaced. NOTE: Pour assurer la sécurité du matériel, il convient de l’inspecter régulièrement afin de déceler tout signe d’usure ou d’endommagement. -
Page 77: Troubleshooting
Using a voltmeter, verify power at outlet. If no power exists, reset circuit breaker at panel. Line cord is damaged. Replace line cord. Contact Cybex Customer Support Services. Line cord is improperly seated in socket. Inspect power connection at wall outlet and at machine for proper contact. - Page 78 Probable Cause Corrective Action Belt transmitter electrodes are not laying flat against the skin. Ensure the belt transmitter electrodes are laying flat against the skin. Belt transmitter needs cleaning. Wash the belt transmitter with mild soap and water. Belt transmitter not properly set up. Setup of the belt transmitter is accomplished by initially bringing it with in 1 foot of the receiver.
-
Page 79: Copyrights And Trademarks
Copyrights and Trademarks List of Copyrights and Trademarks Bluetooth ® is a registered trademark owned by Bluetooth SIG, Inc. Polar ® is a registered trademark of Polar Electro, Inc. iPad ® , iPhone ® , iPod ® , and Apple Watch ®... -
Page 80: Warranty
All terms of this warranty are void if this product is moved beyond the continental borders of the United States of America (excluding Alaska, Hawaii and Canada) and are then subject to the terms provided by that country’s local authorized Cybex representative. -
Page 81: Effects Of State Laws
Changes in Warranty Not Authorized No one is authorized to change, modify or extend the terms of this limited warranty. Effects of State Laws This warranty gives you specific legal rights, and you may have other rights which vary from state to state and country by country. Warranty Information Lifetime 10 years... - Page 82 Columbia Center III - 9525 West Bryn Mawr Ave, Rosemont, IL 60018 • 800-351-3737 • 847-288-3700 • FAX 800-216-8893 www.cybexintl.com...
Need help?
Do you have a question about the 70T Console and is the answer not in the manual?
Questions and answers