Table of Contents
Advertisement
Quick Links
Advertisement
Table of Contents

Related Manuals for Rion Eco Grow 6x6’


Summary of Contents for Rion Eco Grow 6x6’
- Page 1 Eco Grow SSEMBLY NSTRUCTIONS Eco Grow 6x6’ , 6x8’...
- Page 2 Authorized Rion Distributors Canada Backyard Living Source, Inc Footprint Tools Canada Limited 9543 W. Emerald Way, Suite 101 Corporate Headquarters Boise, ID 83704 1745 Bonhill Road, Unit #1 1-866-448-8229 Mississauga, ON L5T 1C1 Fax: 208-898-9518 1-800-866-5749 Customersercvice@ghoinc.co 905-564-6007 www.RionGreenhouseKit.com Fax: 905-564-0059 sales@footprint-tools.ca...
- Page 3 You may nd some parts easier to assemble if you rst moisten them with soapy water. Accessories Rion o ers a wide range of accessories for your greenhouse from modular bases for the foundation, automatic window openers, and shelving for your plants.
-
Page 4: Table Of Contents
Introduction Congratulations on purchasing an EcoGrow. We are certain that it will give you many happy years of pleasure in your garden. EcoGrow has been designed to be as easy to put together as it is beautiful to look at. Most of the work can be done by a single person. -
Page 5: Prepare A Foundation For Your Greenhouse
Introduction Prepare a Foundation for Your Greenhouse dation must be prepared. A number of anchoring options are Before assembling your new Greenhouse a proper foun possible, based on wind and ground conditions in your area. Make sure that you have checked with your local authorities regarding any required building permits. Decide at this time the nal orientation of your Greenhouse. -
Page 6: Identify Greenhouse Parts
Identify Greenhouse Parts Because of the EcoGrow modularity, you may purchase additional middle sections to t your needs. Eco Grow 6x6 Eco Grow 6x8 Eco Grow 6x6 Eco Grow 6x10 Eco Grow 6x8 Eco Grow 6x12 Front Back (2’) Back (4’) Middle (4’... - Page 7 Take a minute to make sure you have everything you need. Note: Do not proceed with assembly if any parts are missing. The part code is stamped on each connector. Profiles are listed in or der by size, largest to smallest. Panels are identified with stickers.
- Page 8 Back 2' Back 4' Front 4' Ext 4' Dimension No of No of No of Description Code (mm) parts parts parts Corner base connector Left rib connector Left pediment connector Right rib connector Right pediment connector 0 Top pediment connector B ase connector T - oval connector Oval junction connector...
- Page 9 Back 2' Back 4' Front 4' Ext 4' Dimension No of No of No of Description Code (mm) parts parts parts Roof glazing -RB 520 (1’ 87⁄16”) Roof glazing -RB 475 (1’ 611⁄16”) Roof glazing - RD 569 (1’ 103⁄8”) Flexible Glazing 14m (45' 111⁄8") GF - 35m...
-
Page 10: Prepare Your Parts For Assembly
Prepare Your Parts for Assembly Remove everything from your packages and sort them according to part type. Since assembly is done from taking parts from every box, it is best to put everything together. Some glazing elements (RA, RB, RC, and RD) are placed inside the long pro les in the interests of space. -
Page 11: Secure The Frame To Foundation
Secure the Frame to Foundation Make sure that the frame is perfectly rectilinear by measuring the diagonals and verifying that they are the same. Use a level to make sure that the frame is level. Acquire the proper hardware before beginning the next procedure. -
Page 12: Assemble The Roof Pediments
Assemble the Roof Pediments Assemble all parts of the hinged door pediment except for the 7A connector and the R3 pro le. Note: Glazing elements (RA, RB, RC, and RD) may have been placed inside the E2 pro les. Remove them before assembly. - Page 13 Back Pediment Assemble the back top pediment as previously described and lock the parts in place with pins. Place the descending pro les on the completed top pediment. Slide the three panels in place. Make sure that the plastic ID strip faces the outside.
-
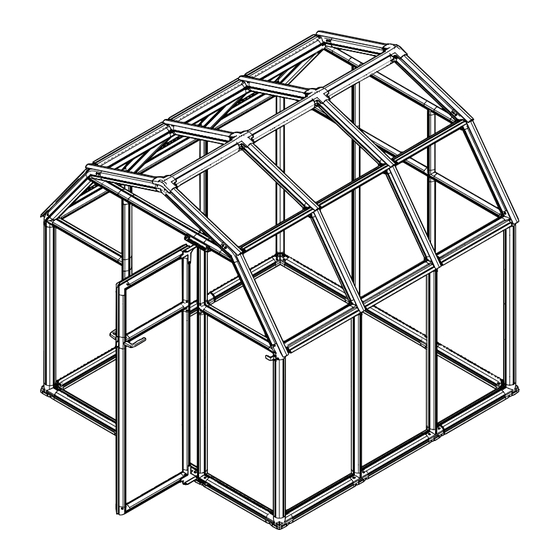
Page 14: Assemble Roof Framework
Assemble Roof Framework Note: Assemble the roof in an area not too far away from the completed frame. Assemble one arch. Note: Glazing elements (RA, RB, RC, and RD) may have been placed inside the E3 and E2 pro les. Remove them before assembly. -
Page 15: Cover The Greenhouse Roof
Cover the Greenhouse Roof Step in the framework of the lower window to conveniently reach the top of the roof. Place RA1 glazing elements on the top of the roof by placing one end in the top channel and pushing it down along the length of the pro le. - Page 16 Place RD1 elements where shown by placing one end in the channel and pushing it down along the length of the pro le. Note: The RD1 glazing elements may have been placed inside one of the long pro les. Note: You may nd it easier to insert RD elements into...
- Page 17 Lock the sides of the PN3 and PN3A panels and roof vent in place using RC2 glazing elements. Make sure that the end of the RC glazing elements are in line with the bottom of the RD elements. Finish locking the panels into place by placing RC3 glazing elements...
- Page 18 Making sure that the PN2A plastic ID strip faces out, slide a PN2A panel into the lower RD1 PN2A element. Bend the panel until it enters the upper RD1 element. PN2A Continue with the rest of the PN2 PN2A and PN2A panels.
-
Page 19: Cover The Walls
Cover the Walls Put the R1 round pro les in place. Add the E1 oval pro les until the frame is completed. Insert two pins in each column to lock them in place. Do not insert pins in the inner (panel) channels of the column pro les. -
Page 20: Raise The Roof
Raise the Roof Place the roof on the completed frame. Note: You will need the help of another person for a short while to lift the roof and put it in place. Make sure that the roof is in the same orientation as the frame. - Page 21 Seal Panels Take the roll of GF sealer, divide it as shown, and pull out enough for one side of a PN1 panel. Note: If the GF Sealer is not divided it will not t in the channel of the column pro le. Cut it to length.
-
Page 22: Assemble The Door
Assemble the Door E100 E101 PN121 E101 Door H33 E100 PN122 7216 7224 E100 Hinges & Pins 7216 Pin1 Pin1 Pin1 Pin1 Pin1 Pin1 7224 7215 7215... -
Page 23: Seal The Door
Seal the Door A = B... -
Page 24: Attach The Door
Hang The Door pin1 pin1 pin1 7217 7224 7224 4016 7279 4016 7279... -
Page 25: Attach Door Holder
Attach Door Holder pin1 7273 7281 Holding The Door Open:... -
Page 26: Final Touches
Rion is not responsible for any damage due to high temperatures. • Always close roof vents in high winds. Rion o ers a wide range of options for your new Greenhouse, including modular shelves, irrigation systems, additional windows, automatic window openers, and others. -
Page 27: Warranty
Greenhouse. In no event shall Rion be liable, whether in contract or tort (including negligence) for damages in excess of the purchase price of the Greenhouse, or for any indirect, incidental, special or consequential damages of any kind, including but not limited to, personal physical injuries to any person, compensa-...
Need help?
Do you have a question about the Eco Grow 6x6’ and is the answer not in the manual?
Questions and answers