Advertisement
Part No. 2320-0144
MEK2007
Trigger-Lock Mounting Kit - Polished
MS Café Fairing
HD XL 1200C Custom 2011– 2014
Aluminum parts are electrocoated (E-coated)
for durability and weather resistance.
Before assembly, read Warnings inside
WARNING
1.
During installation, make sure that the fairing and
hardware do not interfere with any cables or wiring
when the forks are turned all the way in either direction.
Also make sure , through the full range of adjustment,
that the fairing and hardware do not hit the gas tank.
2.
This is a detachable fairing, ALWAYS make sure the
locking mechanism is fully engaged after installing the
fairing.
3.
The improper installation of this kit and related
components could result in serious injury or death.
CAUTION
1.
Memphis Shades fairings are made from Lucite
acrylic, and will last for years with proper care. Clean
your fairing with plenty of soapy water (mild dishwash-
ing liquid is best) and a soft cotton cloth. Use your bare
hands to feel and dislodge bugs, or cover with a wet,
soapy towel and let it soak. Don't use paper towels and
scrape with anything. Small scratches can be removed
with NOVUS #2.
2.
Never use any glass cleaning products, petroleum
based chemicals, or cleaning agents with ammonia,
bleach or any other harsh chemicals. This includes (but
not limited to) RainX, brake fluid, acetone, paint thinner,
benzene and gasoline. "If it hurts your nose, it will hurt
the plastic."
3.
Glass cleansing agents will cause severe damage to
your fairing, and will void your warranty.
For care and cleaning we recommend using Memphis
Shades All Kleer, a unique cleaner/polish, bug
remover and rain repellent that leaves a super slick
surface that makes the next cleaning even easier.
At certain times of the day the Sunlight can reflect off
4.
the curvature of a fairing and cause extreme heat build-
up on motorcycle instruments and instrument panel.
Take care when parking. Park facing the sun, place an
opaque object over the instruments or adjust the fairing
to avoid reflections.
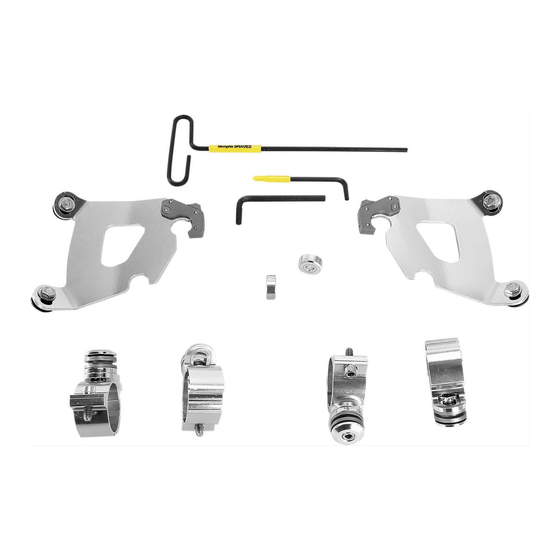
1. Kit Contents
REVISION 0
Ref Code
2. Mounting Instructions
Additional tools required that are not included in this kit.
7/16"(11mm) wrench.
1. Cover gas tank and front fender with towels to avoid
damage during installation.
2.Remove brow retaining bolts, install 7/8 spacer washer
(brow spacer)
3.Install the Mounting plate assemblies
ing, using the bolts that are pre-assembled on the
Mounting plate assemblies.
The Santoprene grommets should be inserted through the
holes in the fairing so that the flat round part of the grommet
lies flat on each side of the plastic. Tabs point in towards the
headlight. (Fig. 2)
4. Loosely install the four Fork Clamps on the forks, approxi-
mately 2" apart. (Fig. 3)
Memphis Shades warrants all product components, metal
and plastic, against defects in materials and workmanship
for 24 months.
For Parts and Warranty Help, Contact:
Memphis Shades, Inc.
P.O. Box 429
Rossville, TN 38066
(901) 853 0293
Visit us on the web at www.memphisshades.com or you
can also reach us by email:
customerservice@memphisshades.com
Description
I2007
Mounting Instructions
M1596EC
Clutch side mounting plate
M1597EC
Throttle side mounting plate
S1215EC
Small detachable clamp assembly
M310
Short arm allen wrench, 3/16
R340
Short arm allen wrench, 1/4
R501
7/8 Spacer washer (Brow spacer)
M314
T-Handle Wrench, 3/16
then reinstall using original bolts. (Fig. 1)
and
onto the fair-
Qty
1
1
1
4
1
1
2
1
Advertisement
Table of Contents

Summary of Contents for Memphis Shades MEK2007
- Page 1 CAUTION 7/16”(11mm) wrench. 1. Cover gas tank and front fender with towels to avoid Memphis Shades fairings are made from Lucite damage during installation. acrylic, and will last for years with proper care. Clean your fairing with plenty of soapy water (mild dishwash- 2.Remove brow retaining bolts, install 7/8 spacer washer...
- Page 2 2. Mounting Instructions, continued Fig. 3 CORRECT 5. Fork Clamp Bushings are pre-adjusted to rear of slot. Adjust as needed and check for clearance. (Fig. 3 & 4) Throttle side, (See Warning) front of bike 6. Slip the mounting plates and fairing onto the fork clamps, (Fig.


Need help?
Do you have a question about the MEK2007 and is the answer not in the manual?
Questions and answers