Advertisement
Ender-3 Pro Series 3D Printer
◆ This guide is for the Ender-3 Pro Series of 3D printers.
◆ Select the correct input voltage to match your local mains
(230V or 115V)
◆ Because of software/hardware upgrades and model
differences, new revisions may not be listed in this guide.
◆ Please plug the power cord into a three−hole power jack.
◆ Detailed instructions for use are available in the TF card.
To be the Chief Evangelist
Guide Book
[ To make Top-quality 3D printer]
V.2.2
Advertisement

Related Manuals for Creality 3D Ender-3 Pro Series


Summary of Contents for Creality 3D Ender-3 Pro Series
- Page 1 Ender-3 Pro Series 3D Printer Guide Book [ To make Top-quality 3D printer] ◆ This guide is for the Ender-3 Pro Series of 3D printers. ◆ Select the correct input voltage to match your local mains (230V or 115V) ◆ Because of software/hardware upgrades and model differences, new revisions may not be listed in this guide.
- Page 2 Notes 1. Do not use the Printer in any way other than described herein to avoid personal injury or property damage. 2. Do not place the Printer near flammables, explosives or heat sources. It is best to place it in a well- ventilated, low-dust environment.
-
Page 3: Table Of Contents
Contents 5. Software Installation ..………………5 1. Introduction ...………………………....1 6. Preparing to Print……………………..6 2. Screen Information..………………..2 7. Trouble-shooting ……………………..7 3. Loading Filament........3 4. Bed L e v e l l i n g ....... 4 Preface Dear consumers, Thank you for choosing our products. -
Page 4: Introduction
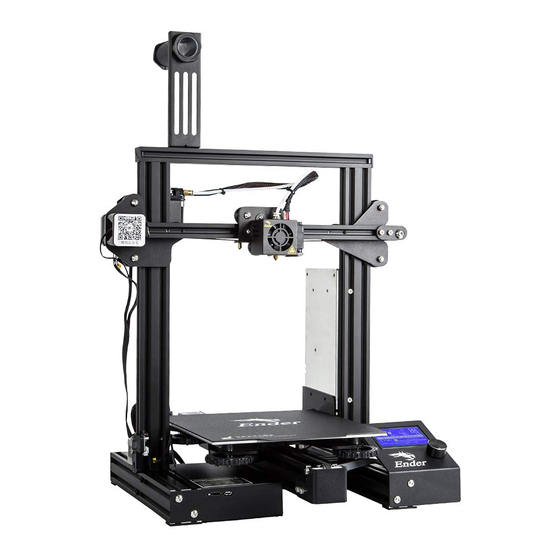
1. Introduction TF Slot and USB Port Display Screen Power 13. Z Stepper Control Box Nozzle Assembly 10. Y Limit Switch 14. Z Limit Switch Print Surface Spool Holder 11. Y Stepper 15. X Limit Switch 12. Coupling 16. X Stepper Control Knob Extruder (E) Stepper... -
Page 5: Screen Information
2. Screen Information Information Displayed Set Temperature of the Nozzle Current Temperature of Print Speed the Nozzle Model Set Temperature of the Hot Bed CurrentTemperature of the Hot Bed Part Cooling Fan Speed Current Location of the nozzle Print Time Print Progress Prompt Message Push:OK/Enter Sub Menu... -
Page 6: Loading Filament
3. Loading Filament 1. Preheat 2. Feeding Method 1 Method 2 Press and hold the extruder lever then insert 1.75mm filament through the small hole of the extruder. Continue feeding until you see filament come out the nozzle. Tip:How to Replace the Filament? 1sCutting filament near the Extruder and slowly feed new filament until they are fed into the new filament. -
Page 7: Bed Levelling
4. Bed Levelling 1. Prepare ‹ A u t o Home. Wait for the nozzle to move to the left/front of the platform. 2. Prepare‹Disable Steppers(Close stepper drive,release motor) 3.Move the nozzle the front/left leveling screw and adjust the platform height by turning the knob underneath. -
Page 8: Software Installation
5. Software Installation 1. Double click to install the software. 2、Double click to 3. Select language→Next→Select your machine→Next→Finish. open the software. -
Page 9: Preparing To Print
6.For the first Printing 1.Slicing Open the software→Load→Select the file→Wait for slicing to finish ,and save the gcode file to TF card. 2.Printing Insert the TF card→ Print → Select the file to be printed. -
Page 10: Trouble-Shooting
7. Trouble shooting... - Page 11 3d industry and establishing a good image shipping and maintenance costs; of 3d printing, since Creality 3d printer have passed all kinds of 5. Not included in warranty coverage: authorized product certificates and quality management system.hereby (1) It is not possible to provide an effective after-sales service card or...
- Page 12 The revision date: May 20,2019 SHENZHEN CREALITY 3D TECHNOLOGY CO.,LTD. 11F & Room 1201,Block 3,JinChengYuan,Tongsheng Community,Dalan g,Longhua District,Shenzhen,China,518109 Official Website: www.creality3d.cn Tel: +86 755-85234565 E-mail: info@creality3d.cn cs@creality3d.cn...
Need help?
Do you have a question about the Ender-3 Pro Series and is the answer not in the manual?
Questions and answers