
Related Manuals for Otto OTSTHOCOBK


Summary of Contents for Otto OTSTHOCOBK
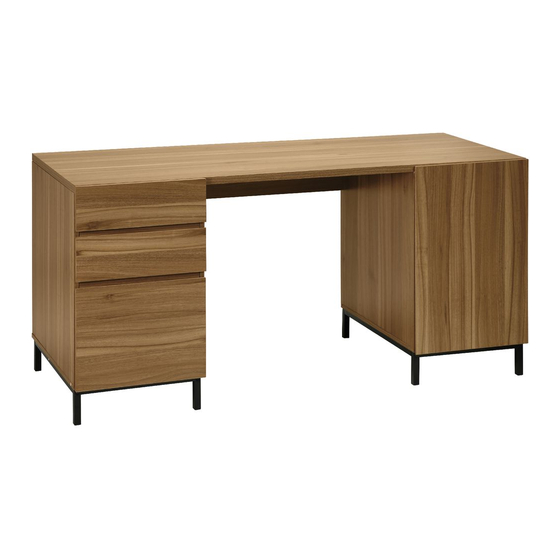
- Page 1 ASSEMBLY INSTRUCTIONS STOCKHOLM TWIN CABINET DESK OTSTHOCOBK OTSTWCWBK Go to page 21 This design and instruction booklet is subject to copyright. 2 Cartons www.officeworks.com.au For spare parts or hardware call 1300 OFFICE (1300 633 423) 1/36...
- Page 2 Furniture Assem bly Ins Estimated Assembly Time: 90minutes Assembly Video • To view an assembly video, go to https://www.officeworks.com.au/ • Search the product by item code or name: • Click on the icon to watch the video. Customer Service Contact Details Spare Parts &...
- Page 3 Tools Required CAUTION: Do not use tools other than those required, as this can damage your new item NOTE • Please check you have all hardware before assembling. • If you are missing any hardware, please contact 1300 OFFICE(1300 633 423). •...
- Page 4 Parts Located in Carton - OTSTHOC1OB/OTSTWC1WB 2pcs 2pcs 2pcs Parts Located in Carton - OTSTHOC2OB/OTSTWC2WB 2pcs 4pcs 4pcs 2pcs 2pcs 2pcs 2pcs Hardware Located in Carton - OTSTHOC2OB/OTSTWC2WB M6x35mm Φ15x12mm 12pcs Φ Φ 6x30mm 32pcs 4x30mm 20pcs 12pcs G(CL) G(CR) 350mm 350mm Φ...
- Page 5 Hardware Spare Part number - HWSTWCABDK M6x35mm Φ15x12mm 12pcs Φ Φ 20pcs 6x30mm 4x30mm 32pcs 12pcs 32pcs Φ Φ 8pcs 3x12mm 4x35mm 8pcs Φ 15x9mm 8pcs M6x40mm Φ 2pcs 4x14mm 12pcs 4pcs 16pcs 8pcs Φ 8pcs 5x30mm Φ 3x14mm Hardware Spare Part number - HWSTCKFDRU 2pcs Hardware Spare Part number - HWSTCKSDRU G(CR)
- Page 6 Assembly Go To Page 21 Step 1 2pcs 6/36...
- Page 7 Step 2 G(CL) 2pcs 9pcs G(CL) Step 3 G(CR) 2pcs 9pcs (CR) 7/36...
- Page 8 Step 4 2pcs Step 5 8pcs 8/36...
- Page 9 Step 6 4pcs 4pcs Step 7 8pcs 9/36...
- Page 10 Step 8 8pcs Step 9 2pcs 10/36...
- Page 11 Step 10 4pcs 4pcs Step 11 8pcs 11/36...
- Page 12 Step 12 4pcs Step 13 12/36...
- Page 13 Step 14 8pcs Step 15 8pcs 13/36...
- Page 14 Step 16 8pcs Step 17 8pcs 8pcs 14/36...
- Page 15 Step 18 4pcs Step 19 G(DL) G(DR) 8pcs 2pcs 2pcs G(DR) G(DL) 15/36...
- Page 16 Step 20 8pcs Step 21 4pcs 4pcs 12 & 13 16/36...
- Page 17 Step 22 6pcs 2pcs Step 23 4pcs 17/36...
- Page 18 Step 24 Holes for A4 suspension files 2pcs 4pcs Holes for foolscap suspension files Step 25 18/36...
- Page 19 Step 26 2pcs 4pcs Step 27 4pcs 2pcs 19/36...
- Page 20 Step 28 4pcs 8pcs Place the assembled drawers into the frame by aligning the slide runners of the drawers with the runners on the unit. If the drawer does not slide in smoothly, remove the drawer to ensure the alignment on both sides are correct. Push the drawers all the way into the unit until it stops. MAXIMUM WEIGHT CAPACITY Desktop 50kg Stationery drawer 3kg...
- Page 21 How to adjust the door 21/36...
- Page 22 Step 1 G(CL) 2pcs 9pcs G(CL) 22/36...
- Page 23 Step 2 2pcs Step 3 G(CR) 9pcs 2pcs G (CR) 23/36...
- Page 24 Step 4 8pcs Step 5 4pcs 4pcs 24/36...
- Page 25 Step 6 8pcs Step 7 8pcs 25/36...
- Page 26 Step 8 2pcs Step 9 4pcs 4pcs 26/36...
- Page 27 Step 10 8pcs Step 11 4pcs 27/36...
- Page 28 Step 12 Step 13 8pcs 28/36...
- Page 29 Step 14 8pcs Step 15 8pcs 29/36...
- Page 30 Step 16 8pcs 8pcs Step 17 4pcs 30/36...
- Page 31 Step 18 G(DL) G(DR) 8pcs 2pcs 2pcs G(DR) G(DL) Step 19 8pcs 31/36...
- Page 32 Step 20 4pcs 4pcs 12 & 13 Step 21 6pcs 2pcs 32/36...
- Page 33 Step 22 4pcs Step 23 Holes for A4 suspension files 2pcs 4pcs Holes for foolscap suspension files 33/36...
- Page 34 Step 24 Step 25 2pcs 4pcs 34/36...
- Page 35 Step 26 4pcs 2pcs Step 27 4pcs 8pcs Place the assembled drawers into the frame by aligning the slide runners of the drawers with the runners on the unit. If the drawer does not slide in smoothly, remove the drawer to ensure the alignment on both sides are correct.
- Page 36 Officeworks Ltd warrants that this product will be free from defects and work as intended for 3 years from the date of purchase by the original customer. If the product has any defects or does not work as intended during the Warranty Period, Officeworks will, at its election and at its expense, repair or replace the product.
Need help?
Do you have a question about the OTSTHOCOBK and is the answer not in the manual?
Questions and answers