
Subscribe to Our Youtube Channel
Related Manuals for SLIDEWHIZZER SW-04


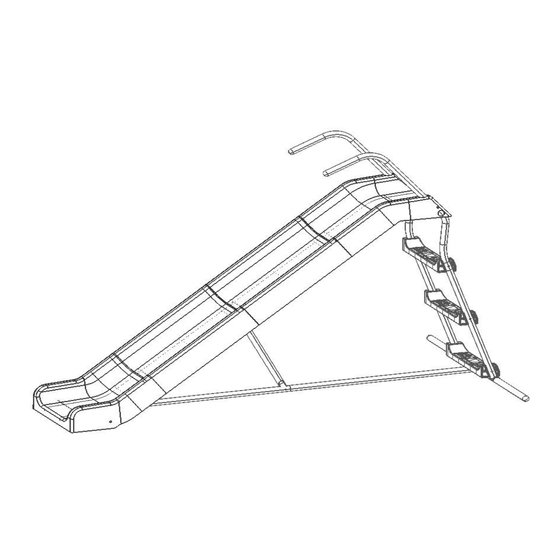
Summary of Contents for SLIDEWHIZZER SW-04
- Page 1 Normal Slide Assembly Instructions Page 1 of 11 SAFETY NOTES To prevent damage and accidents to persons and/or property, please read the following: 1. Thoroughly read all parts of this manual and follow the instructions before using.
-
Page 2: Component List
2. Do not use any accessories other than those provided and /or specified by the manufacturer. 3. This equipment must be assembled and checked by an adult. 4. Retain complete instructions for future reference. 5. Check all nuts and bolts and tighten when required. 6. -
Page 3: Assembly Steps
M6 10mm bolt (x 1) M4 x 14mm (x 6) Handrail tube (x 2) M6 washer (x 7) Plastic cap (x 4) 1/4" x 5/8" (x 6) Spring washer (x 7) M6 square washer (x 6) Domenut (x 7) Spanner (x 1) Middle slide chute (x 2) Tie bar (x 1) Ground anchor (x 2) - Page 4 Middle slide chute (V) 1 - 1. The Top slide chute (J) and the Middle slide chute (V) have tongue-and-groove joint on the edge for the connection. 1 - 2. Turn the Top slide chute (J) and the Middle slide chute (V) to the back side. (Figure 1) 1 - 3.
- Page 5 (Figure 3) 1 - 6. Bolt the edge of Top slide chute (J) and the Middle slide chute (V) by using bolt (M) x 2. (Figure 4) (Figure 4) Page 5 of 11 Step 2 Assembling the Middle slide chute and the Bottom slide chute 2 - 1.
- Page 6 (Figure 3) (Figure 3) 2 - 4. Bolt the edge of the Middle slide chute (V) and the Bottom slide chute (W) by using bolt (M) x 2. (Figure 4) (Figure 4) Page 6 of 11 Step 3 Complete the slide chute assembly 3 -1.
- Page 7 FLAT TABLE NOTE: Please ensure that the slide pieces connect without any gaps. Page 7 of 11 3 -3. Fasten the slide chute of Step 1 and Step 2 by using the steel plate (X) x 1 and bolt (Q) x 2. (Figure 2) (Figure 2) 3 - 4.
- Page 8 5 - 1. Connect the ladder stabilizer bar (I) together 5 - 2. Insert the plastic cap (R) to the both sides of the ladder stabilizer bar (I). 5 - 3. Fasten the bottom handrail tube (L - b) to the ladder stabilizer bar (I) by using bolt (B) x 1 + washer (D) x 1+ spring washer (E) x 1 and domenut (F) x 1.
- Page 9 spring washer (E) x 1 and domenut (F) x 1. (Figure 1) 6 - 2. Connect the tie bar (G) to the ladder stabilizer bar by using bolt (B) x 1 + washer (D) x 1 + spring washer (E) x 1 and domenut (F) x 1. (Figure 2) (Figure 1) (Figure 2) Page 9 of 11...
-
Page 10: Care And Maintenance
6 - 8. Once the equipment has been assembled, make sure that it is placed safely and completely stable, never on carpet (it must be perfectly stable, not least under conditions of maximum load). 6 - 9. Do not install the equipment inside the sauna or any wet area. Because it may cause rusty. - Page 11 Page 11 of 11...
Need help?
Do you have a question about the SW-04 and is the answer not in the manual?
Questions and answers