Table of Contents
Advertisement
Quick Links
Advertisement
Table of Contents

Subscribe to Our Youtube Channel
Related Manuals for Samsung NZ64R1705CK


Summary of Contents for Samsung NZ64R1705CK
- Page 1 Induction Hob User & installation manual NZ64R1705CK/EG...
- Page 2 2 English...
-
Page 3: Table Of Contents
Contents Using this manual The following symbols are used in this User Manual: Safety instructions Important safety precautions Installation Safety instructions for the installer Power connection Cabinet mount Parts and Features (Continued) Cooking zones and control panel What’s included Before you start Initial cleaning Hob Use Maintenance... -
Page 4: Using This Manual
Using this manual Thank you for choosing SAMSUNG Built-In Cooktop. This User Manual contains important information on safety and instructions intended to assist you in the operation and maintenance of your appliance. Please take the time to read this User Manual before using your oven and keep this book for future reference. -
Page 5: Safety Instructions
Safety instructions The safety aspects of this appliance comply with all accepted technical and safety standards. However, as manufacturers we also believe it is our responsibility to familiarize you with the following safety instructions. Important safety precautions WARNING This appliance is not intended for use by persons (including children) with reduced physical, sensory or mental capabilities, or lack of experience and knowledge, unless they have been given supervision or instruction concerning use of the appliance by a person responsible for... - Page 6 Safety instructions since they are not considered to be a reliable fixing means. WARNING: If the surface is cracked, switch off the appliance to avoid the possibility of electric shock. During use the appliance becomes hot. Care should be taken to avoid touching heating elements inside the hob.
- Page 7 appliance in the instructions for use as suitable or hob guards incorporated in the appliance. The use of inappropriate guards can cause accidents. The surfaces are liable to get hot during use. Cleaning and user maintenance shall not be made by children unless they are older than 8 and supervised.
- Page 8 Safety instructions Always ensure that the hotplate and the base of the pan are kept dry. The cooking zones will become hot when you cook. Always keep small children away from the appliance. Keep all packaging materials well out of the reach of children, as packaging materials can be dangerous to children.
- Page 9 Keep pets away from the appliance because pets may step on the controls of the appliance, causing an malfunction. DISPOSING OF ThE PACKAGING MATERIAl WARNING All materials used to package the appliance are fully recyclable. Sheet and hard foam parts are appropriately marked. Please dispose of packaging materials and old appliances with due regard to safety and the environment.
- Page 10 Business users should contact their supplier and check the terms and conditions of the purchase contract. This product and its electronic accessories should not be mixed with other commercial wastes for disposal. For information on Samsung’s environmental commitments and product-specific regulatory obligations, e.g. REACH, WEEE, Batteries, visit : samsung.com/uk/aboutsamsung/samsungelectronics/corporatecitizenship/data_corner.html...
-
Page 11: Installation
Installation installed above the appliance, the safety Warning: This appliance must be distance between cooktop and any installed by an authorised service cupboard/cooker hood should be as person or qualified technician, according shown below. to the instructions in this guide and in compliance with the current local Make sure that the induction hob is well regulations. - Page 12 Installation appliance (stamped on the appliance Rated current of Nominal identification plate) must be checked for appliance (A) cross-sec- correspondence to the available mains tional area supply voltage, and the mains electric (mm 2 ) wiring should be capable of handling the >...
-
Page 13: Cabinet Mount
• The terminal box connection is placed installation kits and can be installed in a on the terminal box. worktop with the appropriate dimensions. The dimensions for hob and oven • The oven and the hob are connected installation are given below. by sockets with each other. - Page 14 Installation Installation dimensions for induction hob Installation dimensions for oven A1(mm) E1 (mm) A2 (mm) E2 (mm) B1 (mm) min. F1 (mm) B2 (mm) min. 560-580 F2 (mm) C1 (mm) min. G1 (mm) C2 (mm) min. G2/J2 555/5 D1 (mm) (mm) D2 (mm) H2 (mm)
- Page 15 The thickness of the worktop, the distances between the hob and the oven must be as shown in the figures for air circulation. min. K (mm) min. M (mm) min. L (mm) Before the Installation of the appliance; • First, Screw the 8 worktop mounting brackets on to the side walls of the appliance.
- Page 16 Installation • Apply the supplied one-sided self-adhesive sealing tape all the way around the lower edge of the cooktop. Do not stretch it. Warning Be careful not to overlap the mounting bracket over the sealing tape. 16 English...
-
Page 17: Parts And Features (Continued)
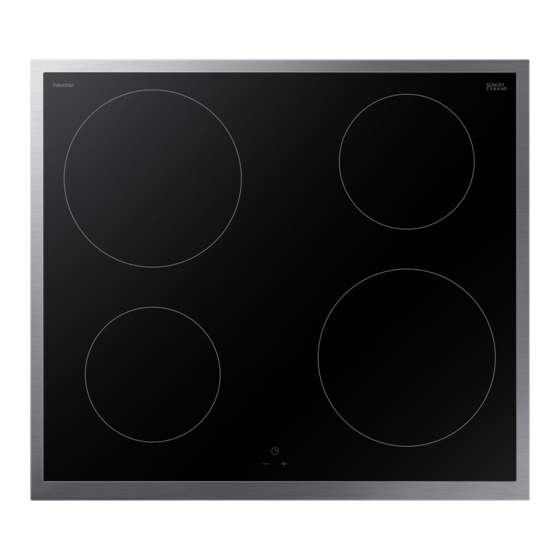
Parts and Features Cooking zones and control panel Cooking zone 1400W / Cooking zone 2100W / 1800W (Boost) 2500W (Boost) Cooking zone 2100 W / Touch Control Unit 2500W(Boost) Cooking zone 1400W / 1800W (Boost) Oven Thermostat Light Timer Hob Cooking Zone Light Oven Hob Control Hob Control... -
Page 18: What's Included
Parts and Features (Continued) What’s included Induction Hob Self-adhesive Mounting Bracket (4+4 ) sealing tape ST3,5 x L9,5 User and Installation Mounting Bracket Manual Screw (8) The key features of your appliance • C eramic glass cooking surface: The appliance has a ceramic glass cooking surface and four rapid - response cooking zones. The hob’s powerful Induction heater elements significantly shorten the amount of time required for the zones to heat up. - Page 19 Residual Heat Indicator After using the hob there will be heat stored in the vitroceramic glass called residual heat. If the residual heat level is greater than +60°C, the residual heat indicator will be active for the cooking zone which is above this temperature. English 19...
-
Page 20: Before You Start
Before you start Initial cleaning Wipe the ceramic glass surface with a damp cloth and ceramic cooktop glass cleaner. Important: Do not use caustic or abrasive cleaners. The surface could be damaged. Hob Use Cookware Induction Zone • Use thick, flat, smooth bottomed good quality cookware made of steel, The induction zone is controlled by a enamelled steel, cast iron or stainless... - Page 21 for setting the cooking level and touch sensors for setting the timer. Each button pressed is followed by a buzzer sound. Switching the Cooking Zones On Use the corresponding knob to set the cooking level from 0 to 9. The element Circular Saucepan Base is now ready to use.
- Page 22 Before you start • Normal button activation will be Heat setting Safety switch off after accompanied with a short sound signal. 6 Hours • Continuous button operation over a 5 Hours longer period of time (10 seconds) 4 Hours will be accompanied with a longer, 1.5 Hours intermittent sound signal.
-
Page 23: Maintenance
Maintenance Cleaning and Care Important: There is a risk of burning yourself when the glass scraper is used Important: Cleaning agents must not on a hot cooking zone: come into contact with a heated ceramic glass surface: All cleaning agents must be 2. - Page 24 Maintenance surface or for storage. • Do not operate a cooking zone if there is no pan on the cooktop or if the pan is empty. • C eramic glass is very tough and resistant to temperature shock, but it is not unbreakable. It can be damaged by a particularly sharp or hard object dropping onto the cooktop.
-
Page 25: Warranty And Service
Warranty and Service If you request a service call because of When do you incur costs even during the an error made in operating the appliance, warranty period? the visit from the customer service tech- • i f you could have remedied the problem nician may incur a charge even during yourself by applying one of the solu- the warranty period. -
Page 26: Troubleshooting & Transport
Do not attempt any further repairs if the following instructions do not help in each specific case. If the problem continues, contact a local Samsung service centre. Warning: Repairs to the appliance are to be performed only by a qualified service technician. - Page 27 Problem Possible Cause Solution Power level 9 or ‘P’ is • automatically reduced. • Operating both zones at If you select power level • Maximum power level power level ‘P’ or 9 would ‘P’ or 9 on two cooking for the two zones is exceed the permitted zones which are on the reached...
-
Page 28: Transport
Communication error between the touch control and heater. Call an authorised service agent. Coil temperature sensor is disabled. Call an authorized service agent. Cooler temperature sensor is disabled. Call an authorized service agent. Large Coil Saturation Error. Switch the hob off by pressing on/off button, switch the hob on by pressing on/off button and continue to use. -
Page 29: Appendix
Appendix Appliance dimensions Width 590 mm Depth 520 mm Height 56 mm Worktop cut - out dimensions Width 560 mm Depth 490 mm Corner radius 3 mm Cooking rings Position Diameter Power Front left 160 mm 1400W/Boost 1800W Rear left 210 mm 2100W/Boost 2500W Rear right... -
Page 30: Product Data Sheet
Product data sheet Supplier’s name Samsung Electronics co. Ltd. Model identification NZ64R1705CK/EG Type of hob Built-In heating technology Induction cooking zones Number of cooking zones and/or areas For cooking zones or area: diameter of useful surface 160mm 210mm area per electric heated cooking zone (Ø) - Page 31 QUESTIONS OR COMMENTS? COUNTRY CAll OR VISIT US ONlINE AT GERMANY 06196 77 555 77 www.samsung.com/de/support...
Need help?
Do you have a question about the NZ64R1705CK and is the answer not in the manual?
Questions and answers