Advertisement
Table of Contents
Back
of Spa
Apply 3M
Adhesive
Locknut
2-1/4" Bu on
Q
Head Socket
Bolt
O
J
Large Pivot
Arm Shim
K
Small Pivot
Arm Shim
Q
Locknut
Figure 3
Covermate VanishXL 190522
Figure 1
B
Cover Moun ng
Bracket - Le
Screw
Washer
Figure 2
Z
P
Rubber
Bumper
Front Pivot
D
Arm
Rear Pivot
Arm
O
2-1/4" Bu on
I
Head Socket
Cover Plate
Bolt
Anchor
2" Bu on
Head Socket
Locknut
G
Ball Stud
P
Moun ng
Washer
Plate
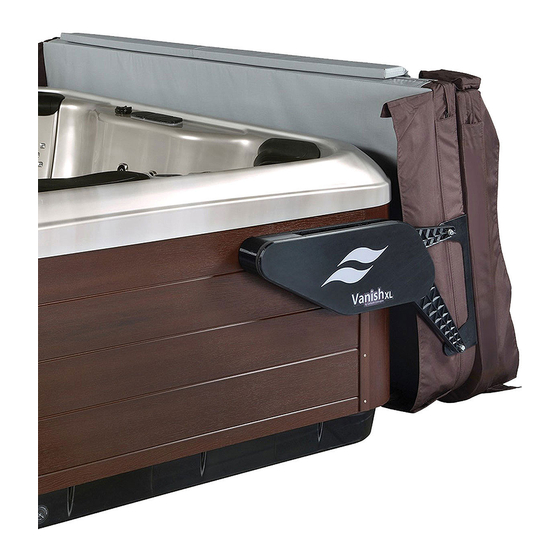
Covermate Vanish XL
Installation Instructions - Updated as of 05/22/19
Step #1
Position the cover (in closed position) on the spa making sure that all four
corners are properly positioned and square on the spa.
Step #2
Attach the cover mounting bracket to the side of the cover, 12 inches from the
back edge of the cover using the supplied 3M glue adhesive. Note: When
standing in front of the spa, the cover mounting bracket-left will be attached to the
left side of the cover. When applying 3M adhesive, make sure to apply it to both
the vertical and horizontal sides of the cover mounting bracket where they come in
contact with the vinyl cover (see Fig. 1).
Step #3
Attach the rubber bumper to the Vanish XL front pivot arms using the
supplied #8 x 1-1/4" self-tapping screw (see Fig. 2).
Step #4
Attach the Vanish XL pivot arms to the Vanish XL base mounting brackets
(see Fig. 2). Note: Make sure to install the large and small pivot arm shims as
shown. Make sure the pivot arms rotate freely, do not overtighted bolts.
Step #5
Attach the Vanish XL pivot arms to the cover mounting bracket attached to
the cover using the supplied 2" button head socket bolts, washers, shims &
locknuts and let the assembly hang freely (see Fig. 3). Note: Make sure to run
the bolts from the inside out. The locknuts need to be facing outwards. Also,
Y
make sure to use the supplied plastic washers as a spacer in between the metal
plate on the pivot arms and the Vanish XL cover mounting bracket. Do not
overtighted bolts, the pivot arms need to rotate freely.
C
Step #6
Swing the Vanish XL bracket assembly up until the front and rear pivot
arms make contact with each other (see Fig. 3). Attach the Vanish XL
bracket assembly to the spa cabinet using the supplied #10 x 1-1/2"
mounting screws.
Step #7
Repeat steps 2, 3, 4, 5 & 6 for the opposite side of the spa.
Step #8
To attach the shocks to the bracket assembly, partially open your vinyl cover
and snap the shocks onto the appropriate ball studs (see Fig. 4). When
Bolt
attaching the shock to the front pivot arm, start with the top ball stud. Over
N
time as your cover begins to get heavier, you may need to remove the shock
and attach it to the bottom ball stud on the front pivot arm. Note: Make
sure the black body of the shock is pointing towards the middle of the spa.
Step #9
Open the vinyl cover so it is in the fully open position. Using the supplied
#10 x 1-1/2" mounting screws, finish attaching the Vanish XL bracket
assembly to the spa.
Step #10
Q
Attach the Vanish XL cover plate to the bracket assembly using the supplied
pancake head self-tapping screws. Next, thread the 3/8 x 3/4" hex cap bolt
through the hole in the cover plate that lines up with the rear pivot arm (see
Fig. 5). Note: Do not overtighten the hex cap bolt.
Page 1
Advertisement
Table of Contents

Related Manuals for Leisure Concepts Covermate Vanish XL


Summary of Contents for Leisure Concepts Covermate Vanish XL
- Page 1 Covermate Vanish XL Installation Instructions - Updated as of 05/22/19 Figure 1 Step #1 Position the cover (in closed position) on the spa making sure that all four corners are properly positioned and square on the spa. Step #2 Attach the cover mounting bracket to the side of the cover, 12 inches from the back edge of the cover using the supplied 3M glue adhesive.
- Page 2 Operation of your Covermate Vanish XL 1) Fold the first half of the cover off the spa. Next, lift up and push the cover back behind the spa. Figure 4 ITEM PART# DESCRIPTION A(L) 101733 VANISH XL BASE BRACKET (L)
Need help?
Do you have a question about the Covermate Vanish XL and is the answer not in the manual?
Questions and answers