Advertisement
Table of Contents
G
K
J
G
Spa Cover
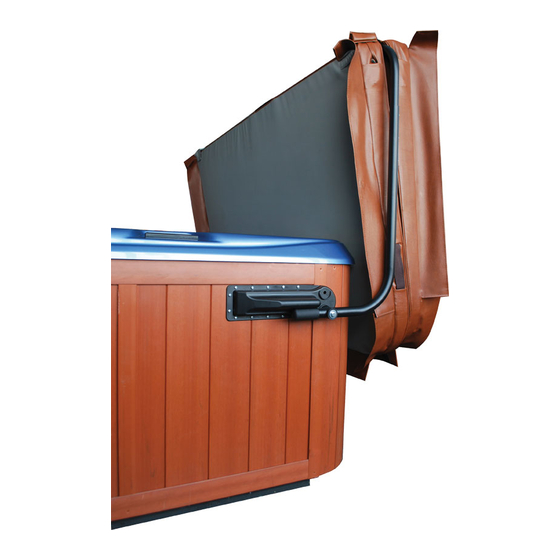
U-shape retainer clip
C
Pivot Arm
Bracket
G
C
K
I
E
E
D
A
Support Arm
A
Support Arm
Installation instructions
Step #1
Position the spa cover (in a closed position) on the spa,
making sure that all four corners are properly positioned
and square on the spa.
Step #2
Determine the mounting height of the mounting brackets
(See Figure 1).
By positioning the brackets to the side of the spa 8" down
from the top of the spa shell, approximately 9" clearance
behind the spa will be needed. Mounted at this position
approximately 75% of the spa cover will be standing above
the spa surface in the open position.
By positioning the brackets 12" down from the top of the
spa shell, approximately 15" clearance behind the spa will be
needed. Mounted at this position approximately 50% of the
spa cover will be standing above the spa surface in the open
position.
Mark the bracket position on the spa, do not
mount the brackets until Step #6.
Step #3
Connect the pivot arms to the mounting brackets (See
Figure 2). The pivot arms should move freely...
do not over-tighten the bolt.
Step #4
Position the support arms on the top of the cover, lying
parallel to the spa cover hinge about ½" away. Insert the
U-shaped retainer clip in between the two cover halves
with the horizontal part touching the underside of the
cover hinge (See Figure 3).
Step #5
Slide the support arms into the pivot arms far enough for
the mounting bracket to be placed in the marked position
from Step #2 (See Figure 4). Do not fasten the support
arms and pivot arms together with self-tapping screws until
Step #7 when you will be making final adjustments.
Step #6
Using the #10 x 1" screws, attach the mounting bracket to
each side of the spa with the pivot arms and support arms
attached to the bracket.
Caution: To prevent splitting of wood cabinet,
pre-drill holes with a 1/16" drill bit.
01DEC08 rev.00
Advertisement
Table of Contents

Related Manuals for Leisure Concepts CoverMate ECO


Summary of Contents for Leisure Concepts CoverMate ECO
- Page 1 Installation instructions Step #1 Position the spa cover (in a closed position) on the spa, making sure that all four corners are properly positioned and square on the spa. Step #2 Determine the mounting height of the mounting brackets (See Figure 1). By positioning the brackets to the side of the spa 8”...
- Page 2 Installation instructions - Page 2 Step #7 Figure 5 Attach the pivot arms to the support arms using the #10 x 5/8 Phillips Pan-Self Tapping Screws (See Figure 5). Support Arm Pivot Arm Bracket You Are Done! Do not use the Covermate in high wind condition (greater than 10 m.p.h). Injury CAUTION! from the spa cover being blown over and impacting the spa user can occur.
Need help?
Do you have a question about the CoverMate ECO and is the answer not in the manual?
Questions and answers