Advertisement
#10 x 1" mounting
M
H
F F
L
B
A
Do not use the Covermate in high wind condition (greater than 10 m.p.h). Injury from the
CAUTION!
spa cover being blown over and impacting the spa user can occur.
O
D
E
K
C
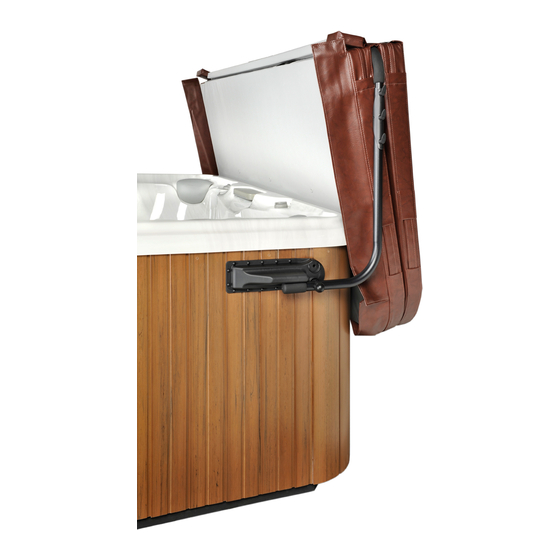
Step #5
Lay the Covermate on the spa cover. Adjust the Coupler Piece and
Support Arms so that the Coupler Piece is laying parallel to the spa
D
cover's hinge about a 1/2" away. (See Fig. 4) Using the #10 self
tapping screws, fasten Support arms to Pivot Arms and the Coupler
Piece.
Note: Be sure to rotate the Coupler Piece so that the inserted
screws are at a horizontal angle with heads facing the back of the
spa.
Step #6
Slip the black hand grips to the edge of the spa cover and snap
black plastic screw head covers on. Push the non-thread plug
I
into the unused bracket (H) hole.
Step #7
Attach the provided 3 hook TowelMate on the preferred side of
your Covermate by simply snapping it into place and inserting
the middle self tapping screw. (See Fig. 5)
You are done!
22AUG08 rev.00
Advertisement
Table of Contents

Related Manuals for Leisure Concepts CoverMate I


Summary of Contents for Leisure Concepts CoverMate I
- Page 1 #10 x 1” mounting Step #5 Lay the Covermate on the spa cover. Adjust the Coupler Piece and Support Arms so that the Coupler Piece is laying parallel to the spa cover’s hinge about a 1/2” away. (See Fig. 4) Using the #10 self tapping screws, fasten Support arms to Pivot Arms and the Coupler Piece.
- Page 2 COVERMATE I PLASTIC BOX CONTENT ITEM Part number Description Quantity 100001 20x40 W/GRIP-PAINTED -1.125" X 04'10"SUPPORT ARM 100002 8" GRIP 100003 1 1/8" x 3'7", COUPLER -PAINTED 100004 1 1/4 x 3'2"; PIVOT ARM ASSEMBLY-PAINTED 100007 PIVOT ARM CAP 1.250" x 3.000" Vinyl black 100344 BUSHING, PLASTIC BLACK .8825 in.
Need help?
Do you have a question about the CoverMate I and is the answer not in the manual?
Questions and answers