Table of Contents
Advertisement
Quick Links
Advertisement
Table of Contents

Related Manuals for Sokkia GCX2


Summary of Contents for Sokkia GCX2
- Page 2 GCX2 GNSS Receiver Operator’s Manual Part Number 1005278-01 Rev A ©Copyright Sokkia March, 2015 All contents in this manual are copyrighted by Sokkia. All rights reserved.
-
Page 3: Table Of Contents
Using Sokkia Software With Your Receiver........ - Page 4 Turning the Receiver ON/OFF........... . 11 Using Internal and External Power Sources .
- Page 5 No Code Differential and/or RTK Solutions Obtained ....... . 28 Receiver Does Not Log Data .
-
Page 6: Preface
• • • • • • Thank you for purchasing this Sokkia product. The materials available in this Manual (the “Manual”) have been prepared by Topcon Positioning Systems, Inc. (“TPS”) for owners of Sokkia products, and are designed to assist owners with the use of the receiver and its use is subject to these terms and conditions (the “Terms and... -
Page 7: License Agreement
Website; Other Statements No statement contained at the TPS and Sokkia websites (or any other website) or in any other advertisements or TPS literature or made by an employee or independent contractor of TPS modifies these Terms and Conditions (including the Software license, warranty and limitation of liability). -
Page 8: Manual Conventions
User supplied text or variable Type guest, and click Enter. Mono Italic Sokkia Reference Manual. Reference to another manual or help document Refer to the Further information to note about system configuration, maintenance, or setup. Supplementary information that can have an adverse affect on system operation, system performance, data integrity, measurements, or personal safety. -
Page 9: Introduction
, which provides the perfect solution for short range job sites that require RTK communication. The GCX2 can be paired with a cellular-enabled data collector to receive corrections from an NTRIP Caster for rover operation. This setup can also be used with MAGNET Relay for a cost effective RTK base solution over long distances. -
Page 10: Gcx2 Features
A highly visible display panel with single-button operation • One USB port for communications and power You can configure the GCX2 receiver in a variety of ways, depending on your project requirements. Typically, the receiver supports the following operation modes. •... -
Page 11: Technical Documents
Relay is a GNSS correction service hosted by the MAGNET Solution. With a subscription to MAGNET Relay, you can connect the GCX2 Cellular receiver to the Relay service (via cellular-enabled data collector) and use it as a Base for up to 10 Rovers. -
Page 12: Getting Acquainted
Locate regulatory and product identification information on the two receiver labels. The product identification label contains the serial number and part number along with a quick response (QR) matrix code. Scan the QR code with any QR code application on a smart phone for product information or visit the Sokkia support website: http://sokkiasupport.com... -
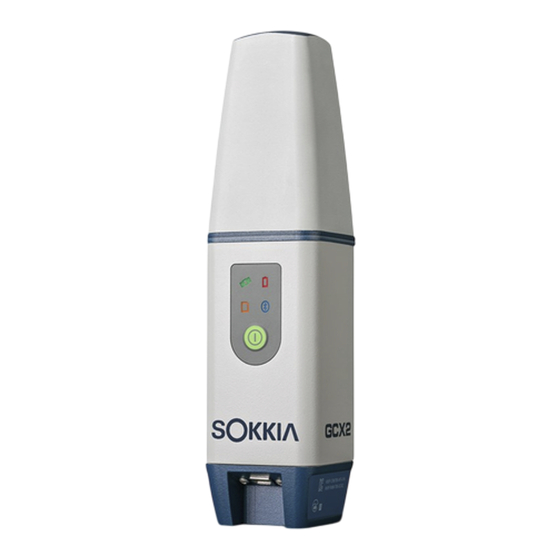
Page 13: Gcx2 Receiver Overview
GCX2 Receiver Overview Figure 3: GCX2 Receiver Overview Cable and Adapters The GCX2 package includes a USB cable for power and data transfer. Table 1 describes the cable and adapters included with your receiver. Table 1. Receiver Cable and Adapters... -
Page 14: Drivers
See “Before You Begin” on page 13. Memory The GCX2 is equipped with an internal, non-removable memory card that provides up to 8 GB of data storage. As data is logged to the receiver’s memory, the REC LED displays the memory capacity status. See “Recording LED”... -
Page 15: Usb Port Panel
Sokkia’s Long-Range Bluetooth technology enables communication of RTCM3 differential corrections between two GCX2 receivers over Bluetooth (up to 300 meters), eliminating the need for additional external radios for corrections. See “System Setup” on page 21. Distance for long-range largely depends upon environmental and field conditions. -
Page 16: Display Panel Operations
Display Panel Operations • • • • • • The LED display panel provides controls for receiver power and data recording. The LEDs display the status of the ® satellite tracking, recording/memory capacity, Long-Range Bluetooth Technology connections, and battery. Status Battery (STAT) (BATT) -
Page 17: Receiver Status Leds
Table 3. Power Button Functions Hardware More than 35-50 Shuts down power of all internal components of the receiver. This Shutdown/Reset seconds function is only recommended when the receiver goes into Exception mode. This operation does not affect internal memory or receiver settings. -
Page 18: Communication Led
Communication LED The Communication LED displays the status of the cellular and Bluetooth activity. The following tables describe the communication activity for three use cases. Bluetooth Status Table 6. Bluetooth LED Patterns Display Description BLUE: Bluetooth is ON. Waiting for a connection. BLUE: Single Bluetooth connection is established. -
Page 19: Managing Power
Managing Power • • • • • • Turning the Receiver ON/OFF To turn on the receiver, press and hold the power button until the LEDs briefly flash. When the receiver is turned ON, the receiver’s channels initialize and begin tracking all visible satellites at any time and location. To turn OFF the receiver, press and hold the power button for more than three and less than 10 seconds (release the power button when the BATT LED blinks solid red). -
Page 20: Charging The Battery
Power Accessories The USB 2.0 port of the GCX2 powers and charges the internal battery. The GCX2 is compatible with standard USB power accessories used with consumer electronic devices. USB power accessories can be sourced locally as long as USB power standards are met.... -
Page 21: Configuring The Receiver
A USB driver is required to connect the GCX2 to a computer. Determine whether your Windows operating systems is 32-bit or 64-bit, and download the appropriate driver from the Sokkia support website: http://sokkiasupport.com. When the GCX2 is connected to a computer for the first time, a driver update will occur on the computer. Viewing Receiver Information In the Sokkia Receiver Utility (SRU), the Receiver Info window displays basic Receiver information, such as hardware and firmware versions, RAM size, receiver ID, serial number, etc. -
Page 22: Loading New Firmware
Upload firmware to the receiver using a Bluetooth or USB connection. To connect the receiver with a computer using a USB connection, you will need to install a USB driver. USB drivers and firmware are available from the Sokkia support website: http://sokkiasupport.com 2. - Page 23 4. Click DeviceConnect. The Connection Parameters window appears. Figure 8: Connection Parameters Window 5. Select USB from the Connect Using drop-down list. Click Connect. 6. The Select Device window appears. Select Receiver in the Device Type field. Click Next. Figure 9: SRU - Select Device P/N: 1005278-01 Loading New Firmware...
- Page 24 7. The Information window appears. Click Next. Figure 10: Firmware Information 8. The Select Files screen appears. Click the Browse icon Image next to the field, and select the Click Next to upload the firmware. receiver board’s main file. Figure 11: Select the Image File P/N: 1005278-01 Loading New Firmware...
- Page 25 9. A confirmation window will appear when the firmware is loaded. Click OK to return to the Connection Parameters window. Figure 12: SRU - Firmware Confirmation 10. Click DeviceConnect. 11. From the Connection Parameters window, select USB Port and the port name, and click Connect. 12.
-
Page 26: Option Authorization Files
The GCX2 receiver ships with standard GPS/GLONASS L1 1 Hz Static OAF option. Upgrade OAFs are available for purchase. Contact your local dealer for more information on available receivers options for the GCX2. The GCX2 receiver is capable of dual frequency static, LongRange, Network RTK, MAGNET Relay operation. - Page 27 3. Navigate to the location of the new OAF. Select the appropriate file and click Open.. Figure 15: Load OAF Sokkia’s SRU initially checks to see if the selected file is compatible with the currently connected receiver. If you chose a file not intended for this receiver, the Upload OAF window displays an error icon next to the Receiver ID and disables the Upload the File to the Receiver button.
-
Page 28: Resetting The Receiving (Clearing The Nvram)
Resetting the receiver will not delete any files already recorded in the receiver’s memory, and the NVRAM keeps information about the receiver file system. Clear NVRAM Using SRU Sokkia Receiver Utility (SRU) Reference 1. Connect the receiver to a computer, and open SRU. See the Manual 2. -
Page 29: System Setup
The GCX2 receiver’s advanced design eliminates the need for cables during operation, enabling for a simplified setup with less parts to keep track of. You can set up the GCX2 receiver in static or RTK configurations in the field and transmit RTK corrections from ®... -
Page 30: Setting Up The Rover Receiver
4. Press the power button to turn the receiver ON. The integrated wireless device in the receiver turns on when the receiver is powered. 5. Connect the receiver to the Bluetooth-enabled data collector that is running Sokkia Field software, to configure the GCX2 as a rover receiver. -
Page 31: Measuring Antenna Height
• measured height (H) of the bottom of the receiver above the station marker (refer figure 21) • model of the receiver (GCX2) used • Any necessary antenna phase center adjustments, based on the antenna model, is automatically applied. This adjustment, when combined with accurately measured height and measurement methods, enables correctly computed reference marker coordinates. -
Page 32: Collecting Data
This chapter provides general information about recording data, downloading it, and removing files to free up internal memory. Set Recording Parameters The Sokkia Receiver Utility (SRU) software enables you to set logging parameters, such as logging rate and types SRU Reference Manual of messages, in which to record data. See the or SRU Help for more information. -
Page 33: File Management
*.tps file extension. You can then transfer a file of collected data to a computer with file managing software, such as the Sokkia Receiver Utility (SRU). This program enables you to use an automatic naming feature, enter file names, and delete files as necessary. -
Page 34: Troubleshooting
“Specifications” on page 32 for external power requirements. • Check the software. Ensure the most current software version is downloaded onto the computer and the most current firmware is loaded into the receiver. For the latest updates, check the Sokkia website: http://sokkiasupport.com •... -
Page 35: Receiver Problems
(L1/L2, GPS/GLONASS must enable or extend validity of the corresponding receiver be on to track satellites). options. Contact a dealer or visit the Sokkia website for details. • For a detailed description of options, see “Receiver Sokkia Receiver Utility (SRU) Managing”... -
Page 36: Too Few Satellites Tracked
• Order a new OAF with the required options activated to disabled or expired. enable or extend validity of the corresponding receiver options. Sokkia Receiver Utility (SRU) Reference • Refer to the Manual for a detailed description of options. There are not enough common satellites. In •... -
Page 37: Receiver Does Not Log Data
The receiver’s memory is disabled or expired. • The receiver’s memory is disabled or expired. • Ensure the memory option is enabled. For details, see Sokkia Receiver Utility (SRU) Reference Manual • The receiver’s internal memory card does not have free space. -
Page 38: No Available Devices Discovered
No Available Devices Discovered Cause Solution The receiver is not receiving power. • Check that the receiver is getting power and is turned • Check that the power cable is correctly attached to the port. • Unplug the cable, then securely and properly reconnect it to the receiver. -
Page 39: Sru Problems
Always ensure the receiver is completely dry before storing it. Dry any moisture with a soft, clean cloth. Getting Customer Support If the troubleshooting hints and tips in this operator’s manual fail to remedy the problem, contact Sokkia Customer Representative. For contact information, see “Getting Technical Support” on page 3. -
Page 40: Specifications
Number of 226 channels with optimized satellite tracking technology Channels NOTE: Includes two dedicated channels for L-Band signal tracking. The GCX2 receiver does not support L-Band signal tracking. Tracked Signals GPS: L1 C/A, L1C, L2P, L2C code and carrier... - Page 41 Table 9. General GCX2 Specifications Data and Memory Removable media None Internal memory Internal up to 2GB Message storage 10 Hz; up to 3,000 files rate (max.) Environment Operating Battery Charging: -0° C to +45° C temperature Battery Operation: -20° C to +63° C (with internal batteries)...
- Page 42 Table 9. General GCX2 Specifications External power 4.5 to 5.5 VDC USB standard, normal ambient conditions input NOTE: 4.5 to 5.5 VDC is the operating range of the external power source when the receiver is on. To turn the receiver on, the power input must be between 4.5 and 5.5 VDC. To charge the internal battery, the external power input must be greater than 4.5 VDC.
-
Page 43: Safety Warnings
Without proper safeguards at the survey site. • Contrary to applicable laws, rules, and regulations. Sokkia receivers should never be used in dangerous environments. Use in rain or snow for a limited period is permitted. Battery Warnings Tampering with the battery by end users or non-factory authorized technicians will void the battery’s warranty. -
Page 44: Regulatory
Regulatory • • • • • • The following sections provide information on this product’s compliance with government regulations for use. FCC Compliance This equipment complies with FCC radiation exposure limits set forth for uncontrolled equipment and meets the FCC radio frequency (RF) Exposure Guidelines in Supplement C to OET65. This equipment has very low levels of RF energy that it deemed to comply without maximum permissive exposure evaluation (MPE). -
Page 45: Community Of Europe Compliance
Community of Europe Compliance The product described in this manual is in compliance with the R&TTE and EMC directives from the European Community. European Community Declaration of Conformity with R&TTE Directive 1999/5/EC The following standards were applied: (R&TTE Directive 1999/5/EEC) •... -
Page 46: Declaration Of Conformity (R&Tte Directive 1999/5/Ec)
Declaration of Conformity (R&TTE Directive 1999/5/EC) esky [Czech] (Sokkia) tímto prohlašuje, že tento (GCX2) je ve shod se základními požadavky a dalšími píslušnými ustanoveními smrnice 1999/5/ES. (Sokkia) (GCX2) Dansk [Danish] Undertegnede erklærer herved, at følgende udstyr overholder de væsentlige krav og øvrige relevante krav i direktiv 1999/5/EF. -
Page 47: Weee Directive
Korean KC-RF Compliance Trade Name or Application Name: Topcon Positioning Systems, Inc. Equipment Name: GNSS Receiver Basic Model Name: GCX2 Ceretificate Number: MSIP-RMM-T8S-126650 Manufacturer/Country of Origin: Topcon Positioning Systems, Inc./U.S.A. Approval Issue Date: 2015-01-05 Korean KC-EMC Class B Statement 이... -
Page 48: Warranty
Sokkia’s Authorized Dealers. During the warranty period, Sokkia will, at its option, repair or replace this product at no additional charge. Repair parts and replacement products will be furnished on an exchange basis and will be either reconditioned or new.
Need help?
Do you have a question about the GCX2 and is the answer not in the manual?
Questions and answers