Table of Contents
Advertisement
Quick Links
Instruction Manual
XE 500 P
XE 501 P
XE 501 PA
XE 600 P
XE 700 P
XE 701 P
XE 720 P
XE 721 P
XE 1020 P
XE 1030 P
with blocstop
™
tirak
Scaffolding Hoist
XE 301 P
with
blocstop
BSO
™
BSO
Griphoist
www.tractel.com
™
tirak
hoists
™
with blocstop
BS/BSO on
2 wire rope
system
Division
®
TE 1020 P
with blocstop
BSO
™
™
1
Advertisement
Chapters
Table of Contents
Troubleshooting

Related Manuals for Tractel Tirak X Series


Summary of Contents for Tractel Tirak X Series
- Page 1 XE 501 P BS/BSO on XE 501 PA 2 wire rope XE 600 P system XE 700 P XE 701 P XE 720 P XE 721 P XE 1020 P XE 1030 P with blocstop ™ Griphoist Division ® www.tractel.com...
-
Page 2: Table Of Contents
TABLE OF CONTENTS 5. OPERATING INSTRUCTIONS INTRODUCTION ................. 5.1 General ..............14 1. GENERAL WARNING ............ 5.2 Normal Operation ........... 15 2. DESCRIPTION 5.3 Emergency Descent ..........16 2.1 Motor and Primary Brake ........6 5.4 BSO Secondary Brake Action ........ 16 2.2 Gear Reducer ............6 6. -
Page 3: Introduction
Specifi cation of “manufacturer” and “supplier” referred to in this manual: “Supplier” defi nition regarding contact advice in this manual: “Manufacturer” defi nition: TRACTEL Inc. Griphoist Division TRACTEL Greifzug GmbH ® TRACTEL Ltd. Griphoist ®... -
Page 4: General Warning
1. GENERAL WARNING READ THIS GENERAL WARNING FIRST IN SUSPENDED SCAFFOLD OPERATIONS, SAFETY IS A MATTER OF LIFE OR DEATH FOR RIGGERS, OPERATORS AND BY-STANDERS. THIS WARNING IS YOUR SHARE OF DUTIES FOR ACHIEVING SAFETY. YOUR DUTY TO UNDERSTAND AND COMPLY 1. - Page 5 15. Training operators and riggers includes setting up 16. Every suspended job must be placed under the rescue procedure should a scaffold be brought to a control of a person having the required competence standstill during a job. Such procedure must be set up and the authority for checking that all the instructions by a competent person of the user, or of its technical prescribed by this manual be regularly and effi...
-
Page 6: Description
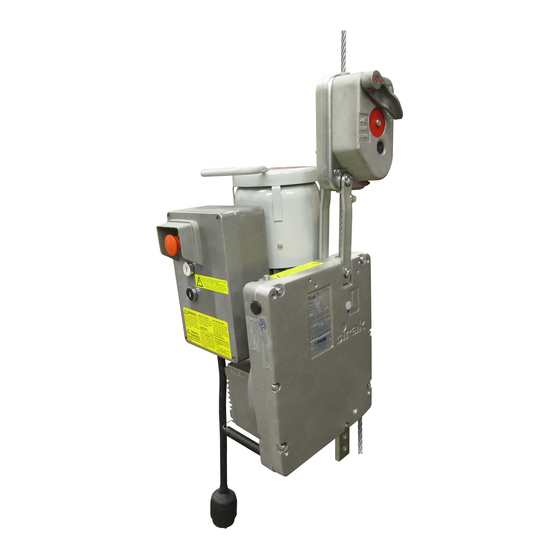
2. DESCRIPTION TE 1020 P Figure 2 with blocstop ™ 2.1 Motor and Primary Brake tirak hoists are driven by a single phase or a ™ three phase motor, totally enclosed fan cooled (TEFC) type with an electromagnetic brake. Pneumatic tirak hoists are available also. -
Page 7: Technical Data
2.7 Technical Data XE 500 P Figure 3 Dimensions XE 501 P XE 501 PA XE 600 P TE 1020 P XE 700 P with blocstop XE 701 P ™ XE 720 P XE 721 P XE 1020 P XE 301 P XE 1030 P with blocstop ™... -
Page 8: Rigging Instructions
3. RIGGING INSTRUCTIONS Fig. 4 Relevant Items (principle sketch) GENERAL Fixing the wire rope to the support equipment 3.1.1 Scope Instructions and advice in this manual exclusively refer Special tirak wire rope to the following items (see Fig. 4): ™ –... -
Page 9: Power Supply And Hoist Control
3.2 Power Supply and Hoist Control 3.2.1 General (1) Check if voltage indicated on the hoist nameplate (2) In some cases, a booster transformer will be needed corresponds to the power supply rating. to compensate for power cord losses or low-source voltage. -
Page 10: Hoist Mounting
3.3 Hoist Mounting Figure 8 Figure 9 3.3.1 tirak X-series ™ Hoist mounting Hoist mounting 90° 90° Bolt the hoist to platform stirrup using stirrup adapter, which also holds the hoist in its upright position (see ™ ™ tirak tirak X-series T-series Figs. -
Page 11: Wire Rope Specifi Cation
4. Wire Rope Wire rope specifi cation Use only wire ropes specifi ed by the manufacturer: (1) Classifi cation/Construction: CAUTION: 5x19, 4x26, or 5x26, with fi ber core, or 6x19, Correct wire rope diameter is very im- (min. 17 wires/strand), galvanized or black, portant for the tirak function! ™... - Page 12 Wire rope rigging instructions (continued) (2) If the wire rope is not equipped with a swaged fi tting as shown in Fig. 15, proceed as follows: Figure 15 Figure 16 Wire Rope Termination Wire Rope Termination – Install heavy duty thimble with a minimum of three by Swaged Fitting by Fist Grip Clamps (3) J-Type (Fist Grip) Clamps (Fig.
-
Page 13: Wire Rope Reeving
Wire rope reeving Figure 19 Opening of BSO Secondary Brake (1) Open the BSO secondary brake by pushing down the control lever (d1) until it locks (Fig. 19). (d1) Closed (2) Push the rope through the BSO secondary brake at (A) into the hoist rope inlet (B). -
Page 14: Rigging
De-Rigging Figure 22 Wire Rope Handling (1) Before de-rigging each tirak hoist must be ™ unloaded by bringing down the platform to a safe and stable support. (2) Remove the loop at the free wire rope end. (3) Press DOWN button to let the wire rope run out. (4) With gloved hands slowly pull the wire rope through BSO secondary brake. -
Page 15: Normal Operation
d) Ceck EMERGENCY STOP button and pushbut-ton control (Fig. 25) i) Check that the UP and DOWN pushbuttons return to their normal open position when released. They should move freely without sticking. ii) Push the red EMERGENCY STOP button. It should lock and remain depressed. Now try pushing the UP or DOWN pushbut- ton –... -
Page 16: Emergency Descent
Emergency Descent Figure 26 Brake Release In case of emergency you can descend with the platform without power proceeding as follows: (1) Take the brake release lever (A) from the carrying handle, and insert it through the motor fan cover hole into the brake release bow. -
Page 17: Trouble Shooting
ELECTRICIANS! 3. Any other repair should only be carried out by Wiring diagrams are found in the control the supplier (TRACTEL Group Company) or box of the motor. by a qualifi ed person, and only original spare parts shall be used. -
Page 18: Bso Secondary Brake
Dirty, corroded, or worn parts. Check operation through the sightglass. Do not use turn or do not turn smoothly if operating improperly. Return unit to TRACTEL. during operation. If you cannot fi nd a trouble’s cause, contact the supplier. 7. INSPECTIONS and MAINTENANCE... -
Page 19: Monthly Inspections
II Lift platform 3 ft. (1 m) above ground or safe Figure 29 surface, and push EMERGENCY STOP but- ton (d2) of the BSO secondary brake (Fig. BSO Secondary Brake 29). Lower the platform to check that Check II + III (d1) CLOSED the BSO secondary brake holds the load. -
Page 20: Maintenance
Authorized tirak ™ hoists and blocstop™ BSO secondary brake shall Repair Center. be returned to an Authorized Tractel Repair Center for A signed and dated inspection record should periodic maintenance after every job and at least after be maintained for each tirak™... -
Page 21: Bs/Bso
tirak ™ Scaffolding Hoist Additional Instruction Manual XE 501 P for tirak hoists with ™ XE 501 PA XE 500 P 2 wire rope systems XE 701 P XE 700 P with blocstop ™ BS/BSO XE 301 P with blocstop ™... -
Page 22: A2. Description A2.1 Two Wire Rope System
TABLE OF CONTENTS ADDITIONAL INSTRUCTIONS A5. OPERATING INSTRUCTIONS A2. DESCRIPTION A5.1 General ..............29 A2.1 Two wire rope System ..........22 A5.3 Emergency Descent ..........30 A2.2 Secondary Brake ..........22 A2.3 Wire Ropes ............23 A5.4 Secondary Brake Action ..........31 A2.7 Technical Data .............24 A6. -
Page 23: A2.3 Wire Ropes
A2.3 Wire Ropes only this special tirak wire rope may be used. CAUTION: ™ It is mandatory that both the PRIMARY NOTE: The manufacturer declines all responsibility AND THE SECONDARY WIRE ROPE for machines used with a wire rope other than MEET THE MANUFACTURERS specifi... -
Page 24: A2.7 Technical Data
A2.7 Technical Data Figure 34 Dimensions XE 501 P XE 501 PA XE 500 P XE 701 P XE 301 P XE 700 P with with blocstop ™ blocstop ™ BS/BSO 500 BS/BSO 500 Hoist Model XE 301 P XE 501 P XE 501 PA XE 500 P XE 701 P XE 700 P Rated load... -
Page 25: A3. Rigging Instructions
A3. RIGGING INSTRUCTIONS Fig. 35 Relevant Items (principle sketch) Fixing the A3.1 GENERAL wire rope to the support equipment A3.1.1 Scope TIE-BACK Instructions and advice of this part of the manual PRIMARY for secondary exclusively refer to the following items (see Fig. 35): tirak wire rope ™... -
Page 26: A4. Wire Rope
A4. Wire Rope 4.1 Wire rope specifi cation (see pages 7 and 11) A4.2 Wire rope rigging instructions Figure 37 Checking Wire Rope Diameter “d” CAUTION: Be sure to use wire rope according to specifi cation (see pages 7, 11), with the diameter (d) (Fig. -
Page 27: A4.3 Wire Rope Reeving
Be sure to use compatible connecting devices, e. Fig. 41 Wire Rope Anchoring Fig. 42 (principle drawg.) g. a 1/2 in. anchor shackle or similar with adequate strength and safety factor. Secure it. Anchoring Installation Distance (a) between the wire ropes: device level approx 1... - Page 28 A4.3.2 Secondary wire rope (S) Figure 46 Secondary Wire Rope Reeving (1) BS/BSO secondary brake should be opened by the primary wire rope under load. Otherwise push and hold release lever (e3) in its vertical position (Fig. 45). ™ tirak X-series Fig.
-
Page 29: A4.4 De-Rigging
A4.4 De-Rigging 4.4.1 Secondary wire rope A4.4.3 Wire Rope Storage (1) Lower the platform until it almost reaches its safe and Clean the wire ropes, reel them (Fig. 48), and store them stable support. Leave the primary wire rope tensioned in a clean and dry place. -
Page 30: A5.3 Emergency Descent
c) CHECK BS/BSO SECONDARY BRAKE: (continued) Figure 50 BS/BSO Secondary II At ground level fi rst close the BSO second- Brake ary brake by pushing EMERGENCY STOP (e3) Check II button (e2). Then push Control lever in DOWN-position and make the wire rope (e1) Closed form a loop between tirak ™... -
Page 31: A5.4 Secondary Brake Action
– With the brake opened (see above) turn the hand If during emergency descent the BS/BSO secondary wheel clockwise (T-series) resp. counter-clockwise brake has been activated, it could be because: (X-series) until the hoist supports the load. CASE (A): The BSO overspeed device has locked on –... -
Page 32: A6. Trouble Shooting
1. Checks and repair of the elec- 3. Any other repair should only be carried out tric equipment must only be carried out by the supplier (TRACTEL Group Company) or by QUALIFIED ELECTRICIANS! by a qualifi ed person, and only original spare Wiring diagrams are shown in the control box parts shall be used. -
Page 33: A7.1 Inspections
A7.1 Inspections Figure 54 A7.1.1 DAILY INSPECTIONS BS/BSO Secondary Brake EACH DAY PRIOR TO USE AND DURING OPERATION Check I CHECK: Slack primary wire rope Secondary (1) Primary brake function: wire rope “click” noise, when starting/stopping the hoist. (e3) (2) blocstop BS/BSO secondary brake function. I At ground level or on a safe surface push DOWN button to get slack in the primary wire rope: release lever (e3) tilts to the side to close... -
Page 34: A7.2 Maintenance
8. NAMEPLATES & LABELS 7.1.2 MONTHLY INSPECTIONS Nameplates 7.1.3 Inspection, Maintenance & Testing 1 tirak nameplate ™ (see page 19) 2 Motor nameplate A7.2 Maintenance 3 Primary brake nameplate A7.2.1 tirak Hoist 4 blocstop ™ Secondary brake nameplate ™ (1) Daily check the primary and BS/BSO secondary 8.2 Labels brake. - Page 35 Code 105850 TRACTEL GREIFZUG GmbH Bergisch Gladbach Type E-Mot. Code 105970 Code 108140 Schalt. Schutzart IP 55 Is.Kl. Code 16206 TRACTEL GREIFZUG GmbH Bergisch Gladbach Bremstyp Leistung Spulenspannung Moment Code 16706 If the motor energizes but the wire rope...
- Page 36 SET-UP INSTRUCTIONS: Anchor E M E R G E N C Y D E - WARNING: the hoist, and connect to electric SCENT: Take brake release supply. Red button must be out to lever out of tirak ™ handle, and Only authorized, properly start the motor.
- Page 37 9. WARRANTY INFORMATION (1) TRACTEL INC. warrants its equipment to be free whom the unit was purchased. The distributor will from defects in material and workmanship under make arrangements with the factory for repairs or normal use and service. replacement of parts within the terms of this war- ranty.
- Page 38 GIVE TO SCAFFOLD ERECTOR & USER OR POST ON JOB CODE OF SAFE PRACTICES FOR SUSPENDED POWERED SCAFFOLDS It shall be the responsibility of all employers and users to read and comply with the following common sense guidelines, which are designed to promote safety in the erection and use of suspended powered scaffolds. These guidelines do not purport to be all-inclusive nor to supplant or replace other additional safety and precautionary measures to cover usual or unusual conditions.
- Page 39 6. SUSPEND LIFELINES FREELY without contact with B. WIRE ROPE AND HARDWARE: structural members or building facade. 1. USE ONLY WIRE ROPE AND ATTACHMENTS as 7. USE LIFELINES OF SIZE AND CONSTRUCTION that specifi ed by the hoisting machine manufacturer. are compatible with the rope grab used.
- Page 40 Personal fall arrest systems GRIPHOIST manual hoists SCAFOR manual hoist … on request! G430-7_BA_XE_BSBSO_US.indd 105160 Printed in Germany © TRACTEL Inc. 02/2016 Tractel Inc. Tractel Inc. ® ® Griphoist Division Griphoist Division 51 Morgan Dr. 315 Cloverleaf Dr., Unit E NORWOOD, MA.
Need help?
Do you have a question about the Tirak X Series and is the answer not in the manual?
Questions and answers