Table of Contents
Advertisement
Available languages
Available languages
Advertisement
Chapters
Table of Contents

Summary of Contents for BioEnergiser circulation maxx reviver
- Page 1 Handleiding...
- Page 3 Q UI CK START G UID E PLEASE NOTE ‒ THIS DEVICE DOES NOT VIBRATE ‒ IT USES ELECTRICAL IMPULSES, NOT VIBRATION! For detailed operation of your Circulation Reviver please refer to the comprehensive instructions within this manual. To use Circulation Reviver immediately, follow this 5-point quick start guide. Remove your Circulation Reviver from the packaging. Take out the Remote Control and remove the screw from the back battery enclosure. Insert 2 x AAA batteries into the compartment as per indication. Then screw up the battery enclosure. Connect the DC adapter to a suitable mains outlet and plug the small DC socket into the device. Turn on the power the central display will light up orange. Remove your footwear and socks or stockings. Sit in a comfortable chair. Both bare feet need to be on the device for it to work. Your left foot on the left foot plate, and your right foot on the right foot plate. Increase the intensity levels for the foot by pressing the “SOLE+” or press “SOLE ‒ “ to decrease the intensity. The intensity level ranges from 0-99, slowly increase the level until you begin to feel the micro-current stimulation. For more information about BioEngergiser Products visit our website at: www.globalproductcom...
-
Page 4: Table Of Contents
CO NTENTS Important Safety information Machine Overview and Parts Names Functions of Control Panel How to Operate 6 - 7 Troubleshooting Technical Specifications For more information about BioEngergiser Products visit our website at: www.globalproductcom... -
Page 5: Important Safety Information
SA FETY I NF O RMA TI O N - P LEA SE REA D Danger Do not use this unit near the heart, above the neck, on the head, around the mouth or on diseased skin. This unit must not be used in combination with the following medical devices: May cause an accident or ill health. -
Page 6: Machine Overview And Parts Names
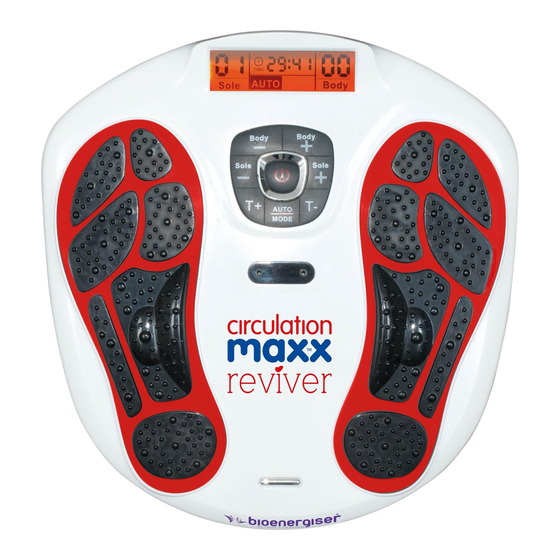
MA CHINE OV ERV IEW AND PART NAMES Main Unit AC Power Adapter Remote Control Electrode Gel Pad x 4 pcs. Wire cable connecting the Electrode Gel pads and device Plastic Protector for Gel Pads LCD Display Screen TOP V IEW Control Panel Output for the feet Electrode Area for Left Foot Output for the feet Electrode Area for Right Foot Cable Connecting the Electrode Gel Pads and Device Jack A Cable Connecting the Electrode Gel Pads and Device Jack B Remote Control Receiver Sensor Silver colour decoration plate Adaptor Jack SIDE V IEW For more information about BioEngergiser Products visit our website at: www.globalproductcom... -
Page 7: Functions Of Control Panel
FUNC TI ON O F CONTROL P ANEL LCD showing the LCD showing the intensity level for body intensity level for Sole maximum 99 levels maximum 99 levels LCD showing the timer LCD showing the program in AUTO or in MODE. ON/OFF switch button Decrease the output intensity of BODY ‒ body (Available from 1 - 99 levels) Increase the output intensity of BODY + body (Available from 1 - 99 levels) Decrease the output intensity of SOLE - Sole (Available from 1 - 99 levels) Increase the output intensity of s SOLE + ole (Available from 1 - 99 levels) Decrease the operation time TIME - (available from 1-60 minutes) Increase the operation time TIME + (available from 1-60 minutes) Auto - is the preset program with 14 pattern in cycle running for Foot AUTO/MODE and 10 pattern in cycle running for body Mode - user can fix the program to the exiting massage pattern on the rest of the time Electrode area of the unit and the gel pad On the device the black ... -
Page 8: How To Operate
H OW TO OP ERATE For Foot ‒ SOLE Tips: In order to increase the conduction, apply Circulation Reviver Foot gel on your sole. 1. Place your bare feet onto Circulation Reviver (do not wear socks). Fig. 1 2. Press the on/off button, the LCD screen will light up in Orange. And the program show AUTO and both Band shown in 00, which is in standby mode. (see Fig. 1) 3. Gently increase intensity setting by pushing the button of “ SOLE +”. Or decrease intensity setting by pushing the button of “ SOLE -”. The intensity level is adjustable between 0 and 99. The LCD display will show the selected level. (see Fig. 2) Fig. 2 4. You can adjust the auto off timer by pressing the “Time ‒“ or “ Time +”. Timer range from 1-60 minutes. To terminate the massage period, user can turn off the unit anytime by pressing the on/off Button once. And the timer start to count down from your time setting (see Fig.3) 5. If you satisfaction on the current massage program then you can lock the current massage programme by press the Auto/Mode key, then the rest of the massage time will only run the selected massage program. (see. Fig. 4) Fig. 3 Important Information: A. The aim is not to get up to ʻ99ʼ. B. Chose an intensity level that is comfortable for you! This level may vary from day to day. C. Remember to drink plenty of fluids ‒ if you are dehydrated, this will reduce the effectiveness of the device. D. If you have dry feet ‒ moisturise them or apply Circulation Reviver Foot Gel for maximum health benefits. FIG. 4 For more information about BioEngergiser Products visit our website at: www.globalproductcom... - Page 9 (see Fig. 5) 2. Connect pin of the cable to the gel pad properly. (see Fig.6) Fig.5 Fig. 6 3. Remove the protective film on the gel pad, and attached the 4 gel pads to the area of the body you wish to treat. 4. Repeat operation as in foot instructions, adjust the intensity using for body .you wish to treat. 5. Gently increase intensity setting by pushing the button of “Body + ”. Or decrease intensity setting by pushing the button of “Body - ”. The LCD will also show the level which you have selected (see Fig. 7). Fig. 7 6. To terminate the massage period, user can turn off the unit anytime by pressing the on/off Button. Care Of Your Gel Pads Never stick two adhesive pads to each other. Keep the adhesive gel pads clean, never expose them to high temperature or direct sunshine. If the electrode gel pads are insufficiently adhesive or dirty, wipe with a wet cloth or change for new ones, replacement parts will be available directly from BioEnergiser or your distributor. Do not clean the electrode gel pads with any chemical. ALWAYS try and protect the gel pads. Store the gel pads on the gel pad protector when not in use, as in the illustration. For more information about BioEngergiser Products visit our website at: www.globalproductcom...
-
Page 10: Troubleshooting
TROU BLESHOOTING Troubleshooting & Maintenance Problem Cause Rectification Batteries inserted in wrong direction. Insert batteries in correct direction or check the Device will not The adapter is not plug well into device battery is in full power. turn on. properly. check the connection of the adapter jack is in well connected. And also the DC adapter with well connecting to the main socket. Power turns Gel pads not attached correctly to the skin. Attach Gel pads correctly to the skin. off too soon Power turns off if you are using the batteries operation, then Fit 4 new identical 1.5V alkaline batteries type AA. while using the batteries weak/exhausted. massager Restart treatment or turn off the massager. Treatment period of 30 minutes is over and power turns off automatically. if you are using the body massage, the Replace electrode gel pad electrode gel pad may be broken Peel off film on the adhesive surface of Gel pad It is difficult to Transparent film not peeled off attach Gel pad Gel pad applied immediately after washing Sufficiently dry Gel pad to the skin Adhesive surface of Gel pad damaged. Replace Gel pad The gel pads get dirty and lost their ... -
Page 11: Technical Specifications
TECHNI CAL SPECIFICA TIONS Product Name Circulation Reviver Model BE130 Power Supply 6V DC or 4x1.5V batteries type AA* for the main unit 2x1.5V batteries type AAA* for the remote control Supplier of Adaptor Golden Profit Electronics Ltd. Model no. of Adapter GPE038-060050-3 Adaptor Input AC 100-240V~50-60Hz 0.1A Adapter Output DC 6V 500mA 3.0W Battery life >350 minutes Frequency Generation Approx. 10 Hz to 55.56 Hz Power Consumption 1.05 W Maximum Output Voltage U <54.8V (during 1 kΩ load) Maximum Output Current I < 910 μA (during 1 kΩ load) Operating Temperature And Humidity -5°C to 50°C, 30%to 90% RH Storage Temperature And Humidity -10°C to 60°C, 10% to 95% RH Main Unit Dimensions 338(L) x 324 (W) x 48(H) mm... - Page 13 SNELG I D S LET OP ‒ DIT APPARAAT TRILT NIET ‒ HET MAAKT GEBRUIK VAN ELEKTRISCHE IMPULSEN, NIET VAN TRILLINGEN! Voor een gedetailleerde werking van uw Circulation Maxx Reviver kunt u de uitgebreide instructies in deze handleiding raadplegen. Wilt u Circulation Maxx Reviver meteen gebruiken, volg dan onderstaande 5 punten uit de snelgids. Haal uw Circulation Maxx Reviver uit de verpakking. Neem de afstandsbediening en verwijder de schroef uit de batterijklep m.b.v. een schroevendraaier. Plaats dan 2 x AAA batterijen in de batterijhouder zoals aangegeven. Schroef vervolgens de batterijklep weer dicht. Sluit de gelijkstroomadapter aan op een geschikt stopcontact en steek de kleine gelijkstroomaansluiting in het apparaat. Schakel het apparaat in. Het centrale beeldscherm zal oranje oplichten. Doe uw schoeisel en sokken of kousen uit en ga in een comfortabele stoel zitten. Plaats uw blote voeten op de voetenpads, uw rechtervoet op de rechtervoetzool en uw linkervoet op de linkervoetzool. Beide voeten moeten op het apparaat staan om het apparaat te laten werken. Verhoog de intensiteitsniveaus voor de voeten door op “SOLE+” te drukken of druk op “SOLE ‒ “ om de intensiteit te verlagen. De intensisteit varieert van 0-99, verhoog het niveau langzaam totdat u de microstroomstimulatie voelt. Voor meer informatie over BioEnergiser Products kijk op onze website : www.globalproduct.com...
- Page 14 INHOUD Belangrijke veiligheidsinformatie Machine overzicht en namen van onderdelen Functies van bedieningspaneel Werking 16 - 17 Oplossen van problemen Technische specificaties Voor meer informatie over BioEnergiser Products kijk op onze website : www.globalproduct.com...
-
Page 15: Belangrijke Veiligheidsinformatie
Dit kan een elektrische schok of een • Hoge koorts accident. • Abnormale bloeddruk Demonteer of verbouw dit apparaat niet. Er zijn • Huidzenuwstoornissen of huidproblemen geen onderdelen die door de gebruiker gerepareerd kunnen worden. • Personen die medische behandeling ontvangen, vooral diegenen die ongemak voelen. Kan een ongeval of Pas op slechte gezondheid veroorzaken. Als het apparaat niet goed functioneert of als u ongemak voelt, stop dan onmiddellijk met gebruik. Als u problemen voelt met uw lichaam of huid, raadpleeg dan een arts en volg zijn/haar instructies op. Als u de elektrodepad naar een andere plek op uw lichaam wilt verplaatsen tijdens de behandeling schakel dan eerst de stroom uit. Als u dit niet doet, kunt u een sterke elektronische schok krijgen. Probeer de pads niet aan een ander persoon te U kunt dan een verbinden tijdens de behandeling. sterke elektronische schok krijgen. Begin niet met de behandeling terwijl u een elektronisch apparaat draagt. De instellingen en tijdsinstellingen van het apparaat kunnen worden beïnvloed. Voor meer informatie over BioEnergiser Products kijk op onze website : www.globalproduct.com... -
Page 16: Machine Overzicht En Namen Van Onderdelen
OV ERZ ICHT V A N D E MACHINE EN NAMEN V AN D E OND ERD ELEN Hoofdapparaat Wisselstroomvoedingsadapter Afstandsbediening Elektrodegelpad x 4 stuks Draadkabel die de elektrodegelpads en het apparaat aan elkaar verbindt Plastic beschermer voor gelpads Lcd scherm B OV ENAANZI C HT Bedieningspaneel Elektrodegebied voor linkervoet Elektrodegebied voor rechtervoet Kabel die de elektrodengelpads en het apparaat aan elkaar verbindt Kabel die de elektrodengelpads en het apparaat aan elkaar verbindt Ontvangstsensor van afstandsbediening Zilveren decoratieplaatje Adapteraansluiting ZIJ AANZICH T Voor meer informatie over BioEnergiser Products kijk op onze website : www.globalproduct.com... -
Page 17: Functies Van Bedieningspaneel
Verlaag de uitgangsintensiteit van de SOLE - zool (1 - 99 niveaus beschikbaar) Verhoog de uitgangsintensiteit van de SOLE + zool (1 - 99 niveaus beschikbaar) Verlaag de gebruikstijd TIME - (1 - 60 minuten beschikbaar) Verhoog de gebruikstijd TIME + (1 - 60 minuten beschikbaar) Auto - het vooraf ingestelde programma met 14 patronen die in een cyclus lopen AUTO/MODE voor de voet en 10 patronen die in een cyclus lopen voor het lichaam. Modus - de gebruiker kan het programma en het massagepatroon aan het einde vaststellen in de rest van de tijd. Elektrodegebied van het apparaat en de gelpad Op het apparaat is het Op het gelpad is het zwarte gebied op het zwarte gebied op het apparaat het kleverige gedeelte het elektrodegebied voor de elektrodegebied voor zool. (zie afb. A). het lichaam, de grootte is 5 cm x 0 cm (zie afb. B). FIG. A FIG. B Voor meer informatie over BioEnergiser Products kijk op onze website : www.globalproduct.com... -
Page 18: Werking 16
1. Plaats uw blote voeten op de Circulation Maxx Reviver (draag geen sokken). Fig. 1 2. Druk op de aan/uit-knop. Het Lcd-scherm zal oranje oplichten. En het programma toont AUTO en de beide banden tonen 00. Het apparaat bevindt zich in de stand-by modus (zie afb. 1). 3. Verhoog langzaam de intensiteitsinstellingen door op de knop “SOLE +” te drukken. Of verlaag de intensiteitsinstellingen door op de knop “SOLE -” te drukken. Het intensiteitsniveau is instelbaar tussen 0 en 99. Het Lcd-scherm geeft het geselecteerde niveau aan. (zie afb. 2). Fig. 2 4. U kunt de automatische uitschakeltimer aanpassen door op “Time ‒“ of “Time +” te drukken. Het tijdbereik loopt van 1-60 minuten. De timer begint af te tellen vanaf de tijdsinstelling die u selecteert (zie afb. 3). Om de massageperiode te beëindigen kan de gebruiker het apparaat op elk moment uitschakelen door eenmaal op de aan/uit-knop te drukken. 5. Als u tevreden bent met het huidige massageprogramma kunt u het huidige massageprogramma vergrendelen door op de knop Auto/Modus te drukken. De rest van de massage zal dan alleen het geselecteerde massageprogramma worden afgespeeld (zie afb. 4). Fig. 3 Belangrijke informatie: A. Het doel is niet om tot ʻ99ʼ te komen. B. Kies een intensiteitsniveau dat voor u comfortabel is! Dit niveau kan van dag tot dag variëren. C. Denk eraan voldoende vocht te drinken ‒ als u gedehydrateerd bent, zal dit de effectiviteit van het apparaat verminderen. D. Als u droge voeten heeft ‒ bevochtig ze of breng Circulation Maxx Reviver voetgel aan voor maximale gezondheidsvoordelen. Fig. 4 Voor meer informatie over BioEnergiser Products kijk op onze website : www.globalproduct.com... - Page 19 1. Sluit de twee kabels aan op de kabelaansluiting van het apparaat. (zie Fig. 5) 2. Sluit de pen van de kabel op de juiste manier aan op. de gelpad (zie Fig. 6) Fig. 5 Fig. 6 3. Verwijder de beschermfolie van de gelpad en bevestig de vier gelpads op het gebied van uw lichaam dat u wilt behandelen. 4. Herhaal de handeling van de voetinstructies, pas de intensiteit aan voor het lichaam. 5. Verhoog langzaam de intensiteitsinstellingen door op de knop “Body + ” te drukken. Of verlaag de intensiteitsinstellingen door op de knop “Body - ” te drukken. Het Lcd-scherm geeft tevens het Fig. 7 geselecteerde niveau aan. (zie Fig. 7). 6. Om de massageperiode te beëindigen kan de gebruiker het apparaat op elk moment uitschakelen door op de aan/uit-knop te drukken. Als u alleen de 2 gelpads wilt gebruiken, moet u 1 gelpad aansluiten op uitgang A en 1 op uitgang B. Verzorging van uw gelpads Plak nooit 2 zelfklevende pads op elkaar. Houd de zelfklevende gelpads schoon en stel ze nooit bloot aan hoge temperaturen of direct zonlicht. Als de elektrodegelpads onvoldoende kleven of vies zijn, veeg ze dan af met een vochtige doek of verwissel ze voor een nieuwe. Vervangende onderdelen zijn direct verkrijgbaar bij uw ditributeur. Reinig de elektrodegelpads niet met een chemische stof. Probeer de gelpads ALTIJD te beschermen. Bewaar de gelpads op hun beschermer wanneer ze niet in gebruik zijn, zoals op de illustratie wordt getoond. Voor meer informatie over BioEnergiser Products kijk op onze website : www.globalproduct.com...
-
Page 20: Oplossen Van Problemen
Zorg ervoor dat beide voetzolen op de juiste manier op elk pedaal zijn geplaatst. De gelpads zijn niet goed op de huid bevestigd Bevestig de gelpads stevig op de huid. De gelpads overlappen elkaar. Plaats de pads zonder dat ze elkaar overlappen. De elektrodekabel is niet juist aangesloten. Sluit de elektrodekabel op de juiste manier aan. De toegepaste intensiteit is te zwak. Verhoog de intensiteit door op de + knop te drukken. De huid wordt Het zelfklevende oppervlak van de gelpads is Was het zelfklevende oppervlak zacht met uw vuil of droog. vingertoppen gedurende ongeveer drie seconden rood of voelt geïrriteerd aan. onder langzaam stromend water. Het zelfklevende oppervlak van de gelpads is Vervang gelpads beschadigd. Hygiëne Na gebruik van het product Reinig het apparaat met een zachte, vochtige doek, maar zorg ervoor dat u de doek goed uitknijpt voordat u het gebied rond de voetpedalen reinigt. Bewaar de elektrodegelpads in de bijgeleverde plastic padbeschermers. Opslag Houd de hele productset schoon en sla de op in een stofvrije en droge locatie met de volgende voorwaarden Opslagtemperatuur en vochtigheid -10°C tot 60°C, 10% tot 95% RV Bedrijfstemperatuur en vochtigheid -5°C tot 50°C, 30% tot 90% RV Voor meer informatie over BioEnergiser Products kijk op onze website : www.globalproduct.com... -
Page 21: Technische Specificaties
Levensduur van de batterij >350 minuten Frequentiegeneratie Ca. 10 Hz tot 55.56 Hz Stroomverbruik 1,05 W Maximaal uitgangsvoltage U <54.8V (tijdens 1 kΩ belasting) Maximale uitgangsstroom I < 910 μA (tijdens 1 kΩ belasting) -5°C tot 50°C, 30% tot 90% RH Bedrijfstemperatuur en vochtigheid -10°C tot 60°C, 10% tot 95% RH Opslagtemperatuur en vochtigheid Afmetingen van het hoofdapparaat 338(L) x 324 (W) x 48(H) mm Gewicht ca. 950 g Inhoud van de verpakking Aantal Onderdelen Circulation Maxx Reviver Wisselstroom-/gelijkstroomadapter Afstandsbediening Kabeldraad voor elektrodegelpads Elektrodegelpads Plastic gelpadbeschermer Gebruiksaanwijzing Accessoires : Gebruik alleen de originele accessoires. Als de gebruiker andere materialen gebruikt, kan dit de veiligheid verlagen. Controleer of de inhoud van de levering compleet is. *Batterijen niet inbegrepen Voor meer informatie over BioEnergiser Products kijk op onze website : www.globalproduct.com... - Page 22 Unit 2 Frederick Road, Hoo Farm Estate The Netherlands Kidderminster, Worcestershire DY11 7RA Bioenergiser Circulation Reviver are trademarks of Bioenergiser (UK) Ltd. All rights reserved. Manufactured for Bioenergiser (UK) Ltd. in the PPR Circulation ReviverTM – Eng. 01.01.2018 Edition 1...
Need help?
Do you have a question about the circulation maxx reviver and is the answer not in the manual?
Questions and answers
This is my first time using this machine. Is there anything I should do before using it. I borrowed it from a friend.
Before using the BioEnergiser Circulation Maxx Reviver for the first time, individuals with certain conditions must consult a doctor. These conditions include:
- Acute disease
- Malignant tumor
- Infectious disease
- Pregnancy
- Cardiac dysfunction
- High fever
- Abnormal blood pressure
- Skin sensory disorders or skin problems
- Receiving medical treatment, especially if feeling discomfort
Also, ensure the device is not used in combination with certain medical devices like pacemakers, life support equipment, or other electronic medical devices, as this may cause accidents or ill health.
This answer is automatically generated
Is it possible to preset the reviver so you don't have to set it every time?
No, the BioEnergiser Circulation Maxx Reviver does not memorize your settings, so you have to manually set it up each time you use it.
This answer is automatically generated
Works with battery but not with electric
The BioEnergiser Circulation Maxx Reviver may not work with electric power due to the following reasons:
1. The adapter is not properly plugged into the device.
2. The adapter jack is not well connected.
3. The DC adapter is not properly connected to the main socket.
Checking and ensuring proper connections of the adapter and power supply can help resolve the issue.
This answer is automatically generated