Black Stone PRO Series Owner's Manual
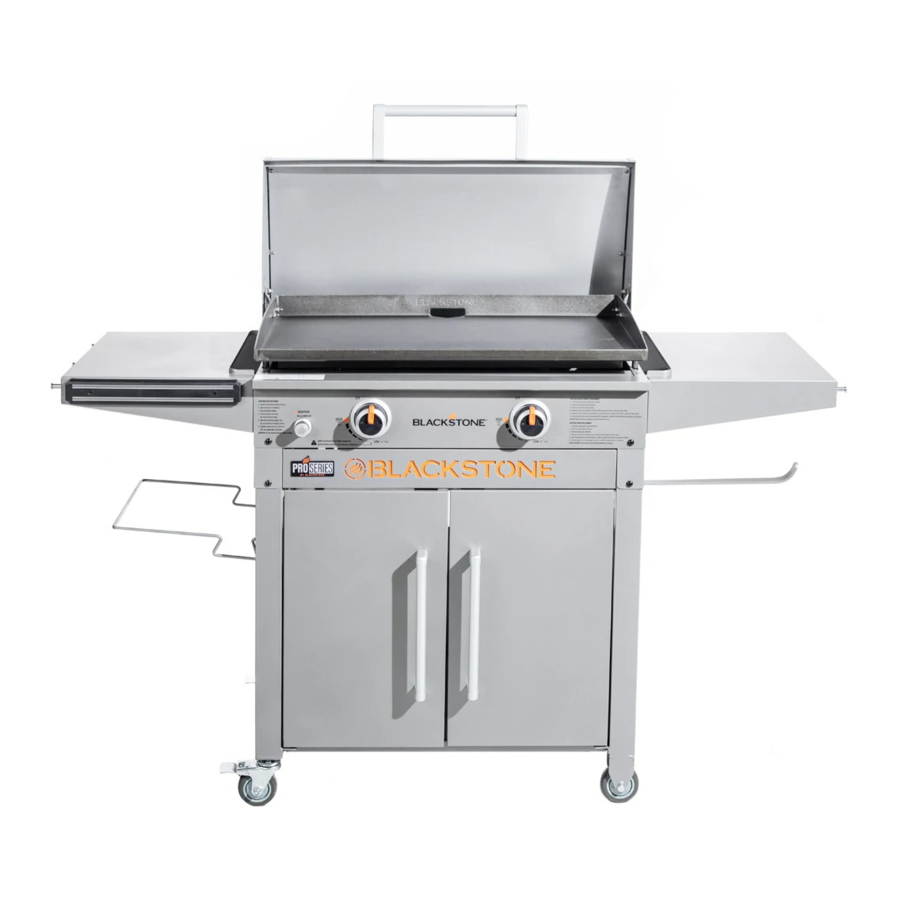
28” griddle cooking station
Hide thumbs
Also See for PRO Series:
- Owner's manual (72 pages) ,
- Parts & assembly (25 pages) ,
- Parts & assembly (24 pages)

Subscribe to Our Youtube Channel
Related Manuals for Black Stone PRO Series


Summary of Contents for Black Stone PRO Series
- Page 1 OWNER’S MANUAL 28” GRIDDLE COOKING STATION Model 1858 5015923 North Atlantic Imports LLC | 1073 West 1700 North Logan, UT 84321 | Blackstoneproducts.com...
-
Page 2: Table Of Contents
Model 1858 | Owner’s Manual | 28” GRIDDLE SAFE T Y ALERT KE Y Read and follow all the notices COOKING STATION found throughout the manual. D A N G E R Owner’s Manual Indicates an imminently hazardous situation which, if not avoided, may result in death or It is the consumer’s responsibility to see that the unit is properly assem- serious injury. -
Page 3: Register Your Product
Register Your Product | Owner’s Manual | Model 1858 REGISTER YOUR PRODUCT Registration allows our Customer Service Representatives to quickly provide assistance with your Blackstone product if needed. The North Atlantic Imports LLC 1-Year Warranty covers replacement parts up to one year after the date of purchase. (Please reference the Warranty chapter for more information.) To enable this warranty, you will need to provide: •... -
Page 4: For Your Safety
Model 1858 | Owner’s Manual | For Your Safety FOR YOUR SAFET Y D A N G E R IF GAS IS DETECTED: Before proceeding, make certain that you understand the FOR YOUR SAFETY section of this manual. Hazardous fire or explosion may result if 1. - Page 5 For Your Safety | Owner’s Manual | Model 1858 WA R N I N G NEVER partially cook meat or HOW TO TELL IF 04. Perform a leak test. (Please refer- poultry and finish cooking later. ence the Leak Test Instructions MEAT IS COOKED Cook food completely to destroy section of the Fuel chapter.)
- Page 6 Model 1858 | Owner’s Manual | For Your Safety WA R N I N G Section 02 GRIDDLE SAFET Y INSTRUCTIONS Adding a large amount of cold or frozen food (or food with significant water content) • Maximum weight on side shelf (if to a hot griddle may cause present) is 10 lbs.
-
Page 7: Assembly Guide
Assembly Guide | Owner’s Manual | Model 1858 ASSEMBLY GUIDE ILLUSTRATED PARTS LIST 01. Griddle body (1 piece) 02. Griddle top & hood (1 piece) 03. Side shelf (2 pieces) 04. Cabinet handle (2 pieces) & 05. Inner shelf (1 piece) 06. - Page 8 Model 1858 | Owner’s Manual | Assembly Guide WA R N I N G The manufacturer has made every ASSEMBLY INSTRUCTIONS effort to eliminate any sharp edges. However, you should Please read all instructions thoroughly before proceeding. Make sure all handle all components with care the plastic packing material is removed before assembling to avoid accidental injury.
- Page 9 Assembly Guide | Owner’s Manual | Model 1858 C A U T I O N Two people are recommended for S T E P 0 2 With the help of another person, place the griddle upside down. the assembly of this product. Unscrew the bolt and nut from the two (2) wheels and use them to attach the wheel to the left side of the unit.
- Page 10 Model 1858 | Owner’s Manual | Assembly Guide S T E P 0 5 Attach the paper towel holder on to the griddle body by a small thumbscrew. Place the garbage bag holder on the left side of the griddle body into the holes on the griddle unit.
- Page 11 Section 01 BAT TERY POWERED IGNITION Care & Maintenance Assembly Guide | Owner’s Manual | Model 1858 TROUBLESHOOTING SYMPTOMS WA R N I N G 01. Burner will not Light with ignition system NEVER APPLY COLD CLEANING THE GRIDDLE COOKING SURFACE S T E P 0 7 With the help of another person, place the griddle top and hood 02.
-
Page 12: Care & Maintenance
Model 1858 | Owner’s Manual | Care & Maintenance CARE & MAINTENANCE D A N G E R NEVER operate this appliance Regularly clean your appliance between uses, especially after extended within 10ft (3.0 m) of any periods of storage. In order to extend the life and condition of unit, structure, combustible material follow best practices detailed in this manual. - Page 13 Care & Maintenance | Owner’s Manual | Model 1858 WA R N I N G This appliance is not intended BURNER MAINTENANCE STORAGE for and should never be In most circumstances, burning used as a heater. • In order to extend and maintain residue off...
-
Page 14: Section 02. Griddle Seasoning Instructions
Model 1858 | Owner’s Manual | Care & Maintenance C A U T I O N Section 02 GRIDDLE SEASONING INSTRUCTIONS Small variations in manufacturing and raw materials can cause some griddles to be slightly For best results, we recommended seasoning the griddle before warped. - Page 15 Care & Maintenance | Owner’s Manual | Model 1858 HOW MUCH OIL? S T E P 0 4 Use cooking tongs or heat resistant gloves to hold folded 1 Tbsp. of Oil paper towels. Spread the cooking oil over surface of griddle top using •...
-
Page 16: Section 03. Cleaning The Burner Assembly
Model 1858 | Owner’s Manual | Care & Maintenance Section 03 CLEANING THE BURNER ASSEMBLY Unit burners vary, however these instructions apply to all units. Clean burner assembly and check burner for damage. If any large cracks or holes are found, replace burner. S T E P 0 1 Turn gas OFF at control knobs and LP cylinder. - Page 17 Care & Maintenance | Owner’s Manual | Model 1858 BURNER FL AME CHECK MATCH LIGHTING INSTRUCTIONS 01. Light burners and rotate knobs from high to low. When knob is Before beginning, if your unit uses at high, flames should be larger a 20lb.
-
Page 18: Section 04. Cleaning Your Griddle
Model 1858 | Owner’s Manual | Care & Maintenance D A N G E R Section 04 DO NOT place flammable CLEANING YOUR GRIDDLE items on side shelves near the griddle. Aerosol containers are STORING YOUR TURNING GRIDDLE OFF particularly hazardous because they can overheat and result GRIDDLE Turn all knobs to OFF position. - Page 19 Care & Maintenance | Owner’s Manual | Model 1858 WA R N I N G NEVER APPLY COLD CLEANING THE GRIDDLE COOKING SURFACE WATER ACROSS THE WHOLE SURFACE OF A HOT S T E P 0 1 To clean griddle after GRIDDLE AT ONCE.
-
Page 20: Fuel | Propane - 20Lb. Tank
Model 1858 | Owner’s Manual | Fuel | Propane – 20lb. Tank FUEL | PROPANE – WA R N I N G 20LB. TANK Fuels used in liquefied propane gas appliances, and the products of combustion of Section 01 such fuels, can expose you to chemicals including benzene, 20LB. - Page 21 20lb. Tank – Propane | Fuel | Owner’s Manual | Model 1858 D A N G E R • NEVER store a spare LP 20LB. LP TANK LP TANK FILLING cylinder/bottle under or near The 20 lb. LP Tank used with Use only licensed and experienced the appliance or in an your griddle must meet the...
-
Page 22: Section 02. Connection & Removal
Model 1858 | Owner’s Manual | Fuel | Propane – 20lb. Tank D A N G E R Section 02 Do not insert any tool or foreign CONNECTION & REMOVAL objects into the valve outlet or safety relief valve. The valve may CONNECTING THE be damaged resulting in a leak. - Page 23 20lb. Tank – Propane | Fuel | Owner’s Manual | Model 1858 WA R N I N G Never attempt to attach Always use cap and strap 07. Turn the coupling nut clock- this griddle to the self- supplied with valve. wise and tighten to a full stop.
-
Page 24: Section 03. Leak Test Instructions
Model 1858 | Owner’s Manual | Fuel | Propane – 20lb. Tank WA R N I N G Section 03 LEAK TEST INSTRUCTIONS If “growing” bubbles appear during leak test, do not use or move the LP bottle. Immediately LEAK TEST SAFE T Y LEAK TESTING VALVES, contact an LP gas supplier or fire department. - Page 25 20lb. Tank – Propane | Fuel | Owner’s Manual | Model 1858...
-
Page 26: Ignition | Battery Powered
Model 1858 | Owner’s Manual | Ignition | Battery Powered IGNITION | WA R N I N G BAT TERY POWERED Do not lean over griddle while lighting. GRIDDLE OPERATING INSTRUCTIONS For proper ignition and operation of the griddle follow the steps below. WA R N I N G S T E P 0 1 In order for the... -
Page 27: Troubleshooting
Troubleshooting | Owner’s Manual | Model 1858 TROUBLESHOOTING Section 01 BAT TERY POWERED IGNITION TROUBLESHOOTING SYMPTOMS 01. Burner will not Light with ignition system 02. Pressing the ignition button does not result in a clicking sound To determine the cause, please try to ignite your griddle with a match. (Please reference the Match Lighting Instructions in the Cleaning the Burner Assembly section of the Care &... -
Page 28: Section 02. Griddle Gas Flow
Model 1858 | Owner’s Manual | Troubleshooting Section 02 GRIDDLE GAS FLOW SYMPTOMS 01. A flame is coming out of the air gate. POSSIBLE CAUSES SOLUTION 01. Something is blocking the venturi Clean the burner assembly to remove in the burner tube. This is not the obstruction. - Page 29 Troubleshooting | Owner’s Manual | Model 1858 SYMPTOMS 01. Griddle will not achieve a high heat or heats unevenly. 02. Burner flames start strong, then immediately drop to low even when burner is set to high position. 03. Flame height drops when a second burner is lit. 04.
-
Page 30: F.a.q
Model 1858 | Owner’s Manual | F.A.Q. F. A .Q. C A U T I O N Small variations in manufacturing Q. What types of cooking oils can I use to season my griddle? and raw materials can cause some griddles to be slightly A. -
Page 31: Warranty
Warranty | Owner’s Manual | Model 1858 NORTH ATLANTIC IMPORTS LLC 1-YEAR WARRANT Y North Atlantic Imports, the North Atlantic Imports LLC’s obliga- This warranty does not cover and is manufacturer, will warranty for one tion under this warranty is limited intended to exclude any liability on year from purchase all parts, work- to replacing or repairing, free of... - Page 32 North Atlantic Imports LLC | 1073 West 1700 North Logan, UT 84321 | Blackstoneproducts.com...
- Page 33 MANUEL D’UTILISATION STATION DE PATIO GRIDDLE DE 28” Modèle 1858 5015923 North Atlantic Imports LLC | 1073 West 1700 North Logan, UT 84321 | Blackstoneproducts.com...
- Page 34 Modèle 1858 | Manuel d’utilisation | STATION DE PATIO MESSAGES REL ATIFS À L A SÉCURITÉ GRIDDLE DE 28” Lisez et suivez tous les aver- tissements qui se trouvent dans ce manuel. Manuel d’utilisation D A N G E R Il incombe au consommateur de s’assurer que l’unité...
-
Page 35: Enregistrer Votre Produit
Enregistrer votre produit | Manuel d’utilisation | Modèle 1858 ENREGISTRER VOTRE PRODUIT L’enregistrement permet à nos représentants du service client de fournir rapidement une assistance avec votre produit Blackstone si nécessaire. La garantie d’un an de North Atlantic Imports LLC couvre les pièces de rechange jusqu’à... -
Page 36: Pour Votre Sécurité
Modèle 1858 | Manuel d’utilisation | Pour votre sécurité POUR VOTRE SÉCURITÉ D A N G E R SI DU GAZ EST DÉTECTÉ: Avant de poursuivre, assurez-vous de bien comprendre la section « POUR VOTRE SÉCURITÉ » de ce manuel. Le non-respect des 1. - Page 37 Pour votre sécurité | Manuel d’utilisation | Modèle 1858 AT T E N T I O N NE JAMAIS cuire partiellement la Si de la graisse ou d’autres RÉFRIGÉREZ: Réfrigérez rapide- viande ou la volaille pour terminer matières chaudes coulent de ment les aliments préparés et la cuisson plus tard.
-
Page 38: Section 02. Instructions De Sécurité Pour La Plaque De Cuisson
Modèle 1858 | Manuel d’utilisation | Pour votre sécurité AT T E N T I O N Section 02 L’ajout d’une grande quantité INSTRUCTIONS DE SÉCURITÉ POUR d’aliments froids ou congelés LA PLAQUE DE CUISSON (ou d’aliments avec une teneur en eau importante) sur une plaque de cuisson chaude •... -
Page 39: Guide De Montage
Guide de montage | Manuel d’utilisation | Modèle 1858 GUIDE DE MONTAGE LISTE DES PIÈCES ILLUSTRÉES 01. Corps de plaque chauf- 02. Plaque de cuisson et 03. Tablette latérale (2 pièces) fante (1 pièce) capot (1 pièce) 04. Poignée d’armoire (2 pièces) et 05. - Page 40 Modèle 1858 | Manuel d’utilisation | Guide de montage AT T E N T I O N Le fabricant a tout mis en INSTRUCTIONS DE MONTAGE œuvre pour éliminer les bords Veuillez lire attentivement toutes les instructions avant de continuer. tranchants.
- Page 41 Guide de montage | Manuel d’utilisation | Modèle 1858 M I S E E N G A R D E Il est recommandé de monter ce É TA PE 0 2 Avec l’aide d’une autre personne, placez la plaque chauffante produit à...
- Page 42 Modèle 1858 | Manuel d’utilisation | Guide de montage É TA PE 0 5 Fixez le porte-essuie-tout au corps de la plaque à l’aide d’une petite vis à oreilles. Placez le support de sac à ordures sur le côté gauche du corps de la plaque chauffante dans les trous de la plaque chauffante.
- Page 43 DÉPANNAGE Entretien et maintenance Guide de montage | Manuel d’utilisation | Modèle 1858 Section 01 DÉPANNAGE DE L’ALLUMAGE ALIMENTÉ PAR BAT TERIE AT T E N T I O N SYMPTÔMES N’APPLIQUEZ JAMAIS D’EAU NE T TOYAGE DE L A SURFACE DE CUISSON DE É...
-
Page 44: Entretien Et Maintenance
Modèle 1858 | Manuel d’utilisation | Entretien et maintenance ENTRETIEN ET D A N G E R MAINTENANCE N’utilisez jamais cet appareil à moins de 3 m (10 pi) de toute structure ou matériau Nettoyez régulièrement votre appareil entre les utilisations, en partic- combustible ou d’une autre ulier après de longues périodes de stockage. - Page 45 Entretien et maintenance | Manuel d’utilisation | Modèle 1858 AT T E N T I O N Cet appareil n’est pas ENTRE TIEN DU STOCKAGE destiné à être un appareil de BRÛLEUR • Afin de prolonger et de maintenir chauffage et ne doit jamais être la durée de vie et l’état de votre utilisé...
-
Page 46: Section 02. Instructions D'assaisonnement Plaque Chauffante
Modèle 1858 | Manuel d’utilisation | Entretien et maintenance M I S E E N G A R D E De petites variations dans Section 02 la fabrication et les matières INSTRUCTIONS D’ASSAISONNEMENT premières peuvent entraîner une PLAQUE CHAUFFANTE légère déformation de certaines plaques. - Page 47 Entretien et maintenance | Manuel d’utilisation | Modèle 1858 QUELLE QUANTITÉ É TA PE 0 4 Utilisez des pinces de cuisine ou des gants résistants D’HUILE? à la chaleur pour tenir l’essuie-tout 1 cuillère à soupe d’huile plié. Étalez l’huile de cuisson sur la surface de la plaque de cuisson à...
-
Page 48: Section 03. Nettoyage Du Brûleur
Modèle 1858 | Manuel d’utilisation | Entretien et maintenance Section 03 NETTOYAGE DU BRÛLEUR Suivez ces instructions pour nettoyer ou remplacer des pièces du brûleur, ou en cas de difficulté à allumer la plaque de cuisson. Pendant le nettoyage, vérifiez que le brûleur n’est pas endommagé. Si vous trouvez des fissures ou des trous importants, remplacez le brûleur. - Page 49 Entretien et maintenance | Manuel d’utilisation | Modèle 1858 VÉRIFICATION DE L A INSTRUCTIONS POUR FL AMME DU BRÛLEUR L’ALLUMAGE AVEC ALLUME T TES 01. Allumez les brûleurs et tournez les molettes de l’intensité élevée Avant de commencer, si votre à...
-
Page 50: Section 04. Nettoyage De Votre Plaque Chauffante
Modèle 1858 | Manuel d’utilisation | Entretien et maintenance D A N G E R Section 04 NETTOYAGE DE VOTRE PLAQUE Ne placez pas d’objets inflammables sur les étagères CHAUFFANTE latérales près de la plaque de cuisson. Les aérosols sont particulièrement dangereux, STOCKAGE DE VOTRE PREMIER NE T TOYAGE... - Page 51 Entretien et maintenance | Manuel d’utilisation | Modèle 1858 AT T E N T I O N N’APPLIQUEZ JAMAIS D’EAU NE T TOYAGE DE L A SURFACE DE CUISSON DE FROIDE SUR UNE PLAQUE DE L A PL AQUE CUISSON CHAUDE. Cela peut provoquer une déformation..
-
Page 52: Carburant | Propane - Réservoir De 9,1 Kg (20 Lb)
Modèle 1858 | Manuel d’utilisation | Carburant | Propane – Réservoir de 9,1 kg (20 lb) CARBURANT | AT T E N T I O N PROPANE – RÉSERVOIR Les carburants utilisés dans les appareils à gaz propane liquéfié DE 9,1 KG (20 LB) et les produits de combustion de tels carburants peuvent vous exposer à... - Page 53 Réservoir de 9,1 kg (20 lb) – Propane | Carburant | Manuel d’utilisation | Modèle 1858 RÉSERVOIR DE GPL DE Gardez toujours les réservoirs de GPL neufs et de remplace- 9,1 KG (20 LB) ment en position verticale pendant l’utilisation, le trans- Le réservoir de GPL de 9,1 kg port ou le stockage.
- Page 54 Modèle 1858 | Manuel d’utilisation | Carburant | Propane – Réservoir de 9,1 kg (20 lb) D A N G E R • Ne rangez JAMAIS une ÉCHANGE DE bouteille de GPL de rechange RÉSERVOIR DE GPL sous ou près de l’appareil ou dans un lieu clos.
-
Page 55: Section 02. Raccordement Et Retrait
Réservoir de 9,1 kg (20 lb) – Propane | Carburant | Manuel d’utilisation | Modèle 1858 D A N G E R Section 02 RACCORDEMENT ET RETRAIT N’insérez aucun outil ou objet dans la sortie de la vanne ou la soupape de sûreté-décharge. - Page 56 Modèle 1858 | Manuel d’utilisation | Carburant | Propane – Réservoir de 9,1 kg (20 lb) AT T E N T I O N N’essayez jamais de fixer cette RE TRAIT DU plaque de cuisson au système de RÉSERVOIR DE GPL gaz propane indépendant d’une POUR LE TRANSPORT roulotte, d’un véhicule récréatif...
-
Page 57: Section 03. Instructions D'essai D'étanchéité
Réservoir de 9,1 kg (20 lb) – Propane | Carburant | Manuel d’utilisation | Modèle 1858 AT T E N T I O N Section 03 INSTRUCTIONS D’ESSAI Si des bulles apparaissent, n’utilisez pas et ne déplacez D’ÉTANCHÉITÉ pas le réservoir de GPL Contactez immédiatement un SÉCURITÉ... -
Page 58: Allumage | Alimenté Par Batterie
Modèle 1858 | Manuel d’utilisation | Allumage | Alimenté par batterie ALLUMAGE | AT T E N T I O N ALIMENTÉ PAR Ne vous penchez pas au-dessus de la plaque de cuisson BAT TERIE pendant l’allumage. FONCTIONNEMENT DE L A PL AQUE CHAUFFANTE AT T E N T I O N Pour un allumage et un fonctionnement corrects de la plaque chauffante, suivez les étapes ci-dessous. -
Page 59: Dépannage
Dépannage | Manuel d’utilisation | Modèle 1858 DÉPANNAGE Section 01 DÉPANNAGE DE L’ALLUMAGE ALIMENTÉ PAR BAT TERIE SYMPTÔMES 01. Le brûleur ne s’allume pas avec le système d’allumage 02. Une pression sur le bouton d’allumage n’entraîne pas de clic Pour déterminer la cause, essayez d’allumer votre plaque chauffante avec une allumette. -
Page 60: Section 02. Flux Du Gas De La Plaque Chauffante
Modèle 1858 | Manuel d’utilisation | Dépannage Section 02 FLUX DU GAS DE LA PLAQUE CHAUFFANTE SYMPTÔMES 01. Une flamme sort de la porte d’air. CAUSES POSSIBLES SOLUTION 01. Quelque chose bloque le venturi Nettoyez l’ensemble du brûleur pour dans le tube du brûleur. Cela ne éliminer l’obstruction. - Page 61 Dépannage | Manuel d’utilisation | Modèle 1858 SYMPTÔMES 01. La plaque chauffante n’atteindra pas une chaleur élevée ou ne chauffe pas de manière inégale. 02. Les flammes du brûleur démarrent fortement, puis tombent immédiate- ment à bas même lorsque le brûleur est réglé en position haute. 03.
-
Page 62: Faq
Modèle 1858 | Manuel d’utilisation | M I S E E N G A R D E De petites variations dans Q. Quels types d’huiles de cuisson puis-je utiliser pour apprêter ma la fabrication et les matières plaque de cuisson? premières peuvent entraîner une légère déformation de certaines R. -
Page 63: Garantie
Garantie | Manuel d’utilisation | Modèle 1858 GARANTIE D’UN AN DE NORTH ATLANTIC IMPORTS LLC North Atlantic Imports, le fabricant, En vertu de cette garantie, l’obliga- Cette garantie ne couvre pas et est garantira toutes les pièces, la fabri- tion de North Atlantic Imports LLC destinée à... - Page 64 North Atlantic Imports LLC | 1073 West 1700 North Logan, UT 84321 | Blackstoneproducts.com...
- Page 65 MANUAL DEL PROPIETARIO 28” PLANCHA ESTACIÓN DE COCINA Modelo 1858 5015923 North Atlantic Imports LLC | 1073 West 1700 North Logan, UT 84321 | Blackstoneproducts.com...
- Page 66 Modelo 1858 | Manual del propietario | 28” PLANCHA ESTACIÓN DE LL AVE DE ALERTA DE SEGURIDAD COCINA Lea y siga todos los avisos que se encuentran en el manual. Manual del propietario P E L I G R O Indica una situación de peligro Es responsabilidad del consumidor asegurarse de que la unidad esté...
-
Page 67: Registre Su Producto
Registre su producto | Manual del propietario | Modelo 1858 REGISTRE SU PRODUCTO El registro permite a nuestros Representantes de Servicio al Cliente brindar asistencia rápidamente con su producto Blackstone si es necesario. La garantía de 1 año de North Atlantic Imports LLC cubre piezas de repuesto hasta un año después de la fecha de compra. -
Page 68: Por Su Seguridad
Modelo 1858 | Manual del propietario | Por su seguridad POR SU SEGURIDAD P E L I G R O SI SE DETECTA GAS: Antes de continuar, asegúrese de comprender la sección POR SU SEGURIDAD de este manual. Se pueden producir incendios o 1. - Page 69 Por su seguridad | Manual del propietario | Modelo 1858 A D V E R T E N C I A NUNCA ase parcialmente la Si la grasa u otro material cali- COCINAR: Cocine la carne y las carne o las aves y termine de ente gotea del electrodoméstico aves exhaustivamente para matar cocinarlas más tarde.
- Page 70 Modelo 1858 | Manual del propietario | Por su seguridad A D V E R T E N C I A Sección 02 Agregar una gran cantidad de INSTRUCCIONES DE SEGURIDAD DE alimentos fríos o congelados LA PLANCHA (o alimentos con un contenido importante de agua) a una plancha caliente puede hacer que •...
-
Page 71: Guía De Montaje
Guía de montaje | Manual del propietario | Modelo 1858 GUÍA DE MONTAJE LISTA DE PIE Z AS ILUSTRADA 01. Cuerpo de plancha (1 pieza) 02. Plancha y capucha (1 pieza) 03. Estante lateral (2 piezas) 04. Manija del gabinete (2 piezas) y 05. - Page 72 Modelo 1858 | Manual del propietario | Guía de montaje A D V E R T E N C I A El fabricante ha hecho todo lo INSTRUCCIONES DE MONTAJE posible para eliminar los bordes afilados. Sin embargo, debe Lea atentamente todas las instrucciones antes de continuar. Asegúrese manejar todos los componentes de retirar todo el material de embalaje de plástico antes de ensamblarlo con cuidado para evitar...
- Page 73 Guía de montaje | Manual del propietario | Modelo 1858 P R E C A U C I Ó N Se recomiendan dos personas PA S O 0 2 Con la ayuda de otra persona , coloque la plancha al revés. para el montaje de este producto.
- Page 74 Modelo 1858 | Manual del propietario | Guía de montaje PA S O 0 5 Fije el toallero de papel al cuerpo de la plancha con un pequeño tornillo. Coloque el soporte de la bolsa de basura en el lado izquierdo del cuerpo de la plancha en los orificios de la unidad de la plancha.
-
Page 75: Cuidado Y Mantenimiento
Vaya a la sección de Instrucciones de curación de la plancha de aceite de cocina para mantener support@blackstoneproducts.com del capítulo Cuidado y mantenimiento. ¡Disfruta cocinando al aire libre en tu el curado. Blackstone 28 ”pro series Griddle! EN LÍNEA: blackstoneproducts.com/ customer-support... - Page 76 Modelo 1858 | Manual del propietario | Cuidado y mantenimiento CUIDADO Y P E L I G R O MANTENIMIENTO Nunca opere este aparato a menos de 3.0 m (10 pies) de cualquier estructura, material Limpie regularmente su electrodoméstico entre usos, especialmente combustible u otro cilindro de después de largos períodos de almacenamiento.
- Page 77 Cuidado y mantenimiento | Manual del propietario | Modelo 1858 A D V E R T E N C I A Este aparato no está MANTENIMIENTO DE ALMACENAMIENTO diseñado para ser usado QUEMADORES como un calentador. • Para extender y mantener la vida útil y el estado de su elec- En la mayoría de las veces, trodoméstico, recomendamos...
- Page 78 Modelo 1858 | Manual del propietario | Cuidado y mantenimiento P R E C A U C I Ó N Sección 02 Pequeñas variaciones en la INSTRUCCIONES DE CURACIÓN DE fabricación y las materias LA PLANCHA primas pueden causar una ligera deformación de algunas Para obtener los mejores resultados, recomendamos curar la plancha placas.
- Page 79 Cuidado y mantenimiento | Manual del propietario | Modelo 1858 ¿CUANTO ACEITE? PA S O 0 4 Use pinzas para cocinar o guantes resistentes 1 Cucharada de Aceite al calor para sostener toallas de papel dobladas. Extienda el aceite • Todas las planchas de 40.8 cm y de cocina sobre la superficie de la 52.8 (17"...
- Page 80 Modelo 1858 | Manual del propietario | Cuidado y mantenimiento Sección 03 LIMPIEZA DEL CONJUNTO DEL QUEMADOR Siga estas instrucciones para limpiar y/o reemplazar pieza del conjunto del quemador o si tiene problemas para encender la plancha. Mientras limpia, revise el quemador para detectar daños. Si encuentra grietas u orificios grandes, reemplace el quemador.
- Page 81 Cuidado y mantenimiento | Manual del propietario | Modelo 1858 CONTROL DE LL AMA INSTRUCCIONES DE DEL QUEMADOR ENCENDIDO CON FÓSFOROS 01. Encienda los quemadores y gire las perillas de alto a bajo. Antes de comenzar, si su unidad Cuando la perilla está en usa Tanque de lp de 20 lb, alta, las llamas deben ser más verifique si hay fugas de gas.
- Page 82 Modelo 1858 | Manual del propietario | Cuidado y mantenimiento P E L I G R O Sección 04 LIMPIANDO SU PLANCHA No coloque artículos inflamables en estantes laterales cerca de la plancha. Los contenedores ALMACENAR SU APAGADO DE L A de aerosol son particularmente peligrosos porque pueden PARRILL A...
- Page 83 Cuidado y mantenimiento | Manual del propietario | Modelo 1858 A D V E R T E N C I A NUNCA APLIQUE AGUA FRÍA LIMPIE Z A DE L A SUPERFICIE DE COCCIÓN EN TODA LA SUPERFICIE DE DE L A PL ANCHA UNA PLANCHA CALIENTE DE UNA VEZ.
- Page 84 Modelo 1858 | Manual del propietario | Carburante | Propano – Cilindro de 20 lb CARBURANTE | A D V E R T E N C I A PROPANO – CILINDRO Los combustibles utilizados en los artefactos de gas propano DE 20 LB licuado y los productos de la combustión de dichos...
- Page 85 Cilindro de 20 lb – Propano | Carburante | Manual del propietario | Modelo 1858 TANQUE DE LP DE 20 LB Mantenga siempre los tanques de LP nuevos e intercam- El tanque de LP de 20 lb. que biados en posición vertical se utiliza con su plancha durante el uso, el tránsito o el debe cumplir con los sigui-...
- Page 86 Modelo 1858 | Manual del propietario | Carburante | Propano – Cilindro de 20 lb P E L I G R O • NUNCA almacene un cilindro/ CAMBIO DEL TANQUE botella de LP de repuesto DE LP debajo o cerca del aparato o en un área cerrada.
- Page 87 Cilindro de 20 lb – Propano | Carburante | Manual del propietario | Modelo 1858 P E L I G R O Sección 02 CONEXIÓN Y REMOCIÓN No inserte herramientas u objetos extraños en la salida de la válvula o en la válvula de CONECTAR EL 06.
- Page 88 Modelo 1858 | Manual del propietario | Carburante | Propano – Cilindro de 20 lb A D V E R T E N C I A Nunca intente conectar REMOCIÓN DE TANQUE esta plancha al sistema de DE LP DE 20 LB PARA gas LP autónomo de un TRANSPORTE O remolque, vehículo recreativo...
- Page 89 Cilindro de 20 lb – Propano | Carburante | Manual del propietario | Modelo 1858 A D V E R T E N C I A Sección 03 Si aparecen burbujas “en INSTRUCCIONES DE PRUEBA DE crecimiento”, no utilice ni FUGAS mueva el tanque de gas LP.
- Page 90 Modelo 1858 | Manual del propietario | Encendido | Batería ENCENDIDO | A D V E R T E N C I A BATERÍA No se incline sobre la plancha mientras se enciende. FUNCIONAMIENTO DE PL ANCHA A D V E R T E N C I A Para un encendido y funcionamiento correctos de la plancha, siga los pasos a continuación.
- Page 91 Solución de problemas | Manual del propietario | Modelo 1858 SOLUCIÓN DE PROBLEMAS Sección 01 SOLUCIÓN DE PROBLEMAS DE ENCENDIDO BATERÍA SÍNTOMAS 01. El quemador no se enciende con el sistema de encendido 02. Al presionar el botón de encendido no se produce un clic Para determinar la causa, intente encender su plancha con una cerilla.
- Page 92 Modelo 1858 | Manual del propietario | Solución de problemas Sección 02 FLUJO DE GAS DE LA PLANCHA SÍNTOMAS 01. Una llama sale de la puerta de aire. POSIBLES CAUSAS SOLUCIÓN 01. Algo está bloqueando el venturi Limpie el conjunto del quemador para en el tubo del quemador.
- Page 93 Solución de problemas | Manual del propietario | Modelo 1858 SÍNTOMAS 01. La plancha no alcanzará un alto calor o se calienta de manera desigual. 02. Las llamas del quemador comienzan con fuerza, luego caen inmediata- mente a bajo incluso cuando el quemador está en posición alta. 03.
-
Page 94: Preguntas Frecuentes
Modelo 1858 | Manual del propietario | Preguntas frecuentes PREGUNTAS P R E C A U C I Ó N FRECUENTES Pequeñas variaciones en la fabricación y las materias primas pueden causar una P. ¿Qué tipos de aceites de cocina puedo usar para curar mi plancha? ligera deformación de algunas placas. -
Page 95: Garantía
Garantía | Manual del propietario | Modelo 1858 NORTH ATLANTIC IMPORTS LLC GARANTÍA DE 1 AÑO North Atlantic Imports, el fabri- La obligación de North Atlantic instrucciones de North Atlantic cante, garantizará por un año a Imports LLC bajo esta garantía se Imports LLC o de otra manera. - Page 96 North Atlantic Imports LLC | 1073 West 1700 North Logan, UT 84321 | Blackstoneproducts.com...
Need help?
Do you have a question about the PRO Series and is the answer not in the manual?
Questions and answers