
Related Manuals for Black Stone 1889


Summary of Contents for Black Stone 1889
- Page 1 MODEL 1889 ITM./ART. 1195080 90cm/36" GRIDDLE COOKING STATION Parts & Assembly North Atlantic Imports LLC | 1073 West 1700 North, Logan UT 84321 | Blackstoneproducts.com...
- Page 2 36” Griddle Cooking Station | Parts & Assembly SAFE T Y ALERT KE Y Before proceeding, make certain that you read and understand the Read and follow all of the notices Owner’s Manual included with found throughout the manual. your griddle. Hazardous fire or explosion may result if instructions are ignored.
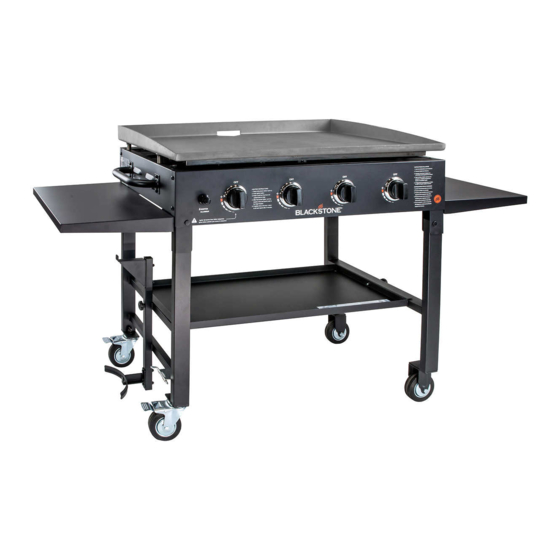
- Page 3 90cm/36" Griddle Cooking Station | Parts & Assembly PARTS & ASSEMBLY ILLUSTRATED PARTS LIST 01. Body (1 piece) 02. Griddle Top (1 piece) 03. Side Shelves (2 pieces) 04. Side Handle (1 pieces) 05. Control Knob (4 pieces) 06. Ignition Button (1 piece) 07.
- Page 4 90cm/36" Griddle Cooking Station | Parts & Assembly ASSEMBLY INSTRUCTIONS Please read all instructions thoroughly before proceeding. Make sure all the plastic packing material is removed before assembling Find a large, clean area to assemble your griddle. Please refer to the parts list and assembly diagrams as necessary.
- Page 5 90cm/36" Griddle Cooking Station | Parts & Assembly WA R N I N G STEP 0 2 The manufacturer has made every effort to eliminate any sharp Pull the locking pin to release the legs, then raise them to a vertical position. edges.
- Page 6 90cm/36" Griddle Cooking Station | Parts & Assembly ST EP 0 4 With the help of another person, place the griddle on its wheels. Then, with four (4) M6 bolts, attach the handle to the left side of the griddle body. ST EP 05 With the help of another person, place the griddle top onto the griddle body...
- Page 7 90cm/36" Griddle Cooking Station | Parts & Assembly STEP 0 6 Attach the upper and lower propane tank hanger. Use two (2) M6x38 screws to attach the upper hanger and secure it from the back with two (2) M6 nuts. Then, use two (2) M6x38 screws to attach the lower hanger and secure it from the back with two (2) M6 nuts.
- Page 8 North Atlantic Imports LLC | 1073 West 1700 North, Logan UT 84321 | Blackstoneproducts.com...
- Page 9 MODÈLE 1889 ITM./ART. 1195080 STATION DE CUISSON AVEC PLAQUE DE 90cm/36po Pièces et assemblage North Atlantic Imports LLC | 1073 West 1700 North, Logan UT 84321 | Blackstoneproducts.com...
- Page 10 Station de Cuission Griddle de 36” | Pièces et assemblage CLÉ D'ALERTE DE Avant de continuer, assurez-vous de lire et de comprendre le mode SÉCURITÉ d'emploi fourni avec votre gril. Lisez et suivez tous les conseils qui Le non-respect des instructions se trouvent dans ce manuel.
- Page 11 Station de Cuisson Avec Plaque de 90cm/36po | Pièces et assemblage PIÈCES ET ASSEMBL AGE LISTE DES PIÈCES ILLUSTRÉES 01. Corps (1 pièce) 02. Plaque de cuisson (1 pièce) 03. Tablettes latérales (2 pièces) 04. Poignée latérale (1 pièce) 05. Bouton de commande (4 pièces) 06.
- Page 12 Station de Cuisson Avec Plaque de 90cm/36po | Pièces et assemblage INSTRUCTIONS DE MONTAGE Veuillez lire attentivement toutes les instructions avant de continuer. Assurez-vous que tout le matériel d’emballage en plastique est enlevé avant de procéder à l’assemblage. Trouvez une grande surface propre pour assembler votre gril. Veuillez vous référer à...
- Page 13 Station de Cuisson Avec Plaque de 90cm/36po | Pièces et assemblage AT T E N T I O N É TAPE 02 Le fabricant a tout mis en œuvre pour éliminer les bords Tirez sur la goupille de verrouillage pour libérer les pieds, puis relevez-les en tranchants.
- Page 14 Station de Cuisson Avec Plaque de 90cm/36po | Pièces et assemblage É TAPE 0 4 Avec l’aide d’une autre personne , placez la plaque chauffante sur ses roues. Ensuite, avec quatre (4) boulons M6, fixez la poignée sur le côté gauche du corps de la plaque chauffante.
- Page 15 Station de Cuisson Avec Plaque de 90cm/36po | Pièces et assemblage É TAPE 0 6 Fixez les supports supérieur et inférieur du réservoir de propane. Utilisez deux (2) vis M6x38 pour fixer le support supérieur et fixez-le par l’arrière à l’aide de deux (2) écrous M6.
- Page 16 North Atlantic Imports LLC | 1073 West 1700 North, Logan UT 84321 | Blackstoneproducts.com...
Need help?
Do you have a question about the 1889 and is the answer not in the manual?
Questions and answers