
Related Manuals for Robinsons Radley Series


Summary of Contents for Robinsons Radley Series
- Page 1 NOMINAL A (mm) B (mm) SIZE 9 x 8 2632 9 x 12 3872 9 x 16 5112 2932 9 x 20 6352 9 x 24 7592 9 x 28 8832...
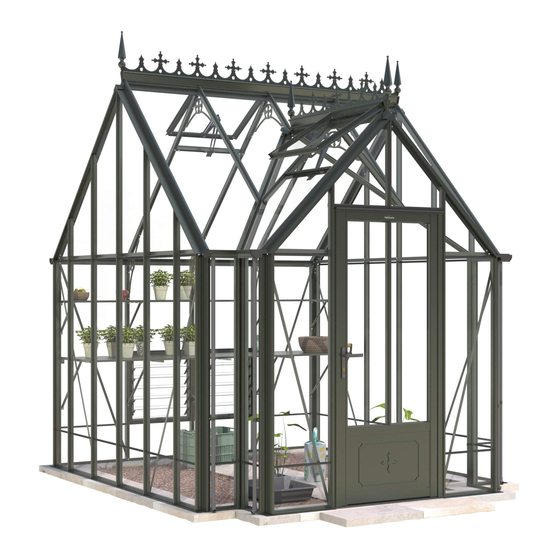
- Page 2 Thank you for purchasing your new Robinsons greenhouse. We recommend you familiarise yourself with the instructions and read all safety information before you commence assembly. This instruction manual is also available online at www.robinsonsgreenhouses.co.uk in our technical help section should you need to reprint it. Should you require any additional advice you can always call us on 0116 267 7091 These instructions are divided into sections highlighted by a white number/letter on a black background at the bottom corner of most pages (see opposite page for details);...
- Page 3 OPTIONAL Robinsons integral cantilever staging and shelving attaches to the inside of the greenhouse frame using either square head bolts (insert four into each glazing bar ’D066’ during construction of the rear (1)) or rectangular ‘crop head’ bolts which can be fitted retrospectively (both sets of REAR bolts accompany the shelving/staging).
- Page 4 Section Part Section Size (mm) Section Part Section Size DV231 2614 (mm) D048 1676 D021 2514 D023 3754 DV235L DV210 2517 2021 DV235R DV212 3757 DV237L D103 1787 2489 DV237R D066 1676 DV261 2925 1000 RUBBER (1m) DV273 2468 D174 DV292 1794 DV251L...
- Page 5 Section Section Part Section Size Part Section Size (mm) (mm) D613 D662 DV100 1 / 4 D812 1660 DV479 1384 DV101 DV633L/R 2173 1 + 1 DV201 2517 DV635L/R 2021 2 + 2 DV637L/R 2489 2 + 2 DV203 3757 DV654 1821 DV349...
- Page 6 THE DIMENSIONS BELOW ARE THE EXACT EXTERNAL BASE DIMENSIONS FOR THE ROBINSONS RANGE. We cannot emphasis how important it is to have a proper base for your Robinsons Greenhouse to be erected upon. It is essential that the BASE IS FLAT, LEVEL AND SQUARE AS WELL AS BEING SUBSTANTIAL enough to take the weight of the greenhouse including its 4mm glass.
- Page 7 Feed glazing rubber into each glazing bar and PARTITION trim to length. Notice that some channels are ONLY REFER TO only used on a partition. Applying a lubricant to SEPARATE MANUAL the aluminium channels will speed up insertion. PARTITION ONLY REFER TO SEPARATE MANUAL...
- Page 8 REAR 9 x 8 9 x 12 Part No mm Quantity DV210 2517 DV212 3757 DV210 D021 2514 D023 3754 D066 1676 D103 1787 D174 SYBOL M6X11 SYBOL D021 M6X15 SYBOL M6X22 10mm 10mm 10mm SYNUT 22mm 22mm 22mm D227 1000 10.5 22mm...
- Page 9 D103 10mm D066 TRANSIT BOLT ON 15mm DIAGONALS 22mm D066 D103 15mm...
- Page 10 Part No Quantity PORCH GABLE Part No Quantity DV269 D671 DV275 D048 1676 DV290 1679 DV224L DV104 DV224R DV105 DV233L 2173 D163 DV233R 2173 DV250L 1345 D174 DV250R 1345 D227 1000 Rubber SYBOL M6X11 SYBOL M6X15 SYNUT 10mm DV275 10mm 10mm 10mm DV269...
- Page 11 DV250L / DV250R DV233L / DV233R DV250R DV250L D163 DV105 D671 DV275 DV233L / DV233R DV250L / DV250R DV269 FLIP VIEW DV250L / DV250R DV104 D048 DV104 DV290 D048 DV290 DV233L / DV233R D174 DV224L / DV224L / DV224R DV224R...
-
Page 12: Table Of Contents
Part No Quantity END GABLE X 2 Part No Quantity DV104 D048 1676 DV105 DV231 2614 D174 DV235L 2021 DV235R 2021 D227 1000 Rubber DV237L 2489 SYBOL DV237R 2489 M6X11 DV251L 1790 SYBOL M6X15 DV251R 1790 SYNUT DV261 2925 DV273 2468 DV292 1794... -
Page 13: Dv237L 2489
DV251L / DV251R DV235L / DV237L / DV251R DV251L DV237R DV235R DV105 DV261 DV251L / DV251R DV273 FLIP VIEW DV251L / DV251R DV104 D048 DV104 DV292 D048 DV292 DV237L / DV237R D174 DV231 DV231... - Page 14 10mm 22mm PORCH SIDES 9x12 Part No Quantity D066 1676 DV345 DV348 DV357 DV361 DV362 1676 DV393 327X327 DV394 327X947 DV395 D174 D227 1000 Rubber SYBOL M6X11 10mm SYBOL 10mm M6X15 SYBOL M6X22 SYNUT 10mm 10mm 15mm 22mm 22mm 10mm 15mm 15mm...
- Page 15 EQUAL...
-
Page 16: Sybol M6X11
REAR ROOF 9x12 Part No Quantity DV100 DV201 2517 DV203 3757 DV254 1790 D227 1000 Rubber SYBOL M6X11 SYBOL M6X22 SYNUT End finials need to be pinched onto the ridge using ‘DV282’ grub screws. Depending on your ridge length a half cresting may need to be cut. Some spacer bar may also be required ‘DV281’... - Page 17 10mm DV254 DV254 22mm DV254 10mm 22mm DV100 D066...
- Page 18 PORCH ROOF 9x12 Part No Quantity DV375R DV386L DV384 DV375L DV386R DV101 DV349 DV349 1230 DV375L DV375R DV380 DV381 1668 DV101 DV384 DV386L 1274 DV386R 1274 DV381 D227 1000 Rubber SYBOL M6X11 DV380 SYBOL DV393 M6X22 DV345 SYNUT DV361 DV362 DV375R DV386L DV375L...
- Page 19 DV101 DV384 FLIP VIEW 22mm DV380 10mm DV381 10mm FLIP VIEW IMPORTANT: Because your porch gutter sections are welded together to eliminate the chance of any leaks the holes circled above can vary slightly in their locations. They may therefore require slight alteration to marry up with DV362 and DV381. Using an 8mm drill bit to enlarge the standard 7mm holes will for example give a little more play to aid fitting.
- Page 20 Part No mm Quantity Part No mm Quantity D220 D866 PLUS SCREW D205 D863L SYBOL D863R M6X11 SYNUT D862 D1208 8 X 12 S/T 1 of - FS6017 610 x 610 8 x 19 S/T pane FS6018 D863R D863R D866 D863L D866 D1208...
- Page 21 D862 D863L D862 FLIP VIEW D119...
- Page 22 Part No mm Quantity Part No mm Quantity D079 PLUS BOLM6X11 FLUFF D114 BOLM6X15 SYBOLM6 X11CROP SYNUTM6 D114 D079 D114 FLIP VIEW...
- Page 23 Part No Quantity D168L D168R (handle) D165 D166 FS6013 D166 D166 D168L D168R D165 D165 INTERNAL VIEW D729TG - 100 x 525 panes x 6 PINCH ALL GLASS RETAINERS BEFORE GLAZING D165...
- Page 24 PORCH CAPS AND COVERS 9x12 GLAZING (plans pto): PART No SECTION SIZE (mm) QUANTITY Glass and aluminium can potentially cause injury. Please ensure you wear D613 protective goggles, gloves, headgear and suitable footwear when assem- D662 bling and glazing the building. D812 1660 DV479...
- Page 25 DV686L DV679R D685 DV686R DV679L D666 DV675R DV685R DV675L DV685L D613 D662 DV656 DV650 DV634R DV480 DV634L DV633R DV479 DV633L D825 D812 D826 D813 DV657 DV686L DV679R D685 DV679L DV686R D666 DV675L DV654 DV685L DV675R D613 DV685R D662 DV656 DV650 DV634R DV480 DV634L...
- Page 26 PORCH GLASS 9x12 The glass in the sides has to bevel on the black ‘ROSEPS’ / white ‘D101’ separator strip (see PART No Size (mm) QUANTITY right) which is on top of the 305mm high glass base panels. This bevelling action allows the D729 525 X 100 glass to tuck underneath the gutter and roof cor-...
- Page 27 D119 Using DV341 as a template mark and carefully drill a Ø3mm hole FS6018 through each side of the porch ridge avoiding surrounding glass! Silicone to waterproof area. DV341 1298 1384 1828...
- Page 28 D220 D220...
- Page 29 D862 D079...
- Page 30 DV499 DV495 DV480 DV700 DV700 DV479 DV478 DV495 DV500 DV495 DV499...
- Page 31 Part No Quantity D522 SYBOLM6 X11CROP SYNUTM6 DV522 DV275...
- Page 32 O7mm...
- Page 33 D119 DV280 DV120 D048 D119 D214 D211 D841 D201 D119 D207 D048 D048 DV219 SHOWN DV218LH / DV219RH D208 D211...
- Page 34 3 slat Example: 2x 4’ shelves ‘ST0304’ = 8’ run 10mm crop D2013 15mm D048 10mm 10mm D066 D048 D2014 10mm crop D2002 =1240mm D2002 =1240mm D2014 D2021 D2003 =1860mm...
- Page 35 7 slat Example: 2x 4’ staging ‘ST0704’ = 8’ run D048 D2045 D2043 D066 D048 10mm D2044 crop 10mm crop 10mm 10mm 10mm D2046 D2046 D2047 D2043 D2045 D2044 D2042 D2042 D2042 D2002 =1240mm 10mm 10mm D2002 FINISH =1240mm START D2003 =1860mm D2002...
- Page 36 Helpline 0116 267 7091 www.birstall.com robinsons @birstall.com...
Need help?
Do you have a question about the Radley Series and is the answer not in the manual?
Questions and answers