Table of Contents
Advertisement
Quick Links
Advertisement
Table of Contents

Subscribe to Our Youtube Channel
Related Manuals for Bolt VM-110


Summary of Contents for Bolt VM-110
- Page 1 RING LIGHT VM-110 LED MACRO RING LIGHT User Manual...
- Page 2 Thank you for choosing Bolt. Thank you for choosing the Bolt VM-110 LED Macro Ring Light. This LED light combines a compact design with versatile features to give you both ease of use and creative lighting control. It’s great for shooting close-ups and even portraits at close range.
-
Page 3: Table Of Contents
Table of Contents Precautions ................................4 Contents ................................. 7 Overview ................................8 Battery Installation ..............................11 Mounting the VM-110 .............................13 Using the Diffusers ..............................16 Turning On the VM-110 and Firing a Test .......................18 Operation Modes..............................20 Troubleshooting ..............................22 Specifications ...............................23 Table of Contents... -
Page 4: Precautions
Precautions ⚠ ⚡ • Before using this product, please thoroughly read the • Keep this product and its batteries out of the reach of following safety notices to ensure safe use and help children. prevent damage to your flash or injury to yourself and •... - Page 5 • Do not use or store this product in flammable conditions • Should the product sustain physical damage, do not (such as environments containing flammable gases or touch any exposed interior metal parts. If touched, they liquid chemicals). This can damage the flash, start a fire, may generate an electric shock or cause a malfunction.
- Page 6 • Keep the metal contacts in the battery compartment clean and free of corrosion and dirt. Do not touch them with your fingers. Corrosive elements on the contacts can damage this product and prevent it from functioning properly. Contacts may be cleaned with isopropyl alcohol on a cotton swab.
-
Page 7: Contents
Contents • VM-110 LED Macro Ring Light • 8 adapter rings (49, 52, 55, 58, 62, 67, 72, and 77mm) • 4 diffusers (clear, frosted white, blue, and amber) • Stand / tripod mount Contents... -
Page 8: Overview
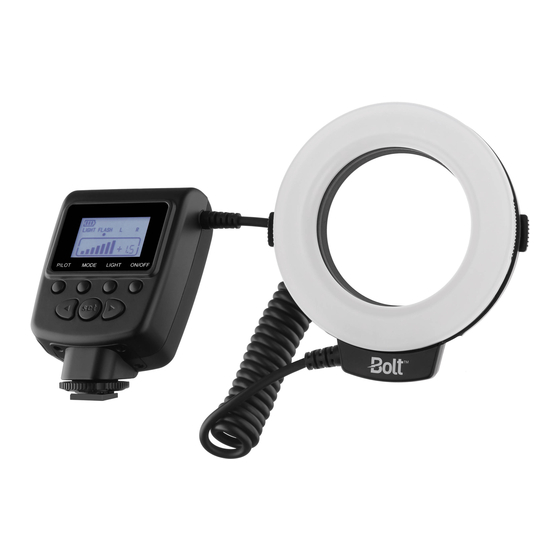
Overview LED Ring Light Power Control Unit LED array Adapter ring locks Battery compartment cover Diffuser mounting indicators Mode button Cable Pilot button Left navigation button Mounting foot Light button Power button Set button Right navigation button Locking wheel Overview... - Page 9 Overview...
- Page 10 Battery level indicator Light mode Flash mode Left mode Right mode Dot indicator Power output level indicator Power output value Overview...
-
Page 11: Battery Installation
Note: For the longest battery life, lithium or Ni-MH batteries are recommended. To install batteries, make sure the VM-110 is turned off and follow these steps: 1. Press on the battery compartment cover and slide it in the direction of the arrow to open it. - Page 12 Important! When battery power is low, the battery level indicator will blink on the LCD. Replace all four batteries at the same time. Do not mix battery types or brands, or use old and new batteries together. Battery Installation...
-
Page 13: Mounting The Vm-110
Mounting the VM-110 The VM-110 has two main components, the power control unit and the LED ring light. The power control unit mounts onto your camera’s hot shoe mount, and the LED ring light mounts onto your camera’s lens via one of the included adapter rings. - Page 14 Do not overtighten. 3. Press and hold the adapter ring locks while mounting the ring light onto the adapter. Make sure that the Bolt logo is on the bottom of the ring light and facing away from the camera.
- Page 15 Mounting the VM-110 power control on the included stand: You can mount the VM-110 power control unit on the included stand in the same way you would mount it on your camera. This allows you to set it on a flat surface or to attach it to a tripod head, light stand, or clamp that has a compatible 1/4"-20 screw mount.
-
Page 16: Using The Diffusers
Using the Diffusers The VM-110 comes with four diffusers that modify the light output: clear, frosted white, blue, and amber. The frosted white diffuser will produce a more diffused light than the clear one. The blue and amber diffusers will cool and warm the light, respectively. Note that you will lose a bit of light with the blue and amber diffusers. - Page 17 To remove the diffuser, rotate it so that the indicator matches up with the OPEN alignment line. The diffuser can then be removed. Tip: Using the VM-110 without any diffuser in place will result in the maximum brightness, but the light will also be the least soft.
-
Page 18: Turning On The Vm-110 And Firing A Test
Turning On the VM-110 and Firing a Test To turn the VM-110 on, press and hold the power button until the LCD on the power control unit turns on. To fire a test, press the PILOT button. Important! Some lenses have front elements that rotate during autofocusing. In such a case, we recommend using manual focus to prevent any possible damage to your lens or camera. - Page 19 LCD Display Status Battery Level Battery level indicator: The battery level indicator on the LCD shows the remaining 70%–100% battery power. 40%–69% 10%–39% 0%–9% Turning On the VM-110 and Firing a Test...
-
Page 20: Operation Modes
Operation Modes Light Mode During Light mode, the light will be on continuously. This is ideal for seeing exactly where the light will fall, as well as for shooting video. Press the LIGHT button to turn on the LEDs for constant lighting. The dot indicator on the LCD will switch to Light mode. - Page 21 Left and Right Mode For more dramatic lighting, you can set your VM-110 to illuminate only from the left or right half of the LED array. To set your VM-110 to Left or Right mode, press the MODE button repeatedly until the dot indicator on the LCD switches to Left mode or Right mode.
-
Page 22: Troubleshooting
The VM-110 is stuck in the Make sure that the mounting foot lock is released. camera hot shoe. The VM-110 is turned on and is in Make sure that fresh batteries are installed and are in the proper orientation. Light mode but won’t light up. -
Page 23: Specifications
Specifications Type: On-camera LED macro ring light Compatible cameras: All cameras with a standard Power Source: 4 AA lithium, Ni-MH, or alkaline hot shoe and a lens filter batteries thread of 49, 52, 55, 58, 62, Power control unit dimensions: 4.5 ×... - Page 24 To obtain warranty coverage, contact the BOLT Customer Service Department to obtain a return merchandise authorization (“RMA”) number, and return the defective product to BOLT along with the RMA number and proof of purchase. Shipment of the defective product is at the purchaser’s own risk and expense.
Need help?
Do you have a question about the VM-110 and is the answer not in the manual?
Questions and answers