Table of Contents
Advertisement
Quick Links
Advertisement
Table of Contents

Subscribe to Our Youtube Channel
Related Manuals for Bolt VM-260


Summary of Contents for Bolt VM-260
- Page 1 Inspiration strikes Inspiration strikes VM-260 FLEXIBLE MACRO FLASH User’s Manual...
- Page 2 Copyright © 2017 Gradus Group. Bolt and other names of Bolt products are trademarks of Gradus Group. Other product and corporate names mentioned herein are trademarks of their respective holders. Introduction...
- Page 3 The VM-260 is powered by three AA batteries (not included) that will provide over 400 flashes at full power. The hot-shoe mount is compatible with Canon, Nikon, Sony, and select Fujifilm, Olympus, Pentax, and Panasonic cameras.
- Page 4 Precautions • Please read and follow these instructions, and keep this manual in a safe place. • Keep this product away from water and any flammable gases or liquids. • Do not attempt to disassemble or repair this product. There are components inside that can produce a hazardous electric shock.
-
Page 5: Table Of Contents
Contents Overview ..............................6–9 Installing Batteries ..........................10–11 Mounting the VM-260 ...........................12 Turning On the VM-260 and Firing a Test ....................13–14 Brightness Adjustment ..........................14 Manual Mode ..............................15 Slave Mode .............................15–16 Troubleshooting ............................17 Specifications ...............................18 Warranty ...............................19 Contents... - Page 6 Overview...
-
Page 7: Overview
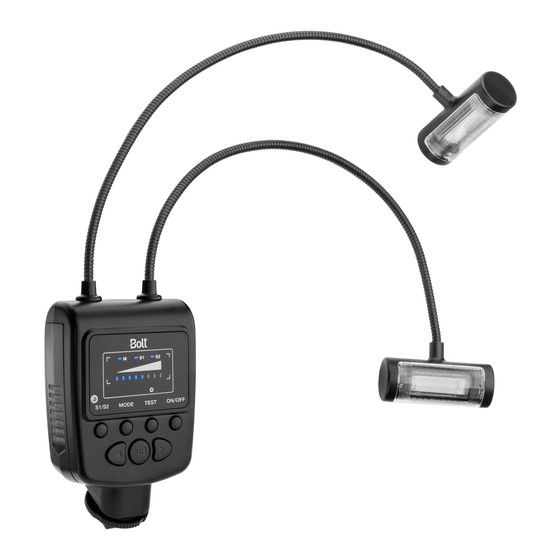
Overview Flexible LED Lights: Power Control Unit: Twin flashtubes Control panel Flexible arms Battery compartment cover Mode button S1/S2 selector button Left navigation button Mounting foot Locking wheel 10. Right navigation button 11. Set button 12. On/off button 13. Test button Overview... - Page 8 S1/S2 MODE TEST ON/OFF Overview...
- Page 9 Control Panel 14. Manual mode indicator 15. Slave mode indicators 16. Flash output indicator 17. Ready indicator 18. Optical sensor Overview...
-
Page 10: Installing Batteries
Note: For the longest battery life, lithium or Ni-MH batteries are recommended. To install batteries, make sure the VM-260 is turned off, and follow these steps: Press on the battery compartment cover, and slide it in the direction of the arrow to open it. -
Page 11: Installing Batteries
Important! When battery power is low, the battery level indicator will blink on the LCD. Replace all three batteries at the same time. Do not mix battery types or brands, or use old and new batteries together. Installing Batteries... -
Page 12: Mounting The Vm-260
Mounting the VM-260 To mount the VM-260 on your camera, make sure the unit is turned off, and follow these steps: Rotate the locking wheel counterclockwise to loosen it. Slide the mounting foot all the way into your camera’s hot shoe. -
Page 13: Turning On The Vm-260 And Firing A Test
Turning On the VM-260 and Firing a Test To turn the VM-260 on, press and hold the On/off button until the control panel lights up. To fire a test, press the Test button. After firing the flash, the ready indicator will blink to indicate the capacitor is charging. Once it’s recharged, the indicator will stop blinking. -
Page 14: Brightness Adjustment
When there is less than 25% battery power remaining, the two LEDs on the left will blink. Brightness Adjustment The brightness output of the VM-260 can be adjusted from 1/1 to 1/128 power. To adjust the output, press the right or left navigation buttons. The power output level indicator displays the current brightness. -
Page 15: Manual Mode
There are two slave modes to select from: S1 Mode: When the VM-260 is set to S1 mode, it will fire in sync with every flash from the master. S2 Mode: When set to S2 mode, the VM-260 will ignore one pre-flash and fire in sync with the second flash. - Page 16 To select slave mode: Press the S1/S2 button to select the appropriate slave mode. Press the right or left navigation buttons to increase or decrease the brightness. The onscreen power output level indicator displays the current brightness output. Slave Mode...
-
Page 17: Troubleshooting
The VM-260 is stuck in the Make sure that the locking wheel is released. camera hot shoe. The VM-260 is turned on, but the • Make sure that fresh batteries are installed and are in the proper flash tubes won’t fire. -
Page 18: Specifications
Specifications Type On-camera LED flexible macro flash Compatible cameras Canon, Nikon, Sony, and select Fujifilm, Olympus, Pentax, and Panasonic Flash guide number (GN) 39 ft. @ ISO 100 Power source AA lithium, NiMH, or alkaline batteries (×3) Sync ≤1/200 sec. Dimensions (H ×... -
Page 19: Warranty
To obtain warranty coverage, contact the BOLT Customer Service Department to obtain a return merchandise authorization (“RMA”) number, and return the defective product to BOLT along with the RMA number and proof of purchase. Shipment of the defective product is at the purchaser’s own risk and expense. For more information or to arrange service, visit www.boltflashes.com or call Customer Service at 212-594-2353. - Page 20 www.boltflashes.com...
Need help?
Do you have a question about the VM-260 and is the answer not in the manual?
Questions and answers