Advertisement
Quick Links
Pre-assembly Preparation
Please read these instructions fully prior to assembly to familiarise yourself with the various stages of
construction. Carefully open all packs supplied and check the contents against the parts and fittings check
list.
Do not destroy any of the packaging until you are certain that you have all the necessary parts for the
assembly.
This item is heavy once assembled. Please try to assemble the item as close as possible to the point of use.
Take care when moving the item to avoid personal injury or damage to the product and always lift rather than
drag.
There are small components used in the construction of this bed as well as plastic foil packaging,
these should be kept away from young children whilst assembling your bed.
This product requires a minimum of 2 people to assemble.
Product Safety
All assembly fastenings should always be tightened properly and care should be taken to ensure that no
fittings are loose.
Periodically check and ensure that all components are in their proper position, free from damage, and that
all connectors are tight.
Once the bed is assembled, do not sit, stand or apply weight directly to the slats unless the mattress is in
place.
We recommend a mattress size of 190cm x 90cm. The thickness of the mattress should not exceed the line
marker on the upper end.
Using this furniture other than for its intended purpose could cause damage to the structure or serious injury
to your child. Please refrain from allowing your children to jump on the bed.
Always use the ladder for entering and leaving the upper sleeping platform.
This product has passed BS EN 747-1:2012+ A1:2015 & BS EN 747-2:2012 + A1:2015
A) Warning: "Bunk beds and high beds can present a serious risk of injury from strangulation if not used
correctly. Never attach or hang items to any part of the bed that are not designed to be used with the
bed for example, but not limited to ropes, strings, cords, hooks, belts & bags."
B) Warning: "Ventilation of the room is necessary in order to keep humidity low and to prevent mould in and
around the bed."
C) Warning: "children can become trapped between the bed and the wall, a roof pitch, the ceiling, adjoining
pieces of furniture (e.g. cupboards) and the like... To avoid risk of serious injury the distance between the
top safety barrier and the adjoining structure shall not exceed 75mm or shall be more than 230mm."
D) Warning: "Do not use the bed if any structural part is broken or missing"
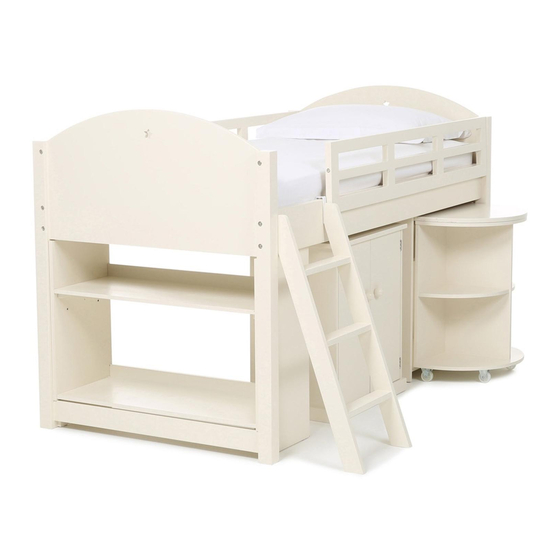
Noah Midsleeper Bed
Assembly Instructions
1
Advertisement

Related Manuals for feather&black Noah Midsleeper


Summary of Contents for feather&black Noah Midsleeper
- Page 1 Noah Midsleeper Bed Assembly Instructions Pre-assembly Preparation Please read these instructions fully prior to assembly to familiarise yourself with the various stages of construction. Carefully open all packs supplied and check the contents against the parts and fittings check list.
- Page 2 Take Care when handling or moving the furniture. Careless handling can damage furniture, try to lift rather than drag There are two options of how the Noah MidSleeper can be assembled (please see below drawings) Please use a Head Screwdriver (not included) and Allen key part 5,6 (included) to assemble the Noah MidSleeper If you require any advice during assembly please call our customer service team on 01243 380600.
- Page 3 Noah MidSleeper Assembly Instructions e - --+-P _ A � R _ T _ S - -+- Q - T _ Y -+---+-- P-A R _ T _ S --+-Q - TY �(D SJ, :�:o + 9 PCS...
- Page 4 Noah MidSleeper Assembly Instructions...
- Page 5 Noah MidSleeper Assembly Instructions...
- Page 6 Noah MidSleeper Assembly Instructions...
- Page 7 Noah MidSleeper Assembly Instructions ®s PARTS PARTS QTY � ////· / · · · · · ( · , � 1 � } I!;) 9 PCS " +itlM M Option 2 � 4PCS ��//. 0 10 2PCS 08x20 lOPC / ..
- Page 8 Noah MidSleeper Assembly Instructions...
- Page 9 Noah MidSleeper Assembly Instructions {.jz Storage Shelf Assembly Please Note The upper shelf (P) has 2 adjustable � fitting positions in panels(N) and (0) Slide the storage shelf unit between the bed posts part (A)
- Page 10 Noah MidSleeper Assembly Instructions Fil the securing brackets (18) to ladder frame part (Q) Secure the ladder (Q) to the bed frame (D) Secure the slats (R) to the bed frame (C) and (D) Slide the pre-assembled 2 door cabinet (M) under the bed frame as shown above...
Need help?
Do you have a question about the Noah Midsleeper and is the answer not in the manual?
Questions and answers