Table of Contents
Advertisement
Quick Links
Advertisement
Table of Contents

Subscribe to Our Youtube Channel
Related Manuals for Brandt BPG6308 Series


Summary of Contents for Brandt BPG6308 Series
- Page 1 GUIDE FOR INSTALLATION AND USE EN Cooking hob BPG6308*...
- Page 2 Visit our website www.brandt.com where you will fi nd our latest innovations, as well as useful and complementary information. BRANDT is delighted to assist you every day and hopes you get the most out of your purchase. Important: Before using your appliance, read this user guide...
-
Page 3: Table Of Contents
TABLE OF CONTENTS SAFETY INSTRUCTIONS ..............3 1 / DESCRIPTION OF YOUR APPLIANCE .........7 2 / INSTALLING YOUR APPLIANCE • Choice of location ................8 • Fitting ...................8 • Fitting tips ..................9 • Case of fl ush fi tting above a drawer, of a cabinet with a door or drawer ..................9 •... -
Page 4: Safety Instructions
SAFETY INSTRUCTIONS IMPORTANT SAFETY INSTRUCTIONS – READ CAREFULLY AND RETAIN FOR FUTURE USE. This guide can be downloaded from the brand web site. • WARNING : this appliance may be used by children aged 8 years and older, and by persons with impaired physical sensorial or mental capacities, or without experience or knowledge, if they are supervised or have received prior instructions on how to use the appliance safely and have understood the risks involved. - Page 5 SAFETY INSTRUCTIONS • This appliance is not connected to a system for evacuating combustion products. It must be installed and connected in compliance with current regulations. Particular attention should be given to applicable ventilation requirements. • The use of a gas hob produces both heat and humidity in a room. Ensure that the kitchen is well ventilated: keep mechanical ventilators open.
- Page 6 SAFETY INSTRUCTIONS • These hobs are designed exclusively for cooking drinks and foodstuffs and do not contain any asbestos-based component parts. • Never leave any CLEANING or FLAMMABLE products in the cupboard beneath your hob (aerosols or other pressurized cans, papers, recipe books, etc.).
-
Page 7: Description Of Your Appliance
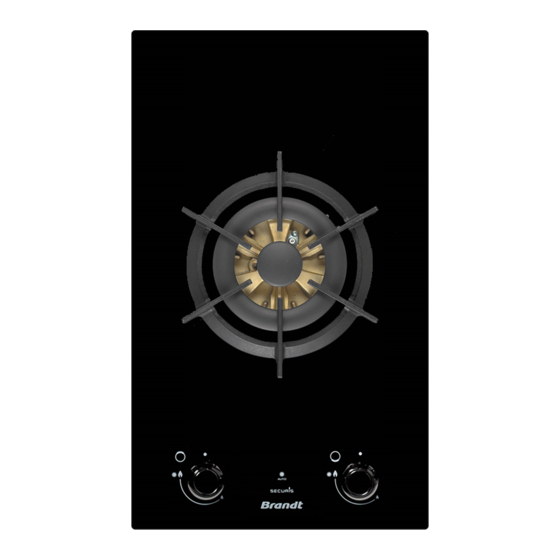
1 / DESCRIPTION OF YOUR APPLIANCE •DESCRIPTION OF YOUR HOB Model: High power hob with Pan support knobs Burner cover Spark igniter Gasket Burner head Thermocouple Injector Knob This Guide to Installation and Use is valid for several models. There may be minor differences in details or fi... -
Page 8: Installing Your Appliance
2 / INSTALLING YOUR APPLIANCE APPLIANCE Width Depth Thickness Standard depending 27 cm 49 cm cabinet cut-out on cabinet Total dimension above the work 5 cm 30 cm 51,5 cm surface Total dimension below the work 5,1 cm 26,3 cm 48 cm surface Fig. -
Page 9: Fitting Tips
2 / INSTALLING YOUR APPLIANCE • FITTING TIPS Underside view of the housing — If you wish, you can immobilise the hobusing the four mounting brackets delivered with their screws, fi xed to the four corners of the casing. You must use the holes provided for this purpose, according to the diagram above (Fig. -
Page 10: Electric Connection
2 / INSTALLING YOUR APPLIANCE • ELECTRIC CONNECTION Your hob is supplied with a power cable (type H05VVF cross-section 1 mm2) with 3 conductors (including 1 ground: green/yellow). These conductors must be connected to the grid via a standardised CEI 60083 live + ground + neutral electrical outlet or or an all-pole cut-off device Cross-section of cable to be used with a minimum distance between contact... -
Page 11: Gas Connection
2 / INSTALLING YOUR APPLIANCE • GAS CONNECTION Preliminary remarks Warning Your appliance is sold pre-set for TOWNGAS. If the hob is installed above an oven or if the proximity of other heat generating elements threatens to cause the connection to heat up, it is vital that the connection be made using a rigid pipe and the appliance should be properly mounted. -
Page 12: Markings On The Injectors
2 / INSTALLING YOUR APPLIANCE Markings on the injectors Example : The table below shows where the injectors injector reference 205B are positioned on your appliance according 205B to the type of gas used. Each number is marked on the injector. Town Gas 205B 115B... -
Page 13: Changing The Type Of Gas
2 / INSTALLING YOUR APPLIANCE • CHANGING THE TYPE OF GAS SWITCHING FROM TOWN GAS TO LPG GAS Connecting the gas supply LPG connection - gas supplied by tank or cylinder. Warning Your appliance is sold pre-set for TOWNGAS. The injectors required for adapting it to LPG can be found in the plastic bag containing this guide. - Page 14 2 / INSTALLING YOUR APPLIANCE Apply the spanner to the injector. Change the injectors, proceeding as follows: Turn the spanner clockwise. — Remove the an support, the burner cover, and the burner head.— Using a Warning No.10 spanner, unscrew the central injector located at the base of the burner unit (see Screw on the adaptor with a ) and using a No.
-
Page 15: Markings On The Injectors
2 / INSTALLING YOUR APPLIANCE Adjust the retarder on the taps Burner power adjustment screw — Using a small fl at-head screwdriver, screw in the brass burner-power screws (yellow) all the way, (fi g. 1) screwing them in a clockwise direction. -
Page 16: Using Your Appliance
3 / USING YOUR APPLIANCE Model 1 burner with control knobs BPG6308B High-power burner 4.1 kW (*) (*) Power obtained with Town gas... - Page 17 3 / USING YOUR APPLIANCE • SWITCHING ON THE GAS BURNERS Each burner is supplied by a tap which can be opened by pressing it and turning it in in a counterclockwise motion. The point “O” corresponds to a closed tap. —...
-
Page 18: Cookware To Be Used With Gas Burners
3 / USING YOUR APPLIANCE • COOKWARE TO BE USED WITH GAS BURNERS • Which burner should you use depending on your cookware? Burner high-power fl ame External ring Central burner 20 to 30 cm 20 to 30 cm 8 to 14 cm Frying, Boiling Gentle simmer —... -
Page 19: Daily Care Of Your Appliance
4 / DAILY CARE OF YOUR APPLIANCE •MAINTAINING YOUR APPLIANCE PRODUCTS/ACCESSORIES MAINTENANCE WHAT TO DO TO BE USED En cas d’encrassement des bougies In the event that the spark plugs become soiled, clean them using a small, hard-bristled brush (non- metallic). -
Page 20: Special Messages, Incidents
5 / SPECIAL MESSAGES, INCIDENTS • DURING USE YOU OBSERVE THAT: WHAT SHOULD YOU DO ? - Check the electrical connection of your appliance - Check that the spark plugs are clean. • Lighting of burners: - Check that the burners are clean and properly assembled There are no sparks when - If the hob is attached to the work surface, check that the you press the knobs.. -
Page 21: Some Tips
6 / SOME TIPS . Hold the knob completely pressed down for a few seconds after the fl ame appears to trigger the safety system. Lighting with gas safety . If there is a power failure, the burner may be lit by bringing feature a match to the burner and at the same time pressing the corresponding knob... -
Page 22: Environment
7 / ENVIRONMENT CARING FOR THE ENVIRONMENT This appliance’s packing materials are recyclable. Recycle them and help to protect the environment by disposing of them in the council receptacles provided for this purpose.Your appliance also contains various recyclable materials. It is therefore marked with this logo to indicate that, in European Union countries, used appliances must not be mixed with... -
Page 24: After Sales Service
(model, ty pe and serial number). This information appears on the manufacturer’s nameplate at tached to your equipment. Brandt France - SAS with share capital of €100.000.000 RCS Nanterre 801 250 531.
Need help?
Do you have a question about the BPG6308 Series and is the answer not in the manual?
Questions and answers