Advertisement
Table of Contents
- 1 Table of Contents
- 2 Warnings
- 3 Additional Warnings
- 4 Features
- 5 Recline Angle
- 6 Vehicle Belts CHECKLIST
- 7 Isofix Checklist
- 8 Forward Facing Installation
- 9 Recline Angle
- 10 Vehicle Belt CHECKLIST
- 11 Isofix Checklist
- 12 Top Tether Warnings
- 13 Features
- 14 Tether Anchorage Installation
- Download this manual
Advertisement
Table of Contents

Related Manuals for Nuna rava au CS12200


Summary of Contents for Nuna rava au CS12200
- Page 1 HOW TO INSTALL IN A VEHICLE instruction booklet model CS12200 IMPORTANT: KEEP THIS INSTRUCTION BOOKLET IN THE PLACE PROVIDED AT THE BACK OF THE CHILD RESTRAINT...
-
Page 2: Table Of Contents
CONTENTS IMPORTANT: Before installation and use of this child restraint check Quick Reference & Pictorial Guide - Rear facing Vehicle Belts ..... 2 - 4 that it is suitable for the size of your child. Quick Reference & Pictorial Guide - Rear facing ISOFIX ........ 5 - 7 Quick Reference &... - Page 3 Pictorial Guide - Rear Facing Vehicle Belts Quick Reference - Rear Facing Vehicle Belts 1. Fully recline the restraint. 3. Place the restraint on the ve- See page 20. hicle seat rear facing. VEHICLE BELT INSTALLATION Pull the vehicle lap/sash belt out Tether Strap - must always be and pass through the slot in the used when the restraint is...
- Page 4 Pictorial Guide - Rear Facing Vehicle Belts Quick Reference - Rear Facing ISOFIX 4. Pass the vehicle belts over the 6. Pull the vehicle belts tight. IMPORTANT: After reading this Quick Reference read the following instructions carefully restraint seating surface and out See page 22.
- Page 5 Pictorial Guide - Rear Facing ISOFIX Pictorial Guide - Rear Facing ISOFIX 3. Place the restraint on the ve- 4. No twists in belts. 1. Fully recline the restraint. 6. Check both sides are connect- See page 27. See page 20. hicle seat rear facing.
- Page 6 Quick Reference - Forward Facing Vehicle Belts Pictorial Guide - Forward Facing Vehicle Belts 1. Adjust the recline angle. 3. Place the restraint on the ve- IMPORTANT: After reading this Quick Reference read the following instructions carefully Select a position that gives the hicle seat facing forward.
- Page 7 Pictorial Guide - Forward Facing Vehicle Belts Pictorial Guide - Forward Facing Vehicle Belts 6. Press the restraint down and 9. Connect the top tether strap. 4. Engage the vehicle belt buck- 7. Maintain tension on the vehicle pull the vehicle belts tight. See page 39.
- Page 8 Quick Reference - Forward Facing ISOFIX Pictorial Guide - Forward Facing ISOFIX IMPORTANT: After reading this Quick Reference read the following instructions carefully 1. Adjust the recline angle. 3. Place the restraint on the ve- hicle seat facing forward. Select a position that gives the ISOFIX COMPATIBLE STRAP INSTALLATION most comfort for your child.
-
Page 9: Warnings
Pictorial Guide - Forward Facing ISOFIX WARNINGS GENERAL • Use the restraint exactly as shown in the instructions. 5. Press the restraint down and 4. Ensure there are no twists in WARNINGS • Do not alter or modify this restraint. pull the straps tight. -
Page 10: Additional Warnings
ADDITIONAL WARNINGS ADDITIONAL WARNINGS TO BE USED WITH A LAP-SASH/LAP ONLY SEAT BELT OR ISOFIX LOW ANCHOR- Only install child restraint in a forward facing AGES IN THE BACK OF MOST CARS WITH FORWARD FACING SEATS. vehicle seat. Never install in a seat that faces the rear or the side of the vehicle. -
Page 11: Features
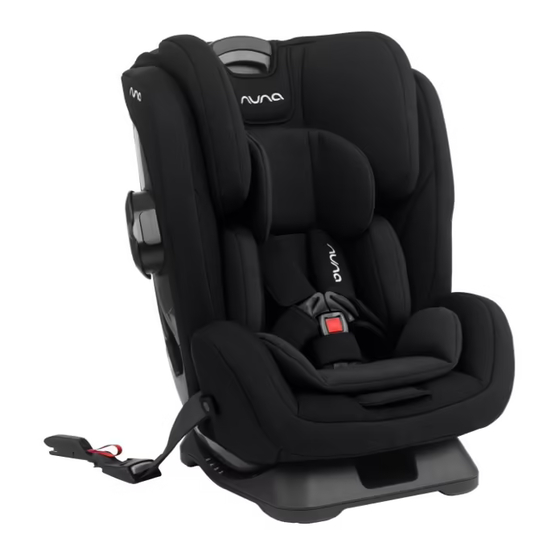
Features Features Adjustable Headrest Crotch Pad Top Tether Anchorage Base Top Tether Top Tether End Storage Bag Seat Pad Shoulder Harness Strap Head Support Adjuster Handle Seat Shell Harness QR Buckle Shoulder Harness Strap Cover Sash Belt Lock-off Device Forward-Facing Vehicle Belt Slot Harness Adjuster (under cover) Infant Body Support Extra side impact protection... -
Page 12: Recline Angle
Recline Angle Using Vehicle Belts This restraint should be installed in the Place the restraint on the vehicle seat rear rear seat. See Page 17. Sash Belt facing. See page 17 for recommended positions Correct Recline Angle in the vehicle. Pull the vehicle lap/sash belt out and pass When used rear facing the restraint must through the slot in the restraint. -
Page 13: Vehicle Belts Checklist
Vehicle Belt Checklist Vehicle Belt Checklist The installed restraint should look like 4 Both lap and sash belt threaded this: through the slots in the side wings. IMPORTANT: the vehicle belts 1 restraint fully reclined, vehicle must be fully down in the slots in belts securely connected to the belt the side wings buckle. - Page 14 Using ISOFIX compatible connectors Using ISOFIX compatible connectors Fully recline the restraint. See page 20. Some vehicles are fitted with low CONNECT anchorage points specifically designed to allow connection by Place the restraint on the vehicle seat rear suitably equipped child restraints. facing.
-
Page 15: Isofix Checklist
ISOFIX checklist ISOFIX checklist The installed restraint should look like 3 No twists in belts, this: 1 Vehicle belts securely connected to the belt buckle, 4 Belts tensioned, indicator shows green 2 Belts pulled tight, 5 Tether strap connected to the an- chorage and correctly tensioned. -
Page 16: Forward Facing Installation
Recline Angle Using Vehicle Belts Correct Recline Angle See page 17 for recommended positions in the vehicle. When used forward facing the restraint Place the restraint on the vehicle seat must always be correctly reclined. The white arrow on the shell must be above forward facing. -
Page 17: Vehicle Belt Checklist
Vehicle Belt checklist Using Vehicle Belts The installed restraint should look like While pressing the child restraint down firmly into the vehicle seat, pull the vehicle this: sash belt until both lap and sash belts are 1 Vehicle belts securely connected to tight. - Page 18 Vehicle Belt checklist Using ISOFIX compatible connectors See page 15 for information on the ISO- 3 No twists in belts, CONNECT FIX anchorages in vehicles. See page 17 for recommended positions in the vehicle. See page 28 for recommended recline angle.
-
Page 19: Isofix Checklist
ISOFIX checklist ISOFIX checklist The installed restraint should look like 3 Straps pulled tight, this: 1 ISOFIX connectors securely con- nected to the anchorages. 4 Tether Strap connected to the an- chorage and correctly tensioned. 2 No twists in straps, Indicator shows green 5 Store end of web in bag on back of cover. -
Page 20: Top Tether Warnings
Top Tether - Features TOP TETHER WARNINGS THIS RESTRAINT MUST BE ATTACHED TO A CHILD RESTRAINT UPPER This child restraint has a tether strap permanently at- tached to the back of the seat. ANCHORAGE POINT IN THE CAR. Always use this tether strap. REFER TO CAR OWNERS HANDBOOK FOR LOCATION OF UPPER AN- CHORAGE POINTS. - Page 21 Top Tether Use Top Tether Use Always connect the snap hook securely to Adjust the tether tension until the web- bing is pulled tight. the anchorage fitting. In some vehicles without a fixed parcel shelf an extension tether strap may be required.
-
Page 22: Tether Anchorage Installation
Tether Anchorage Installation Tether Anchorage Installation Most cars have several threaded holes to If the car is fitted with a child restraint The threaded hole for the Attachment fit the tether anchorage to. anchorage point: anchorage bolt may have a Bolt Refer to the vehicle owners handbook plastic cover over it... - Page 23 Tether Anchorage Installation If the car is not fitted with a child re- Attachment straint upper anchorage point: Bolt For sedans only - drill a 9 mm hole in the Anchor parcel shelf on the centre line of the seat- Fitting ing position as shown on page 40.
Need help?
Do you have a question about the rava au CS12200 and is the answer not in the manual?
Questions and answers