Oracle ZS4-4 Installation Manual
Zfs storage appliance
Hide thumbs
Also See for ZS4-4:
- Safety and compliance manual (88 pages) ,
- Owner's manual (464 pages) ,
- Service manual (364 pages)

Related Manuals for Oracle ZS4-4


Summary of Contents for Oracle ZS4-4
- Page 1 Oracle ZFS Storage Appliance ® Installation Guide For ZS4-4, ZS3-x, 7x20 Controllers, and DE2-24, Sun Disk Shelves, Release 2013.1.5.0 Part No: E69252-01 February 2016...
- Page 3 Oracle. Oracle Corporation and its affiliates will not be responsible for any loss, costs, or damages incurred due to your access to or use of third-party content, products, or services, except as set forth in an applicable agreement between you and Oracle.
- Page 4 Oracle Corporation et ses affiliés déclinent toute responsabilité ou garantie expresse quant aux contenus, produits ou services émanant de tiers, sauf mention contraire stipulée dans un contrat entre vous et Oracle. En aucun cas, Oracle Corporation et ses affiliés ne sauraient être tenus pour responsables des pertes subies, des coûts occasionnés ou des dommages causés par l’accès à...
-
Page 5: Table Of Contents
Using DE2-24 and Sun Disk Shelves Together ........... 16 Maximum Disk Shelves per Controller .............. 16 Hardware Overviews .................. 17 Overview of Disk Shelves .............. 17 Overview of ZS4-4 Controller .............. 30 Overview of ZS3-4 Controller .............. 34 Overview of ZS3-2 Controller .............. 38 Overview of 7420 Controller .............. 44 Overview of 7320 Controller .............. - Page 6 ▼ How to Install the Slide Rails onto a ZS4-4 or ZS3-4 ........ 73 ▼ How to Install the Slide Rails into the Rack for a ZS4-4 or ZS3-4 ...... 74 ▼ How to Install a ZS4-4 or ZS3-4 onto the Rack Slide Rails ...... 76 ▼...
- Page 7 Contents ▼ How to Update Controller Software ............ 137 Troubleshooting Hardware Faults .............. 139 ▼ How to Connect to Oracle ILOM .............. 139...
- Page 8 Oracle ZFS Storage Appliance Installation Guide • February 2016...
-
Page 9: Installation Overview
Installation Overview This guide describes installation procedures for the Oracle ZFS Storage Appliance. Follow these steps to install your appliance: 1. Read “Prerequisites for Installation” on page 2. Review the information about your disk shelves and controllers in “Installation Prerequisites and Hardware Overviews” on page 3. - Page 10 Oracle ZFS Storage Appliance Installation Guide • February 2016...
-
Page 11: Installation Prerequisites And Hardware Overviews
Installation Prerequisites and Hardware Overviews This section gives an overview of the Oracle ZFS Storage Appliance disk shelves and controllers, as well as the prerequisites for installation. For safety information and configuration guidelines, see: “Prerequisites for Installation” on page 11 ■... -
Page 12: Security Information
Prerequisites for Installation Security Information To understand the security issues relevant to initial installation of the Oracle ZFS Storage Appliance, refer to the Oracle ZFS Storage Appliance Security Guide, Release 2013.1.5.0. Safety Information Take the following precautions when installing disk shelves and controllers into a rack. - Page 13 Note - power supply with fan modules to reduce the weight. See “Servicing the Disk Shelves” in Oracle ZFS Storage Appliance Customer Service Manual for instructions. A flashlight for the spotter to ensure the shelf is engaged in the rails.
-
Page 14: How To Disconnect An Rj-45 Cable
Using your thumb and middle finger, apply a slight downward pressure while pulling the plug out of the port. Do not pull the plug upward or pinch the release tab with your fingers below the plug, as shown below. Oracle ZFS Storage Appliance Installation Guide • February 2016... -
Page 15: Cabinet Configuration Guidelines
For safety reasons, mount the heaviest equipment, typically disk shelves, at the bottom ■ of the cabinet. Refer to the appropriate Oracle Safety and Compliance Guide for rack- mounting guidelines. To best prepare for cabling controllers to disk shelves, now and in the future, mount ■... -
Page 16: Using De2-24 And Sun Disk Shelves Together
Directly connecting different disk shelf types is not supported. 7420 Primary storage for 7420 controllers is provided by one to six chains of attached storage. Each chain consists of up to Oracle ZFS Storage Appliance Installation Guide • February 2016... -
Page 17: Hardware Overviews
■ Overview of Disk Shelves Oracle disk shelves are high-availability serial attached SCSI (SAS) devices that provide expanded storage. The main components are hot-swappable, including drives, I/O Modules (IOMs) or SAS Interface Module (SIM) boards for connecting to controllers and other disk shelves, and dual load-sharing power supply with fan modules. - Page 18 Oracle Storage Drive Enclosure DE2-24P FIGURE 1 The Oracle Storage Drive Enclosure DE2-24P is a 2U chassis that supports 24 2.5" SAS-2 drives. The high-performance HDDs provide reliable storage, and the SSDs provide accelerated write operations. This disk shelf features dual, redundant I/O Modules (IOMs), and dual power supply with fan modules.
- Page 19 “Disk Shelf Rear Panel” on page 24 ■ Disk Shelf Component Overview The following sections describe disk shelf components. Oracle Storage Drive Enclosure DE2-24P The Oracle Storage Drive Enclosure DE2-24P can contain the following components: Drive Enclosure DE2-24P Base Chassis ■ Installation Prerequisites and Hardware Overviews...
- Page 20 Sun Disk Shelf (DS2) 24x3.5", LOGFiller ■ Disk Shelf Rail Kit ■ Disk Shelf Front Panel The front panel of an Oracle ZFS Storage disk shelf consists of the drives and indicator lights. Oracle ZFS Storage Appliance Installation Guide • February 2016...
- Page 21 FIGURE 5 Up to four Logzilla SSDs are supported per disk shelf. Logzilla SSDs should be populated in order of slots 20, 21, 22, and 23. (The Oracle Storage Drive Enclosure DE2-24C is shown and represents both models.) Installation Prerequisites and Hardware Overviews...
- Page 22 Oracle Storage Drive Enclosure DE2-24P Status Indicators FIGURE 6 Figure Legend 1 System power indicator 2 Module fault indicator 3 Locate indicator 4 Power / Activity indicator 5 Drive fault indicator Oracle ZFS Storage Appliance Installation Guide • February 2016...
- Page 23 Hardware Overviews Oracle Storage Drive Enclosure DE2-24C Status Indicators FIGURE 7 Figure Legend 1 System power indicator 2 Module fault indicator 3 Locate indicator 4 Power / Activity indicator 5 Drive fault indicator Installation Prerequisites and Hardware Overviews...
- Page 24 9 Power supply fault indicator indicator Disk Shelf Rear Panel The disk shelf rear panel consists of the power supplies, fans, I/O Modules (IOMs) or SAS Interface Modules (SIMs), and indicator lights. Oracle ZFS Storage Appliance Installation Guide • February 2016...
- Page 25 Hardware Overviews Oracle Storage Drive Enclosure DE2-24P Rear Panel FIGURE 9 Figure Legend 1 Power Supply with Fan Module 0 2 I/O Module 1 3 I/O Module 0 4 Power Supply with Fan Module 1 Installation Prerequisites and Hardware Overviews...
- Page 26 6 I/O Module 0 7 I/O Module Filler Panel 8 I/O Module 1 It is especially important that power supplies and their filler panels are in the correct Note - slots. Oracle ZFS Storage Appliance Installation Guide • February 2016...
- Page 27 0 is on the left and power supply 1 is on the right. 0 is on the left, and SIM 1 is on the right. I/O Module Indicators The following disk shelves have I/O Modules (IOMs): Oracle Storage Drive Enclosure DE2-24P ■ Oracle Storage Drive Enclosure DE2-24C ■...
- Page 28 4 Power supply fault indicator 5 Universal power connector 6 Power switch 7 Port fault indicator 8 Port OK indicator 9 SIM board OK indicator (green)/ SIM board fault indicator (amber) 10 SIM locator indicator Oracle ZFS Storage Appliance Installation Guide • February 2016...
- Page 29 Hardware Overviews Power Supply Indicators The following figure shows power supply with fan module indicators for these disk shelves: Oracle Storage Drive Enclosure DE2-24P ■ Oracle Storage Drive Enclosure DE2-24C ■ DE2 Drive Enclosure Power Supply Indicators FIGURE 14 Figure Legend...
-
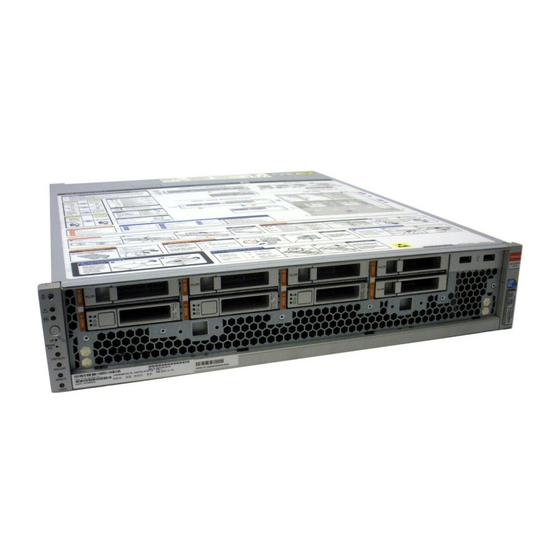
Page 30: Overview Of Zs4-4 Controller
8 Right ejection arm and captive screw latch Overview of ZS4-4 Controller This section provides an overview of the Oracle ZFS Storage ZS4-4 controller. For installation instructions, refer to “Installing a ZS4-4 or ZS3-4 Controller” on page 73. For service... - Page 31 16 Solid state drive 5 (optional) The ZS4-4 controller has two 2.5-inch 1.2TB or 900GB SAS-2 system boot drives in slots 0 and 1, configured as a mirrored pair. Up to four 1.6TB SAS-2 Read flash SSDs can fill slots 2 through 5, in that order.
- Page 32 2 Service action required (amber) 3 OK/Activity (green) ZS4-4 Rear Panel Components The ZS4-4 rear panel is shown in the following figure. Base configuration PCIe cards are not depicted in this illustration. For more information about PCIe cards, see “ZS4-4 PCIe Base and Optional Configurations”...
- Page 33 12 DB-15 video port management (NET MGT) port RJ-45 port Ethernet Ports - The ZS4-4 has four RJ-45 10-Gigabit Ethernet (10GbE) network ■ connectors on the rear panel, labeled NET 0, NET 1, NET 2, and NET 3 (bottom left to top right), as shown in the following figure.
-
Page 34: Overview Of Zs3-4 Controller
The HBA ports are numbered 0-3, bottom to top, as shown in the following figure. Overview of ZS3-4 Controller This section provides an overview of the Oracle ZFS Storage ZS3-4 controller. For installation instructions, refer to “Installing a ZS4-4 or ZS3-4 Controller” on page 73. - Page 35 4x10-core, 2.40GHz 1TB (16GB DIMMs) Four 1.6TB Two 1.2 TB or 4-port (4X4) SAS-2 900GB 6Gb/s external Refer to https://www.oracle.com/storage/nas/index.html for the most recent component specification. ZS3-4 Front Panel Components FIGURE 19 ZS3-4 Front Panel Installation Prerequisites and Hardware Overviews...
- Page 36 The following graphic shows the rear panel of the ZS3-4 controller. Base configuration HBAs are not depicted in this illustration. For information about PCIe cards, see “ZS3-4 PCIe Options” in Oracle ZFS Storage Appliance Customer Service Manual. Oracle ZFS Storage Appliance Installation Guide • February 2016...
- Page 37 Hardware Overviews ZS3-4 Rear Panel Components FIGURE 21 Figure Legend 1 Power supply unit 0 status LEDs 2 Power supply unit 0 AC inlet 3 Power supply unit 1 status LEDs OK: green Power Supply Fail: amber OK: green Power Supply Fail: amber AC OK: green AC OK: green 4 Power supply unit 1 AC inlet...
-
Page 38: Overview Of Zs3-2 Controller
DE2 and Sun Disk Shelves. The HBA ports are numbered 3-0, top to bottom: Overview of ZS3-2 Controller This section provides an overview of the Oracle ZFS Storage ZS3-2 controller. For installation instructions, refer to “Installing a ZS3-2 Controller” on page 81. - Page 39 Hardware Overviews ZS3-2 Electrical Specifications The ZS3-2 controller electrical specifications are listed below. The power dissipation numbers listed are the maximum rated power numbers for the power supply. The numbers are not a rating of the actual power consumption of the appliance. Connectors Two C13 connectors, which work on 110-220v outlets ■...
- Page 40 (Readzilla) solid state drives (SSDs) fill slots 2 through 5, in order. Slots 6 and 7 are empty and must contain drive fillers. Figure Legend 1 Locator LED/button (white) 2 Service Action Required LED 3 Power OK LED (green) (amber) Oracle ZFS Storage Appliance Installation Guide • February 2016...
- Page 41 Note - ZS3-2 Rear Panel Components The ZS3-2 controller PCIe slots and rear panel components are shown in the following figure. For more information about PCIe cards, see “ZS3-2 PCIe Options” in Oracle ZFS Storage Appliance Customer Service Manual. FIGURE 23...
- Page 42 “How to Disconnect an RJ-45 Cable” on page Network Management Port - The network management connector (NET MGT) is an RJ- ■ 45 port and provides an alternate terminal interface to the SP console. Oracle ZFS Storage Appliance Installation Guide • February 2016...
- Page 43 Hardware Overviews Serial Management Port - The serial management connector (SER MGT) is an RJ-45 port ■ and provides a terminal connection to the service processor (SP) console. HBA Ports - The 4x4 SAS-2 HBA, installed in PCIe slot 2 of the ZS3-2, provides ■...
-
Page 44: Overview Of 7420 Controller
8 Rear slide bar 9 Cable covers with connector D) Overview of 7420 Controller This section provides an overview of the Oracle ZFS Storage 7420 controller. For installation instructions, refer to “Installing a 7x20 Controller” on page 99. For service instructions,... - Page 45 Hardware Overviews 7420 Physical Specifications The 7420 controller 3U chassis dimensions are as follows: Dimension Measurement Dimension Measurement Height 13.3 cm/5.25 in Depth 70.6 cm/27.8 in Width 43.7 cm/17.19 in Weight 16.36 kg/96 lbs 7420 Electrical Specifications The following list shows the electrical specifications for the 7420 controller. The power dissipation numbers listed are the maximum rated for the power supply and Note - are not a rating of the actual power consumption of the appliance.
- Page 46 Figure Legend 1 Locator LED and button (white) 2 Service Required LED (amber) 3 Power/OK LED (green) 4 Power button 5 Service Processor (SP) OK LED 6 Fan/CPU/Memory Service (green) Required LED Oracle ZFS Storage Appliance Installation Guide • February 2016...
- Page 47 Hardware Overviews Figure Legend 7 Power Supply (PS) Service 8 Over Temperature Warning LED 9 USB 2.0 Connectors Required LED 10 DB-15 video connector 11 Boot drive 0 (mirrored) 12 Boot drive 1 (mirrored) 13 SSD 2 (optional) 14 SSD 3 (optional) 15 SSD 4 (optional) 16 SSD 5 (optional) The 7420 M2 has two 900GB SAS-2 system boot drives in slots 0 and 1, configured as a...
- Page 48 7 Cluster card slot 8 Network (NET) 10/100/1000 ports: 9 USB 2.0 ports NET0-NET3 10 PCIe slots 5-9 11 Network management (NET 12 Serial management (SER MGT) MGT) port port 13 DB-15 video connector Oracle ZFS Storage Appliance Installation Guide • February 2016...
-
Page 49: Overview Of 7320 Controller
Hardware Overviews Overview of 7320 Controller This section provides an overview of the Oracle ZFS Storage 7320 controller. For installation instructions, refer to “Installing a 7x20 Controller” on page 99. For service instructions, refer to the Oracle ZFS Storage Appliance Customer Service Manual. - Page 50 (HDDs) that store the operating system reside in slots 0 and 1. Up to four solid state drives (ReadZilla SSDs), which store the read cache, fill slots 2 through 5, in order. Slots 6 and 7 are empty and must contain drive fillers. Oracle ZFS Storage Appliance Installation Guide • February 2016...
- Page 51 Following is an illustration of the 7320 storage controller rear panel. The Sun 375-3609 belongs in slot 2, cannot be installed in any other slots, and a second is not offered as an option. For information about PCIe cards, see “7320 PCIe Cards and Risers” in Oracle ZFS Storage Appliance Customer Service Manual.
-
Page 52: Overview Of 7120 Controller
■ connector and is a terminal connection to the SP console. Overview of 7120 Controller This section provides an overview of the Oracle ZFS Storage 7120 controller. For installation instructions, refer to “Installing a 7x20 Controller” on page 99. For service instructions,... - Page 53 Hardware Overviews Connectors Two C13 connectors, which work on 110-220v outlets ■ Input Nominal frequencies: 50/60Hz ■ Nominal voltage range: 100-120/200-240 VAC ■ Maximum current AC RMS: 13.8A @ 100 VAC ■ AC operating range: 90-264 VAC ■ Output 3.3 VDC STBY: 3.0A ■...
- Page 54 10 Serial Management port 11 Network Management port 12 Gbit Ethernet ports NET 0, 1, 2, 3 13 USB 2.0 ports (0, 1) 14 HD15 Video port The 7120 controller has the following ports: Oracle ZFS Storage Appliance Installation Guide • February 2016...
- Page 55 Hardware Overviews Ethernet Ports - There are four RJ-45 Gigabit Ethernet ports (NET0, NET1, NET2, NET3) ■ located on the motherboard that operate at 10/100/1000 Mbit/sec. These network interfaces must be configured before use. Network Management Port - The network management connector (NET MGT) is an RJ- ■...
- Page 56 Oracle ZFS Storage Appliance Installation Guide • February 2016...
-
Page 57: Installing Disk Shelves
Use the following procedure to install an Oracle Storage Drive Enclosure DE2-24C. The Oracle Storage Drive Enclosure DE2-24C requires four standard mounting units (4RU) of vertical space in the cabinet. Starting at the bottom of the cabinet, locate the appropriate rack unit (RU) height. - Page 58 Do not install into the cage nut in the rack, or the clip nut on the rail. Threaded cabinet - The location pins fit inside the rack holes. ■ Oracle ZFS Storage Appliance Installation Guide • February 2016...
- Page 59 How to Install a DE2-24C Disk Shelf Adjust the rail lengths to fit. Install one screw through the rack and into the rear of each rail. Installing Disk Shelves...
- Page 60 How to Install a DE2-24C Disk Shelf Tighten the two locking screws in the rails. Oracle ZFS Storage Appliance Installation Guide • February 2016...
- Page 61 How to Install a DE2-24C Disk Shelf Using a mechanical lift or two people, one at each side of the disk shelf, carefully lift and rest the shelf on the bottom ledge of the left and right rails. Do not lift using the power supply handles.
-
Page 62: How To Install A De2-24P Disk Shelf
Use the following procedure to install an Oracle Storage Drive Enclosure DE2-24P. The Oracle Storage Drive Enclosure DE2-24P requires two standard mounting units (2RU) of vertical space in the cabinet. Starting at the bottom of the cabinet, locate the appropriate rack unit (RU) height, which is six rack holes. - Page 63 How to Install a DE2-24P Disk Shelf This procedure requires a minimum of two people, or a mechanical lift, because of Caution - the weight of the chassis. Attempting this procedure alone could result in equipment damage or personal injury. Always load the heaviest equipment (disk shelves) at the bottom of the rack. Extend all anti-tilt and stabilization devices from the bottom of the rack.
- Page 64 How to Install a DE2-24P Disk Shelf Insert and tighten one screw through the back of the rack and into the back of the rails. If your rack is a threaded universal 19-inch cabinet: Oracle ZFS Storage Appliance Installation Guide • February 2016...
- Page 65 How to Install a DE2-24P Disk Shelf Use the T20 Torx driver to remove the rail location pegs from the front and rear of the rails. Use the supplied wrench to insert two pins into each end of the rails, in the same location where the location pegs were removed.
- Page 66 Carefully slide the shelf into the rails until it is fully seated within the cabinet. The spotter, using a flashlight, should ensure that the shelf is fully seated within the rails. If removing the shelf to reseat it, support it at all times. Oracle ZFS Storage Appliance Installation Guide • February 2016...
-
Page 67: How To Install A Sun Disk Shelf
How to Install a Sun Disk Shelf Install one long patchlock screw per rail to secure the rear of the shelf to the rear of the rack. If the screw cannot be inserted, the shelf might not be fully seated within the rails. - Page 68 Install appropriate rail plates in four locations on the rack (2 front and 2 back) by aligning the two pins on the rail plate with holes on the cabinet rails. Oracle ZFS Storage Appliance Installation Guide • February 2016...
- Page 69 How to Install a Sun Disk Shelf Insert M6 screws in the top and bottom holes of each rail plate and tighten (8 total places). Install each rail by first aligning the front pins of the rack adapter plates with corresponding holes in the front of the rail, then adjust the rail to fit the rack and insert the pins from the rear rack adapter plates into the corresponding holes of the rail.
- Page 70 How to Install a Sun Disk Shelf Install four 8-32 screws into the four remaining front and rear holes of each rack rail (16 total). Oracle ZFS Storage Appliance Installation Guide • February 2016...
- Page 71 How to Install a Sun Disk Shelf Using a mechanical lift or two people, one at each side of the shelf or controller, carefully lift and rest the shelf on the bottom ledge of the left and right rails. The following graphic illustrates the chassis insertion.
- Page 72 Oracle ZFS Storage Appliance Installation Guide • February 2016...
-
Page 73: Installing A Zs4-4 Or Zs3-4 Controller
“How to Install the Slide Rails onto a ZS4-4 or ZS3-4” on page 73 ■ “How to Install the Slide Rails into the Rack for a ZS4-4 or ZS3-4” on page 74 ■ “How to Install a ZS4-4 or ZS3-4 onto the Rack Slide Rails” on page 76 ■... -
Page 74: How To Install The Slide Rails Into The Rack For A Zs4-4 Or Zs3-4
How to Install the Slide Rails into the Rack for a ZS4-4 or ZS3-4 Use the following procedure to install the slide rails into the rack for a ZS4-4 or ZS3-4 controller. If you plan to move the rack after the controller is installed, use mounting screws and cage nuts to secure the slide-rail assembly. - Page 75 How to Install the Slide Rails into the Rack for a ZS4-4 or ZS3-4 toward the rear of the rack until the mounting pins engage the rack with an audible click. The slide assembly mounting pins accommodate 9.5-mm square mounting holes. No Note - other mounting hole sizes are supported.
-
Page 76: How To Install A Zs4-4 Or Zs3-4 Onto The Rack Slide Rails
How to Install a ZS4-4 or ZS3-4 onto the Rack Slide Rails Use the following procedure to install a ZS4-4 or ZS3-4 controller onto the rack slide rails. This procedure requires a minimum of two people, or a mechanical lift, because of Caution - the weight of the chassis. - Page 77 How to Install a ZS4-4 or ZS3-4 onto the Rack Slide Rails Lower the rack stabilization feet if you have not already done so. Push the slide rails into the slide-rail assemblies in the rack as far as possible. Raise the chassis so that the back ends of the mounting brackets are aligned...
-
Page 78: How To Install A Zs4-4 Or Zs3-4 Cable Management Arm
How to Install a ZS4-4 or ZS3-4 Cable Management Arm How to Install a ZS4-4 or ZS3-4 Cable Management Arm Use the following procedure to install the cable management arm (CMA) for a ZS4-4 or ZS3-4 controller. The CMA is an optional assembly that you can use to route the controller cables in the rack. - Page 79 How to Install a ZS4-4 or ZS3-4 Cable Management Arm Insert the left CMA slide-rail connector into the left slide-rail assembly until the connector locks into place with an audible click. Install and route cables to the controller, as required.
- Page 80 Oracle ZFS Storage Appliance Installation Guide • February 2016...
-
Page 81: Installing A Zs3-2 Controller
Installing a ZS3-2 Controller This section contains installation procedures for the ZS3-2 controller. Before beginning installation, see “Installation Prerequisites and Hardware Overviews” on page Use the following procedures to install a ZS3-2 controller: “How to Install the Mounting Brackets and Slide Rail Assemblies for a ■... - Page 82 How to Install the Mounting Brackets and Slide Rail Assemblies for a ZS3-2 Push the mounting bracket release button toward the front of the mounting bracket (2) while withdrawing the bracket from the assembly. Oracle ZFS Storage Appliance Installation Guide • February 2016...
- Page 83 How to Install the Mounting Brackets and Slide Rail Assemblies for a ZS3-2 Attach a mounting bracket to each side of the controller. Installing a ZS3-2 Controller...
- Page 84 If you are using a universal 19-inch cabinet, snap an M6 square cage nut into the top and bottom holes of the location where you will be installing the rail plate as shown. Oracle ZFS Storage Appliance Installation Guide • February 2016...
- Page 85 How to Install the Mounting Brackets and Slide Rail Assemblies for a ZS3-2 Position a slide rail assembly in your rack so that the brackets at each end of the slide rail assembly are on the outside of the front and back rack posts. The following graphic illustrates the rail assembly brackets.
- Page 86 Remove the spacer and confirm that the rails are attached tightly to the rack. Stabilize the rack, using all anti-tilt mechanisms, to prevent it from tipping during installation. See your rack documentation for detailed instructions. Oracle ZFS Storage Appliance Installation Guide • February 2016...
-
Page 87: How To Install A Zs3-2 Onto The Rack Slide Rails
How to Install a ZS3-2 onto the Rack Slide Rails How to Install a ZS3-2 onto the Rack Slide Rails Use the following procedure to install a ZS3-2 controller onto the rack slide rails. This procedure requires a minimum of two people because of the weight of the Caution - chassis. -
Page 88: How To Install A Zs3-2 Cable Management Arm
If the CMA has flat cable covers (for a 1U chassis), install the 2U round cable covers provided in the accessory kit. To replace the flat cable covers: Remove each flat cable cover by lifting up on the cable cover handle. Oracle ZFS Storage Appliance Installation Guide • February 2016... - Page 89 How to Install a ZS3-2 Cable Management Arm Open it 180 degrees to the horizontal position. Apply upward pressure to the outside edge of each hinge connector until the hinge connector comes off the hinge. Position each round cable cover horizontally over the hinges, and align the hinge connectors with the hinges.
- Page 90 Insert the CMA's connector B into the front slot on the right slide-rail until it locks into place with an audible click (frames 1 and 2). Oracle ZFS Storage Appliance Installation Guide • February 2016...
- Page 91 How to Install a ZS3-2 Cable Management Arm The connector B tab (1) goes into the slide-rail front slot (2). Gently tug on the right side of the front slide bar to verify that connector B is properly seated. To install the CMA's connector C into the right slide-rail, perform the following steps: Align connector C with the slide-rail so that the locking spring (1) is positioned inside (server side) of the right slide-rail (frame 1).
- Page 92 How to Install a ZS3-2 Cable Management Arm Gently tug on the right side of the CMA's rear slide bar to verify that connector C is properly seated. Oracle ZFS Storage Appliance Installation Guide • February 2016...
- Page 93 How to Install a ZS3-2 Cable Management Arm To prepare the CMA's connector D for installation, remove the tape that secures the slide-rail latching bracket to connector D and ensure that the latching bracket is properly aligned with connector D (frames 1 and 2). While holding the slide-rail latching bracket in place, insert connector D and its associated slide-rail latching bracket into the left slide-rail until connector D locks into place with an audible click (frames 1 and 2).
- Page 94 CMA to hang by its own weight. Verify that the slide-rails and the CMA are operating properly before routing cables through the CMA: Ensure all rack anti-tilt devices are extended to prevent the rack from tipping. Oracle ZFS Storage Appliance Installation Guide • February 2016...
- Page 95 How to Install a ZS3-2 Cable Management Arm Extend the controller from the front of the rack until the CMA is fully extended. Return the storage controller to the rack. As you push the storage controller into the rack, verify that the CMA retracts without binding. Open the CMA cable covers, route controller cables through the CMA's cable troughs, close the cable covers, and secure the cables with the six Velcro straps.
- Page 96 If you need to install additional Velcro straps, wrap the straps around the cables only, not around any of the CMA components; otherwise, expansion and contraction of the CMA slide bars might be hindered when the server is extended from the rack and returned to the rack. Oracle ZFS Storage Appliance Installation Guide • February 2016...
-
Page 97: How To Verify Operation Of Zs3-2 Slide-Rails And Cma
How to Verify Operation of ZS3-2 Slide-Rails and CMA How to Verify Operation of ZS3-2 Slide-Rails and CMA Use the following procedure to verify the operation of the optional CMA and slide rails on a ZS3-2 controller. Ensure all rack anti-tilt devices are extended to prevent the rack from tipping forward when the Before You Begin storage controller is extended from the rack. - Page 98 Oracle ZFS Storage Appliance Installation Guide • February 2016...
-
Page 99: Installing A 7X20 Controller
Installing a 7x20 Controller This section contains installation procedures for the 7420, 7320, and 7120 controllers. Before beginning installation, see “Installation Prerequisites and Hardware Overviews” on page Use the following procedures to install a 7x20 controller: “How to Remove the 7x20 Mounting Brackets from inside the Slide Rails” on page 99 ■... - Page 100 How to Remove the 7x20 Mounting Brackets from inside the Slide Rails Example 2 Disassembling a 7420 Rail Kit The following graphic illustrates the procedure for disassembling the 7420 rail kit. Oracle ZFS Storage Appliance Installation Guide • February 2016...
-
Page 101: How To Install The Mounting Brackets On A 7X20
How to Install the Mounting Brackets on a 7x20 How to Install the Mounting Brackets on a 7x20 Use the following procedure to install the mounting brackets on a 7420, 7320, or 7120 controller. If the mounting brackets are shipped inside the slide rails, you must remove them before Note - beginning this procedure;... - Page 102 How to Install the Mounting Brackets on a 7x20 The following graphic illustrates how to attach the 7120/7320 mounting brackets. Oracle ZFS Storage Appliance Installation Guide • February 2016...
-
Page 103: How To Install A 7X20 Onto The Rack Slide Rails
How to Install a 7x20 onto the Rack Slide Rails The following graphic illustrates how to attach the 7420 mounting brackets. With the heads of the four chassis locating pins protruding though the four keyed openings in the mounting bracket, pull the mounting-bracket toward the front of the chassis until the mounting-bracket clip locks into place with an audible click. - Page 104 Position a slide rail assembly in your rack so that the brackets at each end of the slide rail assembly are on the outside of the front and back rack posts. Oracle ZFS Storage Appliance Installation Guide • February 2016...
- Page 105 How to Install a 7x20 onto the Rack Slide Rails The following graphic illustrates the rail assembly brackets. Attach each slide rail assembly to the rack posts, but do not tighten the screws completely. Installing a 7x20 Controller...
- Page 106 (~12 in or 30 cm). You will hear an audible click. Oracle ZFS Storage Appliance Installation Guide • February 2016...
- Page 107 How to Install a 7x20 onto the Rack Slide Rails Installing a 7120/7320 onto the Rack Slide Rails Example 3 The following graphic illustrates the 7120/7320 chassis insertion and slide rail locks usage. Installing a 7420 onto the Rack Slide Rails Example 4 The following graphic illustrates 7420 chassis insertion.
-
Page 108: How To Install A 7X20 Cable Management Arm
Do not route short SAS daisy chain cables through the CMA. Do not route an excess of ■ cables such that the CMA clamps bow or appear structurally unfit to support the weight. Oracle ZFS Storage Appliance Installation Guide • February 2016... - Page 109 How to Install a 7x20 Cable Management Arm If using two clustered controllers mounted in the middle of the rack with disk shelves ■ located above and below them, you can divide the disk shelf SAS cables between the two CMAs so they properly route to the upper and lower disk shelves.
- Page 110 How to Install a 7x20 Cable Management Arm Insert the CMA mounting bracket connector into the right slide rail until the connector locks into place. Oracle ZFS Storage Appliance Installation Guide • February 2016...
- Page 111 How to Install a 7x20 Cable Management Arm Insert the right CMA slide rail connector (1) into the right slide rail assembly (2) until the connector locks into place. Installing a 7x20 Controller...
- Page 112 How to Install a 7x20 Cable Management Arm Insert the left CMA slide rail connector (1) into the rail extension on the left slide rail assembly (2) until the connector locks into place. Oracle ZFS Storage Appliance Installation Guide • February 2016...
- Page 113 How to Install a 7x20 Cable Management Arm After you install and route the cables through the assembly, attach the hook and loop straps (1) to secure the cables. Then attach the right and left outer latches to support the assembly. Installing a 7x20 Controller...
- Page 114 Oracle ZFS Storage Appliance Installation Guide • February 2016...
-
Page 115: Cabling The Appliance
Cabling Guide. How to Connect System Cables Use the following procedure to make a physical serial or network connection to Oracle Integrated Lights Out Manager (ILOM), located in the SP. This connection is used for initial setup and configuration. It is strongly recommended that you use a serial SP connection for configuring the primary network interface and for initial configuration because you can monitor progress, especially during system reboots. -
Page 116: How To Connect Disk Shelf And Controller Cables
Connect cables between disk shelves and between storage controller(s) and disk shelves. If clustered controllers, be sure to connect the cluster cables as described in Connecting the Cluster Cables in Oracle ZFS Storage Appliance Cabling Guide. Oracle ZFS Storage Appliance Installation Guide • February 2016... - Page 117 The following illustration shows the cable connections for two clustered Oracle ZFS Storage ZS4-4 controllers and eight DE2-24C disk shelves. “RU nn” represents the rack unit number within the cabinet. The colored letters and numbers (A1, B1, and so on) mark either end of each SAS cable connection between the controllers and the disk shelf chains.
- Page 118 How to Connect Disk Shelf and Controller Cables Oracle ZFS Storage Appliance Installation Guide • February 2016...
-
Page 119: Powering On The Appliance
Powering On the Appliance This section contains power-on procedures for Oracle ZFS Storage Appliance disk shelves and storage controllers. Do not power on disk shelves and controllers until all other cabling is complete, as Caution - described in “Cabling the Appliance” on page 115. -
Page 120: How To Power On A Sun Disk Shelf
Off a Disk Shelf” on page 121. If the module status indicator is not a steady green after module reinsertion and powering on, contact Oracle Customer Service. How to Power On a Sun Disk Shelf Use the following procedure to power on a Sun Disk Shelf. -
Page 121: How To Power On A Controller
Wait several minutes until the power indicators are lit a steady green. How to Power On a Controller Use the following procedure to power on an Oracle ZFS Storage Appliance controller. Plug power cables into power supply 0 and power supply 1 on the storage controller(s). -
Page 122: How To Power Off A Controller
Power button for at least four seconds until the Power/OK status indicator on the front panel flashes, indicating that the storage controller is in standby power mode. Oracle ZFS Storage Appliance Installation Guide • February 2016... -
Page 123: Configuring The Appliance For The First Time
Use this procedure to configure the primary network interface through Oracle Integrated Lights Out Manager (ILOM) when the appliance is first powered on. Oracle ILOM, which is pre-installed in all storage controllers, is a service processor (SP) with an embedded operating system. It provides a full-featured, browser-based web interface and has an equivalent command line interface (CLI). - Page 124 Ensure you have completed cabling as described in “Cabling the Appliance” on page 115. Open a terminal or terminal emulator window and log in to Oracle ILOM in one of the following ways: For a serial connection (recommended), use as the user name. Enter the name of the ■...
- Page 125 Configuring devices. Configuring network devices. Sun ZFS Storage 7120 Version ak/SUNW,iwashi_plus@2013.06.05.0.0,1-1.6 Copyright (c) 2008, 2013, Oracle and/or its affiliates. All rights reserved. Checking hardware configuration ... done. Starting appliance configuration ... done. Press any key to begin configuring appliance: [*] To begin configuration, press any key.
-
Page 126: How To Perform Initial Configuration (Bui)
Direct your browser to the system using either the IP address or host name you assigned to the primary network interface (NET-0 port), as follows: https: //ipaddress:215 or https://hostname:215. The login screen appears. Oracle ZFS Storage Appliance Installation Guide • February 2016... - Page 127 How to Perform Initial Configuration (BUI) If the login screen does not appear and the message Secure Connection Failed is Note - displayed, click the link to add an exception, download the certificate, and click Confirm Security Exception. In the Username field, type .
-
Page 128: How To Perform Initial Configuration (Cli)
Press any key to begin initial configuration ... Configure the appliance network interfaces. aksh: starting configuration with "net" ... Oracle ZFS Storage Appliance Installation Guide • February 2016... - Page 129 How to Perform Initial Configuration (CLI) Configure Networking. Configure the appliance network interfaces. The first network interface has been configured for you, using the settings you provided at the serial console. Subcommands that are valid in this context: datalinks => Manage datalinks devices =>...
- Page 130 Configure Network Time Protocol (NTP) to synchronize the appliance time clock. Configure Time. Configure the Network Time Protocol. Subcommands that are valid in this context: help [topic] => Get context-sensitive help. If [topic] is specified, Oracle ZFS Storage Appliance Installation Guide • February 2016...
- Page 131 How to Perform Initial Configuration (CLI) it must be one of "builtins", "commands", "general", "help", "script" or "properties". show => Show information pertinent to the current context commit => Commit current state, including any changes abort => Abort this task (potentially resulting in a misconfigured system) done =>...
- Page 132 <pool> => Configure the storage pool unconfig => Unconfigure the storage pool => Add additional storage to the storage pool import => Search for existing or destroyed pools to import Oracle ZFS Storage Appliance Installation Guide • February 2016...
- Page 133 => Finish operating on "support" hostname:maintenance system setup support> done aksh: initial configuration complete! Related Topics For further configuration, see the Oracle ZFS Storage Appliance Administration Guide, ■ Release 2013.1.5.0. Configuring the Appliance for the First Time...
-
Page 134: How To Configure Management Interfaces
Check the boxes for "Enable Interface" and "Allow Administration." The "Allow Administration" option makes it a management interface, enabling BUI connections on port 215 and CLI connections on ssh port 22. Choose an IP address protocol. Click APPLY. Oracle ZFS Storage Appliance Installation Guide • February 2016... -
Page 135: How To Lock Cluster Management Interfaces (Bui)
How to Lock Cluster Management Interfaces (BUI) How to Lock Cluster Management Interfaces (BUI) Use the following procedure to lock the management interfaces on clustered controllers after initial configuration. A private (locked) management interface provides BUI and CLI access to a controller regardless of whether the controller is in the active or passive state. -
Page 136: How To Lock Cluster Management Interfaces (Cli)
Lock the interface by setting the type to private: configuration cluster resources (uncommitted)> set type=private configuration cluster resources (uncommitted)> commit Choose the management interface for the second controller using the select command: Oracle ZFS Storage Appliance Installation Guide • February 2016... - Page 137 Unzip the downloaded file using an archive manager or by issuing the unzip command. The file is expanded into the All_Supported_Platforms directory. To upload and apply the update using the BUI or CLI, see “Maintaining the System” in Oracle ZFS Storage Appliance Customer Service Manual. Configuring the Appliance for the First Time...
- Page 138 Oracle ZFS Storage Appliance Installation Guide • February 2016...
- Page 139 In rare cases, faults associated with uncorrectable CPU errors are not diagnosable or displayed in the controller. These faults will be preserved by and observable in the Oracle ILOM, located in the service processor. Connect to Oracle ILOM on the server platform to diagnose hardware faults that do not appear in the BUI.
- Page 140 Oracle ZFS Storage Appliance Installation Guide • February 2016...
Need help?
Do you have a question about the ZS4-4 and is the answer not in the manual?
Questions and answers