
Related Manuals for Salente Ario


Summary of Contents for Salente Ario
- Page 1 Ario INSTRUCTION MANUAL – PRESSURE COOKER PART Before operating your new appliance, Please read all instructions carefully and keep for future reference WWW.SALENTE.CZ...
-
Page 2: Important Safeguards
IMPORTANT SAFEGUARDS When using pressure cookers, basic safety precautions should always be followed: 1. Read all instructions before operation. 2. Do not operate while unattended. 3. Do not touch hot surfaces. Use handles or knobs. 4. Close supervision is necessary when the pressure cooker is used near children. 5. - Page 3 Operating Instructions. 17. Do not use this pressure cooker for pressure frying with oil. 18. DO NOT place the product near flammable materials or use in a humid environment. 19. DO NOT damage the Seal Belt and DO NOT replace it with anything other than the replacement belt designated for this unit.
-
Page 4: About Your Pressure Cooker
30. Always attach plug to appliance first, then plug cord into the wall outlet. To disconnect, turn any control to off, then remove plug from wall outlet. 31. Do not use outdoors. 32. Do not place on or near a hot gas or electric burner, or in a heated oven. 33. - Page 5 the main power cord is connected to a properly grounded 220 – 240 V | 50Hz power receptacle. • This product is to be used in DRY INDOOR environments only, and is NOT intended for commercial use. • All parts and accessories for this appliance must be used properly according to the instructions.
-
Page 6: Parts Identification
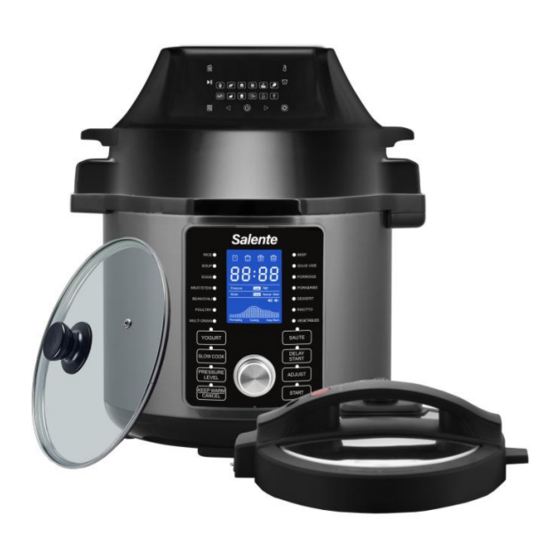
PARTS IDENTIFICATION 1. Handle 2. Lid 3. Pressure Limiting Valve 4. Float Valve (external view) 5. Float Valve (internal view) 6. Inner Pot 7. Outer Pot 8. Main Body Handles 9. Upper Ring 10. Control Panel 11. Power Cord 12. Condensation Cup 13. - Page 7 22.Lid Release Button 23.Stainless Steel Basket 24.Tempered Glass Lid 25.Measuring cup 26.Spoon 27. Rack 28. Air fryer basket 29. Steam Rack ACCESSORIES...
-
Page 8: How To Use The Control Panel
HOW TO USE THE CONTROL PANEL A-FOOD MENU: Use these Knob to select a Menu function, Press START button begin the cooking cycle. B-YOGURT FUNCTION: Including two steps, Pasteurize and Culture . C-SLOW COOK BUTTON: Use this button to select Slow cook program. D-PRESSURE LEVEL BUTTON: Use this button to select pressure cooking level, Low Pressure or High Pressure. - Page 9 G-DELAY START BUTTON: Delay cooking at 30-minute increments; press to increase delay time H-ADJUST: Press to adjust for quantity of ingredients; toggle between Less, Normal, and More. NOTE: Cook time is correlated with quantity of ingredients I-CONTROL KNOB: Turn to cycle through cooking presets or adjust cook time. Press to adjust the time of a selected preset J-LCD DISPLAY The LCD display uses icons, words, and numbers to depict time, pressure levels, modes,...
- Page 10 Common Messages GLASS LID ASSEMBLY **Your Pressure Cooker is equipped with a Tempered Glass Lid that can be used with the SLOW COOK and WARM functions. Please do not use this Glass Lid with any other functions on this Pressure Cooker. Assembly of the Knob on the Glass Lid will require a Screwdriver (not included).
-
Page 11: Pressure Cooker Lid Markings
Then place the Y-Ring and Rubber Seal Ring (18) back into the Lid (2) making sure the hole in the center of the Y-Ring's cross-section is lined up with the metal pin in the center of the Lid (2). Press down firmly until the Y-Ring is secured onto the Lid (2) (Figures 1- 2). -
Page 12: Lid Assembly
2. Clean all the parts by wiping with a soft damp cloth or sponge and dry thoroughly. 3. Thoroughly clean the cooking pot in the dishwasher or with warm soapy water. Rinse, towel or air-dry, and place in the pressure cooker. LID ASSEMBLY: 1. - Page 13 WATER TEST For the first use, to ensure correct assembly of the Rubber Seal Ring (18),it is recommended to read the following instructions and fill the Inner Pot (6) with water to the 2/3 line and program to pressure cook for 30 minutes. Once completed, pour out the water.
- Page 14 WARNING: To avoid a serious burn injury when cooking foods other than rice, never exceed the Figure 13 2/3 MAX PRESSURE COOK mark of the combined volume of liquids and solids (Figure 12 - 13). Be certain the inner receptacle, where the heating plate (14) is located, is clean and dry before inserting the Inner Pot (6) into the pressure cooker and adjust the pot left and right to ensure optimal contact between the Inner Pot and...
- Page 15 automatically build up the pressure, cook the food and go to Keep Warm when cooking is complete. COOKING PRESET QUANTITY (ADJUST) COOK TIME (MIN.) MANUAL TIME SETTING Less Normal Rice 1 to 99 min More Less Normal Soup 1 to 99 min More Less Normal...
- Page 16 Beef 1 to 99 min. More Less Normal Steam 2 hours 1 to 4 hours More Less Normal Porridge 1 to 99 min. More Less Normal Pork & Ribs 1 to 99 min. More Less Normal More Dessert 1 to 99 min. Less Normal Risotto...
- Page 17 AFTER SELECTING A MENU BUTTON 1.The Default Cook Time will display for the selected setting. For example, if Rice is selected, the display will show 00 12. 2. Push the button START. The Pre-heating Icon will illuminate. 3. As the unit heats up and pressure builds, the Float Valve will rise. The amount of liquid and other ingredients in the pressure cooker determines the length of time needed for full pressure to build - generally 5 to 40 minutes.
- Page 18 switch to OFF. and texture of food will begin to change after 1 hour on keep Warm. A bit of condensation in the upper ring during keep Warm is normal. TO RESET OR CANCEL User can reset or cancel any function at anytime by pressing the Keep Warm/Cancel button until the display shows 00:00 - OFF.
- Page 19 lid.(Figure 14) CAUTION HOT STEAM – RISK OF SCALDING: USE TONGS OR LONG UTENSIL TO TURN THE VALVE. KEEP HANDS AND FACE AWAY FROM PRESSURE LIMITING VALVE (3) HOW TO USE THE SAUTÉ FUNCTION This setting allows cooking over high heat, without the lid, before pressure cooking. Before Pressure Cooking, most recipes will benefit from the golden color, richer flavors and moist results gained from Sauteing.
-
Page 20: How To Use The Slow Cook Function
5. Press START button. 6. When cooking is complete the cooker beeps and the LCD screen displays Yogt. 7. Remove steel pot with milk place pot on a wire rack and cool until milk reaches 43 ℃ Culture Stir active culture into warm milk according to your recipe. Return steel pot to pressure cooker base. - Page 21 CAUTION! Never put your face or hands directly over the cooker when removing Glass Lid, escaping steam can cause serious burn injury. HOW TO USE THE DELAY START FUNCTION If you wish to Program your pressure cooker to automatically cook prepared food at a later time, you can program the pressure cooker to delay cooking by up to 24-hours.
-
Page 22: Safety Features
SAFETY FEATURES There are nine safety devices installed in the pressure cooker to assure its reliability (Figure 17). Figure 17 1. Lid Safety Lock System 2. Lid Safety Switch 3. Open and Close Lid Safety Device 4. Thermal Fuse 5. Pressure Limiting Valve 6. -
Page 23: Cleaning The Pressure Cooker
3. Pressure Limiting Valve The pressure limiting valve will release air automatically when the pressure inside exceeds the preset temperature. NOTE: Overfilling the pressure cooker (see Instructions for Use) may clog the pressure limiting valve, which can cause excess pressure to develop. 4. - Page 24 3. Remove the Condensation Cup (12) and rinse it thoroughly and let dry. Clean the Inner Main Body (13) and Upper Ring (9) with a damp sponge or wash cloth. 4. Remove the pressure limiting valve (3) by gripping and firmly pulling upwards. Rinse with warm water and dry.
-
Page 25: Troubleshooting
TROUBLESHOOTING PROBLEM SOLUTION Yes even though it will have a loose fit it is safely secured. It 1. Is the Pressure Limiting will turn 360 degrees. But when pressure has built up, and Valve (3) on the lid (2) the Valve is set to “Sealing” properly, it will resemble a supposed to be loose? bobble head. - Page 26 around the rim of the lid around the lid is normal for the first 5 minutes or so during the pressurizing during the Pressurizing process. If it continues beyond 10 sequence. How do I fix this? minutes or steam is still releasing when the timer has begun counting down it may mean that the Rubber Seal Ring (18) did not form a tight seal when the Lid (2) was locked.
- Page 27 my lid. What is stuck? lid gently to make it go back down. Then turn the lid clockwise to unlock the lid. If it is still stuck, unplugging the unit may help. 8. What is the clear plastic part It is the Condensation Cup: Refer to part (12) on pages 5 and that came with my pressure 8 to attach the condensation cup to the back of the pressure cooker?
- Page 28 and check if food at the bottom of the inner pot is burnt. Bad power connection or no Check the power cord from the power. pressure cooker to the wall outlet 17. Display is blank to ensure a good connection. after plugging in power cord.
- Page 29 lf any of the below error codes appear on the pressure cooker display, unplug the power cord and check if the pressure cooker is properly assembled, if the food is properly and evenly positioned, and if there is enough liquid in th cooker. Then, let it cool for at least 1O minutes and plug it back into the outlet and turn it on.
-
Page 30: Declaration Of Conformity
Do not throw these products into the unsorted municipal waste DECLARATION OF CONFORMITY Hereby, the company Abacus Electric, s.r.o. declares that the SALENTE is in compliance with the requirements of the standards and regulations, relevant for the given type of device.
Need help?
Do you have a question about the Ario and is the answer not in the manual?
Questions and answers