Busch-Jaeger AudioWorld 8215 U Product Manual
Flush-mounted digitalradio
Hide thumbs
Also See for AudioWorld 8215 U:

Related Manuals for Busch-Jaeger AudioWorld 8215 U


Summary of Contents for Busch-Jaeger AudioWorld 8215 U
- Page 1 2CKA001473B8722 │ 20.06.2018 Product manual ® Busch-AudioWorld Flush-mounted DigitalRadio 8215 U...
-
Page 2: Table Of Contents
Table of contents Table of contents Notes on the instruction manual........................4 Safety ................................. 5 Information and symbols used ......................5 Intended use ............................6 Improper use ............................6 Target group / Qualifications of personnel ................... 7 2.4.1 Operation ............................7 2.4.2 Installation, commissioning and maintenance ..................7 Safety instructions .......................... - Page 3 Table of contents 8.2.3 Adjusting the volume ........................32 8.2.4 Selecting the station ........................32 8.2.5 Busch iDock / AUX (My player) .......................33 8.2.6 Sleep function (turn-off time) ......................34 8.2.7 Alarm clock ............................35 Extended operation ..........................36 8.3.1 Display .............................36 8.3.2 Button assignment ...........................36 8.3.3 Menu "Alarm time"...
-
Page 4: Notes On The Instruction Manual
If you pass the device on, also pass on this manual along with it. Busch-Jaeger accepts no liability for any failure to observe the instructions in this manual. If you require additional information or have questions about the device, please contact Busch- Jaeger or visit our Internet site at: www.BUSCH-JAEGER.de... -
Page 5: Safety
However, residual hazards remain. Read and adhere to the safety instructions to prevent hazards of this kind. Busch-Jaeger accepts no liability for any failure to observe the safety instructions. Information and symbols used The following Instructions point to particular hazards involved in the use of the device or provide... -
Page 6: Intended Use
Each use not listed in Chapter 2.2 “Intended use“ on page 6 is deemed improper use and can lead to personal injury and damage to property. Busch-Jaeger is not liable for damages caused by use deemed contrary to the intended use of the device. The associated risk is borne exclusively by the user/operator. -
Page 7: Target Group / Qualifications Of Personnel
Safety Target group / Qualifications of personnel 2.4.1 Operation No special qualifications are needed to operate the device. 2.4.2 Installation, commissioning and maintenance Installation, commissioning and maintenance of the device must only be carried out by trained and properly qualified electrical installers. The electrical installer must have read and understood the manual and follow the instructions provided. -
Page 8: Safety Instructions
Safety Safety instructions Danger - Electric voltage! Electric voltage! Risk of death and fire due to electric voltage of 100 … 240 V. Dangerous currents flow through the body when coming into direct or indirect contact with live components. This can result in electric shock, burns or even death. -
Page 9: Information On Protection Of The Environment
Information on protection of the environment Information on protection of the environment Environment Consider the protection of the environment! Used electric and electronic devices must not be disposed of with domestic waste. – The device contains valuable raw materials which can be recycled. Therefore, dispose of the device at the appropriate collecting depot. -
Page 10: Setup And Function
Setup and function Setup and function Functions The device is a functional radio with various setting options and is installed flush-mounted in the wall. The device offers you, for example: ■ Various possible combinations with other devices. – E.g. the combination with an Busch-iDock as connecting option for a different player. ■... -
Page 11: Possible Combinations
Setup and function Possible combinations 8215 U 8218 U 8222 EB (2x / 4x) 8223 U (1x / 2x) 8224 EB (2x / 4x) 8225 EB (1x / 2x) 8226 EB (1x / 2x) 8226/10 EB (1x / 2x) 8252-xxx Table 1: Possible combinations │11 Product manual 2CKA001473B8722... -
Page 12: Technical Data
Technical data Technical data Designation Value Nominal voltage: 230 V AC, ±10%, 50 Hz Temperature range: 5°C - +40°C Storage temperature: -20°C - +70°C Protection type: IP 20 ≤ 0.5 W Power consumption during the idle state: Display size: 3.8 cm (1.5") Power supply terminals: 1 x 2.5 mm²... -
Page 13: Connection, Installation / Mounting
Connection, installation / mounting Connection, installation / mounting Danger - Electric voltage! Risk of death due to electrical voltage of 100 … 240 V during short-circuit in the low-voltage conduit. – Low-voltage and 100 … 240 V conduits must not be installed together in a flush-mounted box! Attention! - antenna signal is too weak! If the antenna signal is too weak at the mounting location planned for the device,... -
Page 14: Mounting
Connection, installation / mounting Mounting Caution! The device can sustain damage when coming into contact with hard objects! The plastic parts of the device are sensitive. – Pull the attachment off only with your hands. – Do not lever parts off with screwdrivers or similar hard objects. Hinweis Elektronische Geräte mit integriertem Schaltnetzteil können im Einzelfall Empfangsstörungen verursachen, wenn diese in unmittelbarer Nähe zum Radio... - Page 15 Connection, installation / mounting In addition to the integrated antenna, an external antenna can be connected to the connection provided. 2. For the selection of the antenna set intern the switch on the rear of the device on "Internal" or "External". –...
- Page 16 Connection, installation / mounting 5. Plug the attachment together with the frame onto the flush-mounted insert. – Ensure that the plug-in connection on the rear side does not get jammed. – If mounting is difficult, check whether a burr has formed at the lock-in opening of the flush- mounted insert and remove it.
-
Page 17: Electrical Connection
Connection, installation / mounting Electrical connection 6.3.1 Loudspeaker For MONO mode, the loudspeaker can be connected to the left (L- / L+) or right (R- / R+) connecting terminals. For STEREO mode, two loudspeakers can be connected, one to the left (L- / L+) and one to the right (R- / R+) connecting terminal. -
Page 18: Commissioning
Commissioning Commissioning Operation of setup mode / Initial commissioning (Setup) 7.1.1 Display Fig. 8: Display overview for commissioning [1] Function [2] Menu / menu level [3] Menu number 7.1.2 Button assignment Fig. 9: Button assignment for initial commissioning / setup mode [1] One level higher [2] Preceding menu item [3] Next menu item... -
Page 19: Initial Commissioning / Setup
Commissioning Initial commissioning / Setup 7.2.1 Overview – The setup menus The setup is carried out automatically during initial commissioning or when resetting the settings (RESET). If certain functions are not relevant for you, press the "PLUS" or "MINUS" button to switch to the next menu item. - Page 20 Commissioning Mode (4 / 7), see chapter 7.2.5 “Menu "Audio mode"“ on page 25 ■ Select mono or stereo mode (type of connection) Fig. 13: Setup menu "Mode" Illumination (5 / 7), see chapter 7.2.6 “Menu "Illumination"“ on page 26 ■...
-
Page 21: Menu "Language
Commissioning 7.2.2 Menu "Language" Fig. 17: Menu item "Language" The device offers you several languages for selection. If this function is not relevant for you, press the "PLUS" or "MINUS" button to switch to the next menu item. Selecting languages 1. -
Page 22: Menu "Time
Commissioning 7.2.3 Menu "Time" Fig. 18: Menu item "Time" The time is set via this menu item. If this function is not relevant for you, press the "PLUS" or "MINUS" button to switch to the next menu item. Setting the time 1. -
Page 23: Menu "Alarm Clock
Commissioning 7.2.4 Menu "Alarm clock" Fig. 19: Menu item "Alarm clock" NOTE We recommend that you always set the alarm call function immediately. Otherwise it remains inactive and cannot be used during normal operation. Nor is the time displayed on the deactivated display. It is not possible to activate it later. - Page 24 Commissioning Alarm call function 1. Switch to menu item "Alarm call function" with the "PROG" button. 2. Set the alarm call function to "Inactive" or "Active" with the "PLUS / MINUS" buttons. 3. Confirm your selection with the "PROG" button. –...
-
Page 25: Menu "Audio Mode
Commissioning 7.2.5 Menu "Audio mode" Fig. 20: Menu item "Mode" The "Mode" menu describes the output quality. In this menu you select between mono and stereo mode. If this function is not relevant for you, press the "PLUS" or "MINUS" button to switch to the next menu item. -
Page 26: Menu "Illumination
Commissioning 7.2.6 Menu "Illumination" Fig. 21: Menu item "Illumination" In this menu the desired display illumination is set. If this function is not relevant for you, press the "PLUS" or "MINUS" button to switch to the next menu item. Select from the following setting options: Menu function Description The display is permanently illuminated. -
Page 27: Menu "Search Mode
Commissioning 7.2.7 Menu "Search mode" Fig. 22: Menu item "Search mode" In this menu the available stations are set. We recommend the use of the automatic search mode for radio stations. If this function is not relevant for you, press the "PLUS" or "MINUS" button to switch to the next menu item. -
Page 28: Setting Stations Manually
Commissioning 7.2.7.2 Setting stations manually Fig. 24: Menu item "Setting stations manually" Use the following steps to set up the stations manually: First stations: 1. Switch to menu item "Search mode" with the "PROG" button. 2. Use the "PLUS / MINUS" buttons to change the setting option. ■... -
Page 29: Menu "Quit
Commissioning Additional stations: 8. Confirm the enquiry with the "PROG" button. 9. Confirm the enquiry "Yes" with the "PROG" button if you wish to set up additional stations. 10. Search for the suitable radio frequencies with the "PLUS / MINUS" buttons. 11. -
Page 30: Operation
Operation Operation Operating modes The device has three operating modes. Standby ■ The device is in standby. Fig. 26: Standby Standard operation, see chapter 8.2 “Normal operation“ on page 31 ■ E.g. playing music Fig. 27: Standard operation Settings, see chapter 8.3 “Extended operation“... -
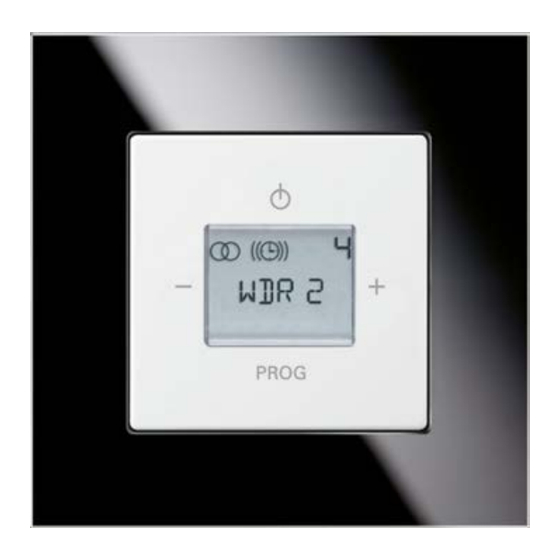
Page 31: Normal Operation
Operation Normal operation 8.2.1 Display [1] Current radio station [2] Station of the stored radio station Abb. 29: Overview of radio display [1] Stereo reception [2] The alarm is activated [3] Turn-off time (sleep function) is set. [4] Station channel / menu selection level [5] RDS name / frequency / menu item [6] MHz (displayed in the case of stations without RDS) -
Page 32: Adjusting The Volume
Operation 8.2.3 Adjusting the volume Use the following steps to adjust the volume: 1. During normal operation press the buttons "MINUS" [1] or "PLUS" [2]. – The device adjusts the volume. Fig. 32: Adjusting the volume 8.2.4 Selecting the station Use the following steps to change a station: 1. -
Page 33: Busch Idock / Aux (My Player)
Operation 8.2.5 Busch iDock / AUX (My player) Fig. 34: Busch-iDock / AUX With the Busch-iDock you can play music from your iPhone, iPod or a different player via the device and loudspeakers. A different player can be connected via the lateral jack socket of the Busch-iDock. NOTE To use this function the Busch-iDock station must be connected and available. -
Page 34: Sleep Function (Turn-Off Time)
Operation 8.2.6 Sleep function (turn-off time) Fig. 36: Sleep function By switching on the sleep function the device is automatically switched off after a preset time. This function can only be called up when the radio is switched on. Activating the sleep function 1. -
Page 35: Alarm Clock
Operation 8.2.7 Alarm clock Fig. 37: Menu item "Switching the alarm clock on / off" The alarm call function is switched on or off via this menu. This function can only be called up in standby mode when the radio is switched off. If the radio is switched on you would change to the device settings. -
Page 36: Extended Operation
Operation Extended operation The change to extended operation is only possible when the radio is switched on. In standby mode you would be activating the alarm clock. Use the following steps to change into extended operation: 1. Switch the radio on. 2. -
Page 37: Menu "Alarm Time
Operation 8.3.3 Menu "Alarm time" Fig. 40: Menu item "Setting the alarm time" The alarm time is set via this menu. If this function is not relevant for you, press the "PLUS" or "MINUS" button to switch to the next menu item. -
Page 38: Menu "Time
Operation 8.3.4 Menu "Time" Fig. 41: Menu item "Setting the time" The time is set via this menu item. If this function is not relevant for you, press the "PLUS" or "MINUS" button to switch to the next menu item. Time 1. -
Page 39: Menu "Station
Operation 8.3.5 Menu "Station" 8.3.5.1 Search and save Fig. 42: Menu item "Save station" Use the following steps to search for and to save a station: 1. Switch to menu item "Station" with the "PROG" button. 2. Select the "Save" function with the "PLUS" or the "MINUS“ button. 3. -
Page 40: Delete
Operation Quitting the input: 14. Switch in enquiry "Additional station" to "No". – Press the "PLUS" button. 15. Confirm the enquiry "No" with the "PROG" button once you have set all the stations. – The device switches back to the selection menu. 16. -
Page 41: Menu "Version
Operation 8.3.6 Menu "Version" Fig. 44: Menu item "Version" The version of the device is displayed via this menu. If this function is not relevant for you, press the "PLUS" or "MINUS" button to switch to the next menu item. Device version 1. -
Page 42: Reset (Resetting The Device)
Operation 8.3.8 RESET (resetting the device) If you wish to delete all the settings you have made and to re-enter them, the device must first be fully reset to its state at the point of delivery. 1. Press all four buttons on the device simultaneously for approximately 5 seconds. -
Page 43: Maintenance
Maintenance Maintenance Cleaning Caution! - Risk of damaging the device! ■ When spraying on cleaning agents, these can enter the device through crevices. – Do not spray cleaning agents directly onto the device. ■ Aggressive cleaning agents can damage the surface of the device. –... -
Page 44: Faq And Tips
FAQ and Tips FAQ and Tips Automatic overload detection: The device has an automatic overload detection function. This function switches off the loudspeaker output at overload. – To reset the automatic overload detection, switch the device ON, OFF and then ON again. –... -
Page 45: Index
Index Index Menu "Search mode" ............20, 27 Menu "Station" ............... 39 Adjusting the volume ............. 32 Menu "Time" ...............19, 22, 38 Alarm clock................35 Menu "Version" ..............41 Automatic overload detection ..........44 Menü „Beleuchtung“............20, 26 Automatic search mode ............27 Mounting ................. - Page 46 Index │46 Product manual 2CKA001473B8722...
- Page 47 Tel.: +49 2351 956-1600 document and its contents, or Fax: +49 2351 956-1700 extracts thereof, must not be reproduced, transmitted or reused by third parties without prior written consent by ABB © Copyright 2018 Busch-Jaeger Elektro GmbH All rights reserved...
Need help?
Do you have a question about the AudioWorld 8215 U and is the answer not in the manual?
Questions and answers