Table of Contents
Advertisement
Quick Links
Installation / Care / Use Manual
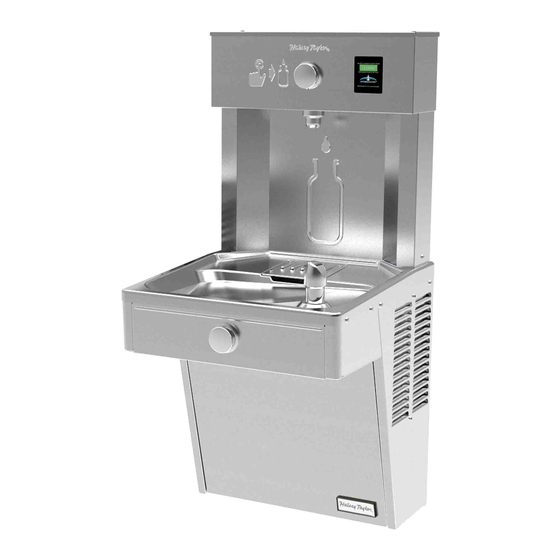
Model: HTHBHVR8-25 Hydroboost Bottle Filling Station & Cooler
Description
Combination Vandal Resistant Refrigerated Drinking Fountain (Cooler) and Bottle Filling Station delivers chilled, clean potable drinking water.
Top Bottle Filling section dispenses water for bottles at the press of the top button. While the bottom Water Cooler section, which houses the
refrigeration and filtration systems, delivers a steady stream of water for direct drinking at the press of the front button.
Ratings
•
Electrical: 230Vac, 50Hz, (See nameplate for Amperage), 1 phase.
•
Ambient Air Temperature: 50-100.4°F (10-38°C).
•
Water Pressure: 20-100 psig (0.14-0.69 MPa).
•
Maximum Water Temperature: 90 °F (3 2 °C).
•
Refrigerant: HFC-R134a
Definitions
DANGER
– Indicates death or serious injury will result if proper precautions are not taken.
WARNING
– Indicates death, serious injury or property damage can result if proper precautions are not taken.
CAUTION
– Indicates some injury or property damage may result if proper precautions are not taken.
Authorized Service Personnel – Factory trained personnel or personnel having working knowledge of electrical, plumbing and
machine (appliance) maintenance procedures.
Safety
DANGER
•
Please read these instructions completely before starting the installation or performing any service. Failure to follow the instructions and
safety precautions in this manual can result in serious injury or death.
•
After installation, keep these instructions in a safe location for future reference.
•
Electric supply must be identical in voltage, cycle, and phase to that specified on nameplate.
•
Electrical supply must have Ground Fault Circuit Interrupter (GFCI) protection.
•
A means for disconnecting electrical supply to the unit must be incorporated in the fixed wiring in accordance with wiring rules. This is
to allow electrical disconnection of the unit from electrical supply after installation.
WARNING
•
For use with clean, clear potable drinking water only. Do not use with water that is microbiologically unsafe or of unknown quality
without adequate disinfection before the system.
•
Installation and connection to water and electrical mains must be in compliance with local and national laws.
•
All Installation and Service work must be performed by an authorized service personnel.
CAUTION
•
This appliance can be used by children aged from 8 years and above and persons with reduced physical, sensory, or mental
capabilities or lack of experience and knowledge if they have been given supervision or instructions concerning use of the appliance
in a safe way and understand the hazards involved. Children shall not play with the appliance. Cleaning and user maintenance shall
not be made by children without supervision.
•
To prevent a metallic taste or increased metal content in the water due to an electrolysis process caused by electrical feedback from
the grounding of electrical equipment to water supply and water waste mains, connect to these mains using non-conductive
materials. The provided Filter meets this requirement.
HTHBHVR8_2A
HTHBHVR8-NF_2A
Original Instructions
Page 1
•
Ingress Protection: IP21
•
For Indoor Commercial Use only.
•
Water Inlet: 3/8"O.D. unplated copper tube.
•
Waste Water Outlet: 1-1/4" O.D. tube
1000003018 (Rev. D - 09/18)
Advertisement
Table of Contents

Subscribe to Our Youtube Channel
Related Manuals for Halsey Taylor HTHBHVR8-25


Summary of Contents for Halsey Taylor HTHBHVR8-25
- Page 1 HTHBHVR8-NF_2A Installation / Care / Use Manual Original Instructions Model: HTHBHVR8-25 Hydroboost Bottle Filling Station & Cooler Description Combination Vandal Resistant Refrigerated Drinking Fountain (Cooler) and Bottle Filling Station delivers chilled, clean potable drinking water. Top Bottle Filling section dispenses water for bottles at the press of the top button. While the bottom Water Cooler section, which houses the refrigeration and filtration systems, delivers a steady stream of water for direct drinking at the press of the front button.
- Page 2 HTHBHVR8_2A HTHBHVR8-NF_2A Installation For correct and safe installation, please read these instructions completely. DANGER • All Installation work must be performed by an authorized service personnel. • Disconnect electrical supply serving the Installation area to reduce risk of electrocution. • Unit not suitable for installations where water jets could be used.
- Page 3 HTHBHVR8_2A HTHBHVR8-NF_2A Page 3 1000003018 (Rev. D - 09/18)
- Page 4 HTHBHVR8_2A HTHBHVR8-NF_2A MOUNTING SCREWS TOP COVER MOUNTING BRACKET FOR FASTENING UNIT BOTTLE FILLER TO WALL MOUNTING SCREW DO NOT REMOVE MOUNTING SCREW DO NOT REMOVE NOTE: TRIM PLATES MUST BE INSTALLED ON THE INSIDE OF THE BOTTLE FILLER SIDE PANEL SLOTS WATER COOLER Installation: Bottle Filler Mounting 1.
- Page 5 HTHBHVR8_2A HTHBHVR8-NF_2A Operation: Start-Up Turn water supply on and inspect for leaks. Fix all leaks before continuing. Connect plug-end of International Power Cord Sets from the Cooler and Bottle Filler into electrical outlets. Bottle Filler must have electrical power to dispense water. Be sure to reinstall fuse to the circuit or switch the circuit breaker back to the “ON” position. WARNING: Exposed electrically energized components.
- Page 6 HTHBHVR8_2A HTHBHVR8-NF_2A “UNIT TYP” - Type of unit (REFRIG or NON-RFRG) SETTING FILTER CAPACITY “FLT SIZE” - Select filter capacity Depress the program button for approximately 2 seconds until the “RST BCNT” - Reset bottle count. display changes then release. The display will change and scroll When display shows “RNG SET”...
- Page 7 HTHBHVR8_2A HTHBHVR8-NF_2A Service: Inspection/Replacement • Inspect Bottle Filler and Cooler twice each year for proper operation and performance. • Inspection of the unit will require disconnecting electrical supply, removal of panels, etc. and reassembly and return to service practices. Lower Front Panel: To access the refrigeration system and plumbing connections, remove four (4) screws from bottom of cooler to remove the lower front panel.
Need help?
Do you have a question about the HTHBHVR8-25 and is the answer not in the manual?
Questions and answers