H3C S5130S-EI Series Manual
Hide thumbs
Also See for S5130S-EI Series:
- Installation manual (109 pages) ,
- Hardware information (67 pages) ,
- Configuration manual (250 pages)
Table of Contents
Advertisement
Contents
Preparing for installation ················································································ 1
Safety recommendations ··································································································································· 3
Examining the installation site ···························································································································· 3
Temperature/humidity ································································································································ 3
Cleanliness ················································································································································· 3
EMI ····························································································································································· 4
Laser safety ················································································································································ 4
Installation tools ················································································································································· 5
Installing the switch ························································································ 6
Installing the switch in a 19-inch rack················································································································· 6
Mounting brackets ······································································································································ 6
Attaching the mounting brackets to the switch ··························································································· 8
Rack-mounting the switch ························································································································ 10
Mounting the switch on a workbench ··············································································································· 11
Mounting the switch on a wall ·························································································································· 12
Grounding the switch ······································································································································· 13
Grounding the switch with a grounding strip ···························································································· 14
Grounding the switch with a grounding conductor buried in the earth ground ········································· 15
Installing and removing power modules ··········································································································· 15
Installing a power module ························································································································ 16
Removing a power module ······················································································································ 17
Connecting the power cord ······························································································································ 17
Connecting the AC power cord for the fixed AC power module (method 1) ············································ 18
Connecting the AC power cord for the fixed AC power module (method 2) ············································ 19
Connecting the DC power cord for the fixed DC power module (method 1) ············································ 20
Connecting the DC power cord for the fixed DC power module (method 2) ············································ 21
Connecting the power cord for a PSR75-12A/PSR150-A1 power module ·············································· 22
Connecting the power cord for a PSR150-D1 power module ·································································· 23
Verifying the installation ··································································································································· 24
Accessing the switch for the first time ·························································· 25
Setting up the configuration environment ········································································································ 25
Connecting the serial console cable ················································································································ 26
Connecting the micro USB console cable ········································································································ 27
Setting terminal parameters ····························································································································· 29
Powering on the switch ···································································································································· 29
Setting up an IRF fabric ··············································································· 30
IRF fabric setup flowchart ································································································································ 30
Planning IRF fabric setup ································································································································· 31
Planning IRF fabric size and the installation site ······················································································ 31
Identifying the master switch and planning IRF member IDs ··································································· 31
Planning IRF topology and connections··································································································· 31
Identifying IRF physical ports on the member switches ··········································································· 32
Planning the cabling scheme ··················································································································· 34
Configuring basic IRF settings ························································································································· 35
Connecting the IRF physical ports ··················································································································· 35
Verifying the IRF fabric setup ··························································································································· 36
Maintenance and troubleshooting ································································ 37
Fixed power module failure ······························································································································ 37
Symptom ·················································································································································· 37
Solution ···················································································································································· 37
Removable power module failure ···················································································································· 38
Symptom ·················································································································································· 38
Solution ···················································································································································· 38
i
Advertisement
Table of Contents

Related Manuals for H3C S5130S-EI Series


Summary of Contents for H3C S5130S-EI Series
-
Page 1: Table Of Contents
Contents Preparing for installation ················································································ 1 Safety recommendations ··································································································································· 3 Examining the installation site ···························································································································· 3 Temperature/humidity ································································································································ 3 Cleanliness ················································································································································· 3 EMI ····························································································································································· 4 Laser safety ················································································································································ 4 Installation tools ················································································································································· 5 Installing the switch ························································································ 6 Installing the switch in a 19-inch rack················································································································· 6 Mounting brackets ······································································································································... - Page 2 Fan tray failure ················································································································································· 38 Symptom ·················································································································································· 38 Solution ···················································································································································· 38 Configuration terminal issues ··························································································································· 38 No display on the configuration terminal ·································································································· 38 Garbled display on the configuration terminal ·························································································· 39 Appendix A Chassis views and technical specifications ······························· 40 Chassis views ··················································································································································...
- Page 3 Ethernet port LEDs ··································································································································· 87...
-
Page 4: Preparing For Installation
Preparing for installation The S5130S-EI switch series includes the following models: Model Product ID Non-PoE switch models LS-5130S-10P-EI S5130S-10P-EI LS-5130S-10P-EI-GL LS-5130S-12TP-EI S5130S-12TP-EI LS-5130S-12TP-EI-GL LS-5130S-20P-EI S5130S-20P-EI LS-5130S-20P-EI-GL LS-5130S-28P-EI S5130S-28P-EI LS-5130S-28P-EI-GL S5130S-28P-EI-M LS-5130S-28P-EI-M LS-5130S-28TP-EI S5130S-28TP-EI LS-5130S-28TP-EI-GL LS-5130S-52P-EI S5130S-52P-EI LS-5130S-52P-EI-GL S5130S-52P-EI-M LS-5130S-52P-EI-M LS-5130S-52TP-EI S5130S-52TP-EI LS-5130S-52TP-EI-GL LS-5130S-28S-EI... - Page 5 LS-5130S-52ST-PWR-EI S5130S-52ST-PWR-EI LS-5130S-52ST-PWR-EI-GL NOTE: The available chassis models and accessories vary by country and region. This document describes only the preceding models. For the chassis models and accessories available in your country or region, contact the local H3C marketing personnel.
-
Page 6: Safety Recommendations
Safety recommendations To avoid equipment damage or bodily injury, read the following safety recommendations before installation. Note that the recommendations do not cover every possible hazardous condition. • Before cleaning the switch, remove all power cords from the switch. Do not clean the switch with wet cloth or liquid. -
Page 7: Emi
Table 1 Dust concentration limit in the equipment room Substance Concentration limit (particles/m³) ≤ 3 x 10 Dust (no visible dust on the tabletop over three days) NOTE: Dust diameter ≥ 5 μm The equipment room must also meet strict limits on salts, acids, and sulfides to eliminate corrosion and premature aging of components, as shown in Table Table 2 Harmful gas limits in the equipment room... -
Page 8: Installation Tools
Installation tools No installation tools are provided with the switch. Prepare the following tools yourself as required. • Flat-blade screwdriver • Phillips screwdriver • ESD wrist strap • Needle-nose pliers • Diagonal pliers • Crimping tool • Marker • Heat gun... -
Page 9: Installing The Switch
CAUTION: Keep the tamper-proof seal on a mounting screw on the chassis cover intact, and if you want to open the chassis, contact H3C for permission. Otherwise, H3C shall not be liable for any consequence. Figure 1 Hardware installation flow... - Page 10 Table 3 Mounting brackets applicable to the switch Switch model Mounting brackets Views S5130S-28P-EI S5130S-28P-EI-M S5130S-28TP-EI S5130S-52P-EI S5130S-52P-EI-M S5130S-52TP-EI S5130S-28S-EI S5130S-28S-EI-M S5130S-52S-EI S5130S-52S-EI-M Mounting brackets A (provided) See A in Figure S5130S-28P-PWR-EI S5130S-28P-HPWR-EI S5130S-52P-PWR-EI S5130S-28S-PWR-EI S5130S-28S-HPWR-EI S5130S-28S-HPWR-EI-Q S5130S-52S-PWR-EI S5130S-28MP-EI S5130S-28MP-HPWR-EI S5130S-52MP-EI S5130S-28F-EI S5130S-52F-EI...
-
Page 11: Attaching The Mounting Brackets To The Switch
Figure 2 Mounting brackets (1) Screw hole for attaching the bracket to the switch (2 ) Screw hole for attaching the bracket to the rack post Attaching the mounting brackets to the switch Determine the installation position for the mounting brackets. The S5130S-28F-EI, S5130S-52F-EI, S5130S-28PS-EI, S5130S-28ST-PWR-EI, and ... - Page 12 Repeat step to attach the other mounting bracket to the chassis. Figure 3 Attaching mounting bracket A (S5130S-28P-HPWR-EI switch) Figure 4 Attaching mounting bracket B to the port side mounting position (S5130S-52F-EI switch) Figure 5 Attaching mounting bracket B to the power module side mounting position (S5130S-52F-EI switch)
-
Page 13: Rack-Mounting The Switch
Figure 6 Attaching mounting bracket C (S5130S-20P-PWR-EI switch) Rack-mounting the switch This task requires two people. To mount the switch in the rack: Wear an ESD wrist strap and make sure it makes good skin contact and is reliably grounded. Verify that the mounting brackets have been securely attached to the switch chassis. -
Page 14: Mounting The Switch On A Workbench
Figure 8 Mounting an S5130S-52F-EI switch in the rack (power module side mounting position for the mounting brackets) Figure 9 Mounting an S5130S-20P-PWR-EI switch in the rack Mounting the switch on a workbench IMPORTANT: • Ensure 10 cm (3.9 in) of clearance around the chassis for heat dissipation. •... -
Page 15: Mounting The Switch On A Wall
Mounting the switch on a wall CAUTION: • Before drilling holes in a wall, make sure no electrical lines exist in the wall. • Leave a minimum clearance of 10 mm (0.39 in) around the chassis for heat dissipation. Table 4 describes the switch models that support wall mounting and installation holes distances required for wall-mounting the switch. -
Page 16: Grounding The Switch
Drill two holes with a diameter of 6 mm (0.24 in) (7 mm/0.28 in for an S5130S-16S-PWR-EI switch) and a depth of 25 mm (0.98 in) at the marked locations. Hammer the screw anchors into the wall and use a Phillips screwdriver to fasten the screw into the screw anchor. Leave 1.5 mm (0.06 in) between the screw head and the wall for hanging the switch. -
Page 17: Grounding The Switch With A Grounding Strip
Grounding the switch with a grounding strip WARNING! Connect the grounding cable to the grounding system in the equipment room. Do not connect it to a fire main or lightning rod. If a grounding strip is available at the installation site, use the grounding strip to ground the switch. To ground the switch by using a grounding strip: Attach the ring terminal end of the grounding cable to the grounding hole in the switch. -
Page 18: Grounding The Switch With A Grounding Conductor Buried In The Earth Ground
Figure 15 Connecting the grounding cable to a grounding strip (1) Grounding post (2) Grounding strip (3) Grounding cable (4) Hex nut Grounding the switch with a grounding conductor buried in the earth ground If the installation site has no grounding strips, but earth ground is available, hammer a 0.5 m (1.64 ft) or longer angle iron or steel tube into the earth ground to serve as a grounding conductor. -
Page 19: Installing A Power Module
This section applies only to the switch models that support removable power modules. The S5130S-28F-EI and S5130S-52F-EI switches each provide two power module slots. They come with power module slot 1 empty and power module slot 2 installed with a filler panel. You can install one power module, or two power modules for redundancy. -
Page 20: Removing A Power Module
AC power module (method 1) S5130S-52P-PWR-EI S5130S-28S-HPWR-EI Connecting the DC power cord for the fixed S5130S-52S-PWR-EI H3C RPS1600-A DC power module (method 1) S5130S-28MP-HPWR-EI Connecting the AC power cord for the fixed AC power source AC power module (method 2) -
Page 21: Connecting The Ac Power Cord For The Fixed Ac Power Module (Method 1)
S5130S-52F-EI –48 VDC power source in the Connecting the power cord for a equipment room PSR150-D1 power module H3C RPS800-A or Connecting the power cord for a RPS1600-A PSR150-D1 power module S5130S-16S-PWR-EI Connecting the AC power cord for the fixed... -
Page 22: Connecting The Ac Power Cord For The Fixed Ac Power Module (Method 2)
Figure 22 Securing the AC power cord for the fixed AC power module through a cable tie Connecting the AC power cord for the fixed AC power module (method 2) Insert the two ends of the bail latch through the two holes at both sides of the AC-input power receptacle. -
Page 23: Connecting The Dc Power Cord For The Fixed Dc Power Module (Method 1)
(method 1) CAUTION: • To connect the switch to a –48 VDC power source, use the DC power cord provided by H3C. To avoid connection mistakes, identify the positive (+) and negative (-) marks on the two wires of the DC power cord before connection. -
Page 24: Connecting The Dc Power Cord For The Fixed Dc Power Module (Method 2)
Figure 25 Connecting the DC power cord for the fixed DC power module Connecting the DC power cord for the fixed DC power module (method 2) CAUTION: To avoid connection mistakes, identify the positive (+) and negative (-) marks above the DC power receptacle before connecting the switch to a –48 VDC power source. -
Page 25: Connecting The Power Cord For A Psr75-12A/Psr150-A1 Power Module
Figure 26 Attaching the terminal block to the fixed DC power module Figure 27 Securing the DC power cord to the terminal block Connecting the power cord for a PSR75-12A/PSR150-A1 power module Pull the bail latch leftward, as shown in Figure Connect the plug of the power cord to the power receptacle on the switch. -
Page 26: Connecting The Power Cord For A Psr150-D1 Power Module
(– or L–) to the negative terminal (–) and the positive wire (+ or M/N) to the positive terminal (+). • To use an H3C RPS to supply power to the power module, use a compatible RPS power cord to connect the RPS to the power module. -
Page 27: Verifying The Installation
Figure 30 Connecting the DC power cord for a PSR150-D1 power module (S5130S-52F-EI) Verifying the installation After you complete the installation, verify that: • There is enough space for heat dissipation around the switch, and the rack or workbench is stable. -
Page 28: Accessing The Switch For The First Time
The other S5130S-EI switch models each provide only a serial console port. No serial console cable or micro USB console cable is provided with the switch. Prepare yourself or purchase it from H3C. Figure 31 Connecting the serial console port to a PC... -
Page 29: Connecting The Serial Console Cable
Connecting the serial console cable A serial console cable is an 8-core shielded cable, with a crimped RJ-45 connector at one end for connecting to the serial console port of the switch, and a DB-9 female connector at the other end for connecting to the serial port on the configuration terminal. -
Page 30: Connecting The Micro Usb Console Cable
Connect the micro USB connector to the micro USB console port on the switch. Click the following link, or copy it to the address bar on the browser to download the USB console driver. http://www.h3c.com.hk/Technical_Support___Documents/Software_Download/Other_Product /USB_Console/USB_Console/ Select a driver program according to the operating system you use: XR21V1410_XR21B1411_Windows_Ver1840_x86_Installer.EXE—32-bit operating... - Page 31 Figure 34 Software Installation Click Finish. Figure 35 Completing the device driver installation wizard...
-
Page 32: Setting Terminal Parameters
Setting terminal parameters To configure and manage the switch through the console port, you must run a terminal emulator program, HyperTerminal or PuTTY, on your configuration terminal. For more information about the terminal emulator programs, see the user guides for these programs. The following are the required terminal settings: •... -
Page 33: Setting Up An Irf Fabric
Setting up an IRF fabric You can use H3C IRF technology to connect and virtualize the switches into a large virtual switch called an "IRF fabric" for flattened network topology, and high availability, scalability, and manageability. IRF fabric setup flowchart... -
Page 34: Planning Irf Fabric Setup
Step Description "Installing the switch in a 19-inch rack" or "Mounting the switch Install IRF member switches. on a workbench." Connect grounding cables and "Grounding the switch" and "Connecting the power cord." power cords. Power on the switches. See the IRF configuration guide or virtual technologies Configure basic IRF settings. -
Page 35: Identifying Irf Physical Ports On The Member Switches
The switch can form an IRF fabric only with switches from the same switch series. For the physical ports that can be used for IRF connections and the restrictions for using the ports, see Table 7. The IRF physical ports can set up IRF connections only when operating at their highest speeds. For example, a 10-GE port must operate at 10 Gbps. - Page 36 Table 7 IRF physical ports and use restrictions Candidate IRF physical Restrictions for using the ports for Device model ports IRF connections S5130S-16S-PWR-EI The port must operate at its highest speed. • S5130S-28S-EI SFP+ port—10 Gbps • 10/100/1000BASE-T autosensing S5130S-28PS-EI All the following ports on the port—1 Gbps S5130S-28S-EI-M...
-
Page 37: Planning The Cabling Scheme
Candidate IRF physical Restrictions for using the ports for Device model ports IRF connections The port must operate at 1 Gbps. The IRF physical ports on the member switches must be same type. All the following ports on the For switches with 52 service ports, the service front panel: Other S5130S-EI switch ports are divided into two groups: ports 1 to... -
Page 38: Configuring Basic Irf Settings
Use twisted pair cables, SFP/SFP+ cables, or SFP/SFP+ transceiver modules and fibers to connect the IRF member switches as planned. Wear an ESD wrist strap when you connect twisted pair cables, SFP/SFP+ cables, or SFP/SFP+ transceiver modules and fibers. For how to connect them, see H3C Transceiver Modules User Guide. -
Page 39: Verifying The Irf Fabric Setup
Verifying the IRF fabric setup To verify the basic functionality of the IRF fabric after you finish configuring basic IRF settings and connecting IRF ports: Log in to the IRF fabric through the console port of any member switch. Create a Layer 3 interface, assign it an IP address, and make sure the IRF fabric and the remote network management station can reach each other. -
Page 40: Maintenance And Troubleshooting
Verify that the operating temperature of the switch is in the acceptable range, and the power module has good ventilation. Overtemperature can cause the power module to stop working and enter protection mode. If the issue persists, contact H3C Support. -
Page 41: Removable Power Module Failure
Fan tray failure Symptom The system status LED on the switch indicates a fan tray failure. Solution When a fan tray issue occurs, contact H3C Support. Configuration terminal issues No display on the configuration terminal Symptom The configuration terminal does not have display when the switch is powered on. -
Page 42: Garbled Display On The Configuration Terminal
Stop bits—1. Flow control—None. Verify that the console cable is not faulty. If the issue persists, contact H3C Support. Garbled display on the configuration terminal Symptom The configuration terminal displays garbled text. Solution To resolve the issue: Verify that the following settings are configured for the terminal: Baud rate—9600. -
Page 43: Appendix A Chassis Views And Technical Specifications
Appendix A Chassis views and technical specifications Chassis views S5130S-10P-EI Figure 42 Front panel (1) 10/100/1000BASE-T autosensing Ethernet port (2) 10/100/1000BASE-T autosensing Ethernet port LED (3) SFP port LED (4) System status LED (SYS) (5) Console port (6) SFP port Figure 43 Rear panel (1) Grounding screw (2) AC-input power receptacle... -
Page 44: S5130S-12Tp-Ei
S5130S-12TP-EI Figure 44 Front panel (1) 10/100/1000BASE-T autosensing Ethernet port (2) 10/100/1000BASE-T autosensing Ethernet port LED (3) SFP port LED (4) System status LED (SYS) (5) Console port (6) SFP port Figure 45 Rear panel (1) Grounding screw (2) AC-input power receptacle S5130S-20P-EI Figure 46 Front panel (1) 10/100/1000BASE-T autosensing Ethernet port... -
Page 45: S5130S-28P-Ei/S5130S-28P-Ei-M
Figure 47 Rear panel (1) AC-input power receptacle (2) Grounding screw S5130S-28P-EI/S5130S-28P-EI-M Figure 48 Front panel (1) 10/100/1000BASE-T autosensing Ethernet port (2) 10/100/1000BASE-T autosensing Ethernet port LED (3) SFP port LED (4) System status LED (SYS) (5) Console port (6) SFP port Figure 49 Rear panel (1) Grounding screw (2) AC-input power receptacle... -
Page 46: S5130S-28Tp-Ei
S5130S-28TP-EI Figure 50 Front panel (1) 10/100/1000BASE-T autosensing Ethernet port (2) SFP port (3) Console port (4) Micro USB console port (5) 10/100/1000BASE-T autosensing Ethernet port LED (6) System status LED (SYS) (7) SFP port LED Figure 51 Rear panel (1) Grounding screw (2) AC-input power receptacle S5130S-52P-EI/S5130S-52P-EI-M... -
Page 47: S5130S-52Tp-Ei
Figure 53 Rear panel (1) Grounding screw (2) AC-input power receptacle S5130S-52TP-EI Figure 54 Front panel (1) 10/100/1000BASE-T autosensing Ethernet port (2) 10/100/1000BASE-T autosensing Ethernet port LED (3) Console port (4) Micro USB console port (5) System status LED (SYS) (6) SFP port LED (7) SFP port Figure 55 Rear panel... -
Page 48: S5130S-28S-Ei/S5130S-28S-Ei-M
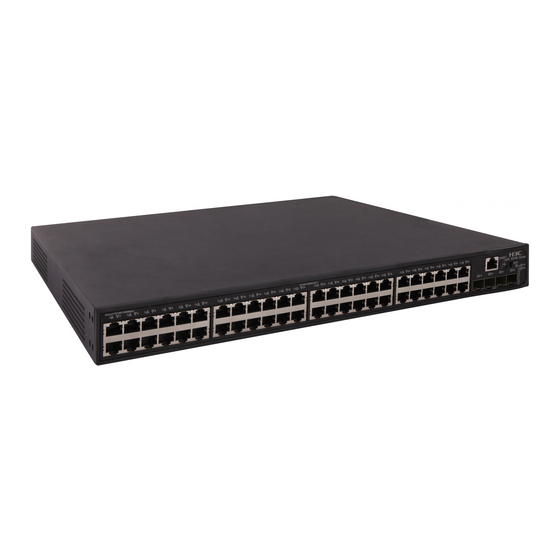
S5130S-28S-EI/S5130S-28S-EI-M Figure 56 Front panel (1) 10/100/1000BASE-T autosensing Ethernet port (2) 10/100/1000BASE-T autosensing Ethernet port LED (3) SFP+ port LED (4) System status LED (SYS) (5) Micro USB console port (6) Console port (7) SFP+ port Figure 57 Rear panel (1) Grounding screw (2) AC-input power receptacle S5130S-52S-EI/S5130S-52S-EI-M... -
Page 49: S5130S-28F-Ei
Figure 59 Rear panel (1) Grounding screw (2) AC-input power receptacle S5130S-28F-EI Figure 60 Front panel (1) SFP port (2) SFP port LED (3) 10/100/1000BASE-T autosensing Ethernet port (4) 10/100/1000BASE-T autosensing Ethernet port LED (5) Management Ethernet port (6) Console port (7) Micro USB console port (8) System status LED (SYS) (9) Power module 2 status LED (PWR2) -
Page 50: S5130S-52F-Ei
S5130S-52F-EI Figure 62 Front panel (1) SFP port (2) SFP port LED (3) 10/100/1000BASE-T autosensing Ethernet port (4) 10/100/1000BASE-T autosensing Ethernet port LED (5) Console port (6) Micro USB console port (7) System status LED (SYS) (8) Power module 2 status LED (PWR2) (9) Power module 1 status LED (PWR1) (10) SFP+ port (11) SFP+ port LED... -
Page 51: S5130S-28Mp-Ei
S5130S-28MP-EI Figure 64 Front panel (1) 10/100/1000BASE-T autosensing Ethernet port (2) 5G/2.5G/1000BASE-T autosensing Ethernet port (5GBASE-T) (3) Console port (4) 10/100/1000BASE-T autosensing Ethernet port LED (5) System status LED (SYS) (6) SFP port LED (7) 5G/2.5G/1000BASE-T autosensing Ethernet port LED (8) Micro USB console port (9) SFP port Figure 65 Rear panel... -
Page 52: S5130S-52Mp-Ei
S5130S-52MP-EI Figure 66 Front panel (1) 10/100/1000BASE-T autosensing Ethernet port (2) 10/100/1000BASE-T autosensing Ethernet port LED (3) 5G/2.5G/1000BASE-T autosensing Ethernet port (5GBASE-T) (4) Console port (5) Micro USB console port (6) System status LED (SYS) (7) SFP port (8) SFP port LED (9) 5G/2.5G/1000BASE-T autosensing Ethernet port LED Figure 67 Rear panel (1) Grounding screw... -
Page 53: S5130S-28Ps-Ei
S5130S-28PS-EI Figure 68 Front panel (1) 10/100/1000BASE-T autosensing Ethernet port (2) 10/100/1000BASE-T autosensing Ethernet port LED (3) SFP port (4) Management Ethernet port (5) Console port (6) System status LED (SYS) (7) SFP+ port (8) SFP+ port LED (9) Management Ethernet port status LED (ACT/LINK) (10) SFP port LED Figure 69 Rear panel (1) Grounding screw... -
Page 54: S5130S-28St-Ei
S5130S-28ST-EI Figure 70 Front panel (1) 10/100/1000BASE-T autosensing Ethernet port (2) SFP+ port (3) 10/5/2.5/1GBASE-T autosensing Ethernet port (4) Console port (5) 10/100/1000BASE-T autosensing Ethernet port LED (6) SFP+ port LED (7) 10/5/2.5/1GBASE-T autosensing Ethernet port LED (8) System status LED (SYS) Figure 71 Rear panel (1) Grounding screw (2) AC-input power receptacle... -
Page 55: S5130S-10P-Hpwr-Ei
Figure 73 Rear panel (1) AC-input power receptacle (2) Grounding screw S5130S-10P-HPWR-EI Figure 74 Front panel (1) 10/100/1000BASE-T autosensing Ethernet port (2) 10/100/1000BASE-T autosensing Ethernet port LED (3) SFP port LED (4) System status LED (SYS) (5) Mode LED (MODE) (6) Port LED mode switching button (7) Console port (8) SFP port... -
Page 56: S5130S-12Tp-Hpwr-Ei
S5130S-12TP-HPWR-EI Figure 76 Front panel (1) 10/100/1000BASE-T autosensing Ethernet port (2) 10/100/1000BASE-T autosensing Ethernet port LED (3) SFP port LED (4) System status LED (SYS) (5) Mode LED (MODE) (6) Port LED mode switching button (7) Console port (8) SFP port Figure 77 Rear panel (1) AC-input power receptacle (2) Grounding screw... -
Page 57: S5130S-28P-Pwr-Ei
Figure 79 Rear panel (1) AC-input power receptacle (2) Grounding screw S5130S-28P-PWR-EI Figure 80 Front panel (1) 10/100/1000BASE-T autosensing Ethernet port (2) Port LED mode switching button (3) 10/100/1000BASE-T autosensing Ethernet port LED (4) SFP port LED (5) System status LED (SYS) (6) Mode LED (MODE) (7) Console port (8) SFP port... -
Page 58: S5130S-28P-Hpwr-Ei
S5130S-28P-HPWR-EI Figure 82 Front panel (1) 10/100/1000BASE-T autosensing Ethernet port (2) Console port (3) Port LED mode switching button (4) 10/100/1000BASE-T autosensing Ethernet port LED (5) System status LED (SYS) (6) RPS status LED (RPS) (7) Mode LED (MODE) (8) SFP port LED (9) SFP port Figure 83 Rear panel (1) Grounding screw... -
Page 59: S5130S-52P-Pwr-Ei
S5130S-52P-PWR-EI Figure 84 Front panel (1) 10/100/1000BASE-T autosensing Ethernet port (2) 10/100/1000BASE-T autosensing Ethernet port LED (3) Console port (4) Port LED mode switching button (5) System status LED (SYS) (6) RPS status LED (RPS) (7) Mode LED (MODE) (8) SFP port (9) SFP port LED Figure 85 Rear panel (1) Grounding screw... -
Page 60: S5130S-28S-Pwr-Ei
Figure 87 Rear panel (1) AC-input power receptacle (2) Grounding screw S5130S-28S-PWR-EI Figure 88 Front panel (1) 10/100/1000BASE-T autosensing Ethernet port (2) Port LED mode switching button (3) 10/100/1000BASE-T autosensing Ethernet port LED (4) SFP+ port LED (5) System status LED (SYS) (6) Mode LED (MODE) (7) Micro USB console port (8) Console port... -
Page 61: S5130S-28S-Hpwr-Ei
S5130S-28S-HPWR-EI Figure 90 Front panel (1) 10/100/1000BASE-T autosensing Ethernet port (2) SFP port (3) Console port (4) Port LED mode switching button (5) 10/100/1000BASE-T autosensing Ethernet port LED (6) System status LED (SYS) (7) RPS status LED (RPS) (8) Mode LED (MODE) (9) SFP+ port LED (10) SFP port LED (11) Micro USB console port... -
Page 62: S5130S-52S-Pwr-Ei
Figure 93 Rear panel (1) AC-input power receptacle (2) Heat sink (3) Grounding screw S5130S-52S-PWR-EI Figure 94 Front panel 10 9 (1) 10/100/1000BASE-T autosensing Ethernet port (2) 10/100/1000BASE-T autosensing Ethernet port LED (3) Console port (4) Port LED mode switching button (5) System status LED (SYS) (6) RPS status LED (RPS) (7) Mode LED (MODE) -
Page 63: S5130S-28Mp-Hpwr-Ei
S5130S-28MP-HPWR-EI Figure 96 Front panel (1) 10/100/1000BASE-T autosensing Ethernet port (2) 5G/2.5G/1000BASE-T autosensing Ethernet port (5GBASE-T) (3) Console port (4) Port LED mode switching button (5) 10/100/1000BASE-T autosensing Ethernet port LED (6) System status LED (SYS) (7) RPS status LED (RPS) (8) Mode LED (MODE) (9) SFP port LED (10) 5G/2.5G/1000BASE-T autosensing Ethernet port LED... -
Page 64: S5130S-10Ms-Upwr-Ei
S5130S-10MS-UPWR-EI Figure 98 Front panel (1) 2.5G/1000/100BASE-T autosensing Ethernet port (2) SFP+ port (3) Console port (4) Port LED mode switching button (5) 2.5G/1000/100BASE-T autosensing Ethernet port LED (6) System status LED (SYS) (7) RPS status LED (RPS) (8) SFP+ port LED (9) Mode LED (MODE) (10) Micro USB console port Figure 99 Rear panel... -
Page 65: S5130S-28St-Pwr-Ei
S5130S-28ST-PWR-EI Figure 100 Front panel (1) 10/100/1000BASE-T autosensing Ethernet port (2) SFP+ port (3) 10/5/2.5/1GBASE-T autosensing Ethernet port (4) Console port (5) Port LED mode switching button (6) 10/100/1000BASE-T autosensing Ethernet port LED (7) SFP+ port LED (8) System status LED (SYS) (9) Mode LED (MODE) (10) 10/5/2.5/1GBASE-T autosensing Ethernet port LED Figure 101 Rear panel... -
Page 66: S5130S-52St-Pwr-Ei
S5130S-52ST-PWR-EI Figure 102 Front panel (1) 10/100/1000BASE-T autosensing Ethernet port (2) 10/100/1000BASE-T autosensing Ethernet port LED (3) SFP+ port (4) Console port (5) Port LED mode switching button (6) Mode LED (MODE) (7) System status LED (SYS) (8) 10/5/2.5/1GBASE-T autosensing Ethernet port (9) 10/5/2.5/1GBASE-T autosensing Ethernet port LED (10) SFP+ port LED Figure 103 Rear panel... - Page 67 Item S5130S-10P-EI S5130S-12TP-EI S5130S-20P-EI 4 (The two lowest-numbered SFP ports form combo interfaces with their SFP port corresponding 10/100/1000BASE-T autosensing Ethernet ports, respectively.) • Rated voltage: 100 VAC to 240 VAC @ 50 or 60 Hz Input voltage • Max voltage: 90 VAC to 264 VAC @ 47 to 63 Hz Minimum power consumption Maximum power...
- Page 68 S5130S-28P-EI S5130S-52P-EI Item S5130S-28P-EI-M S5130S-52P-EI-M Melting current of 2 A/250 V 3.15 A/250 V power module fuse Using fixed fan trays to draw ambient air in Cooling system Natural cooling without fan trays from the left side and exhaust heated air from the right side and power module side.
- Page 69 S5130S-28S-EI S5130S-52S-EI Item S5130S-28TP-EI S5130S-52TP-EI S5130S-28S-EI-M S5130S-52S-EI-M Minimum power 10 W 20 W 10 W 19 W consumption Maximum power 24 W 42 W 24 W 44 W consumption Chassis leakage UL 60950-1/EN 60950-1/IEC 60950-1/GB 4943 current compliance Melting current of 2 A/250 V 3.15 A/250 V 2 A/250 V...
- Page 70 Rated voltage: –48 VDC to –60 VDC • Max voltage: –36 VDC to –72 VDC DC power source for the PSR150-D1 power module: –48 VDC power source in the equipment room or an RPS (H3C RPS800-A or RPS1600-A) • • 1 × PSR75-12A: 15 W 1 ×...
- Page 71 Item S5130S-28MP-EI S5130S-52MP-EI • 1 × serial console port • 1 × micro USB console port Console port When both ports are connected, only the micro USB console port is available. 10/100/1000BASE-T autosensing Ethernet port 5G/2.5G/1000BASE-T autosensing Ethernet port SFP port •...
- Page 72 Item S5130S-28ST-EI S5130S-52ST-EI S5130S-28PS-EI 8 (The eight SFP ports form combo interfaces with their corresponding SFP port 10/100/1000BASE-T autosensing Ethernet ports, respectively.) SFP+ port AC power source: • Rated voltage: 100 VAC to 240 VAC @ 50 or 60 Hz •...
- Page 73 Item S5130S-10P-HPWR-EI S5130S-12TP-HPWR-EI S5130S-20P-PWR-EI 4 (The two lowest-numbered SFP ports form combo interfaces with their SFP port corresponding 10/100/1000BASE-T autosensing Ethernet ports, respectively.) • Rated voltage: 100 VAC to 240 VAC @ 50 or 60 Hz Input voltage • Max voltage: 90 VAC to 264 VAC @ 47 to 63 Hz 30 W The combo copper ports on Maximum PoE...
- Page 74 Item S5130S-28ST-PWR-EI S5130S-52ST-PWR-EI 10/5/2.5/1GBASE-T autosensing Ethernet port SFP+ port • Rated voltage: 100 VAC to 240 VAC @ 50 or 60 Hz Input voltage • Max voltage: 90 VAC to 264 VAC @ 47 to 63 Hz Maximum PoE power 30 W per port Total PoE power...
- Page 75 VAC to 240 VAC @ 50 • Max voltage: 90 VAC to 264 VAC @ 47 to 63 Hz or 60 Hz Input voltage DC power source: H3C RPS1600-A • Max voltage: 90 VAC • Rated voltage: –54 VDC to –57 VDC to 264 VAC @ 47 to 63 •...
- Page 76 240 VAC @ 47 to 63 Hz to 240 to 240 VAC @ VAC @ 50 VAC @ 50 50 or 60 DC power source: H3C or 60 Hz or 60 Hz RPS1600-A Input voltage • • • •...
- Page 77 S5130S-16S- S5130S-28S- S5130S-52S- S5130S-28S- S5130S-28S Item PWR-EI PWR-EI PWR-EI HPWR-EI -HPWR-EI-Q Maximum power • AC: 478 W AC: 451 W consumption 157 W 235 W 400 W • (including PoE DC: 825 W DC: 793 W power consumption) Chassis leakage UL 60950-1/EN 60950-1/IEC 60950-1/GB 4943 current compliance...
- Page 78 Rated voltage: 100 VAC to 240 VAC @ 50 or 60 Hz • Max voltage: 90 VAC to 264 VAC @ 47 to 63 Hz DC power source: H3C RPS1600-A Input voltage • Rated voltage: –54 VDC to –57 VDC •...
-
Page 79: Appendix B Frus
AC: 100 VAC to 240 VAC @ 50 Hz or 60 Hz Rated input voltage DC: 240 VDC For more information about the power module, see H3C PSR75-12A AC: 90 VAC to 290 VAC @ PSR75-12A Power Module User 47 Hz to 63 Hz Max input voltage Manual. -
Page 80: Management Ethernet Port
• S5130S-28S-EI • S5130S-28S-EI-M • S5130S-52S-EI • S5130S-52S-EI-M • S5130S-28S-PWR-EI • S5130S-28S-HPWR-EI • S5130S-28S-HPWR-EI-Q • S5130S-52S-PWR-EI • S5130S-28F-EI • S5130S-52F-EI • S5130S-10MS-UPWR-EI • S5130S-28MP-EI • S5130S-28MP-HPWR-EI • S5130S-52MP-EI Table 22 Console port specifications Item Serial console port Micro USB console port Connector type RJ-45 Micro USB Type B... -
Page 81: 10/100/1000Base-T Autosensing Ethernet Port
10/100/1000BASE-T autosensing Ethernet port Table 24 10/100/1000BASE-T autosensing Ethernet port specifications Item Specification Connector type RJ-45 • 10 Mbps, half/full duplex • 100 Mbps, half/full duplex Transmission rate, duplex mode, and • auto MDI/MDI-X 1000 Mbps, full duplex • MDI/MDI-X autosensing Max transmission distance 100 m (328.08 ft) Transmission medium... -
Page 82: 10/5/2.5/1Gbase-T Autosensing Ethernet Port
Table 26 2.5G/1000/100BASE-T autosensing Ethernet port specifications Item Specification Connector type RJ-45 • 2.5 Gbps, full duplex • 1 Gbps, full duplex Transmission rate, duplex mode, and • auto MDI/MDI-X 100 Mbps, full duplex • MDI/MDI-X autosensing Max transmission distance 2.5G mode: 100 m (328.08 ft) Transmission medium Category-5e (or above) twisted pair cable... - Page 83 Table 28 SFP port support for SFP transceiver modules and cables SFP port support for SFP Model Restrictions transceiver modules and cables S5130S-28S-EI S5130S-28ST-EI S5130S-28S-EI-M S5130S-52ST-EI S5130S-52S-EI S5130S-52S-EI-M No SFP ports S5130S-28S-PWR-EI S5130S-28ST-PWR-EI S5130S-52S-PWR-EI S5130S-52ST-PWR-EI S5130S-10MS-UPWR-EI S5130S-10P-EI To use transceiver modules with a maximum transmission distance S5130S-20P-EI greater than or equal to 80 km...
- Page 84 SFP port support for SFP Model Restrictions transceiver modules and cables S5130S-28PS-EI S5130S-28P-HPWR-EI S5130S-28S-HPWR-EI Make sure the ambient temperature does not exceed 40°C (104°F) when the following conditions are met: • The switch uses one or two PSR75-12A power modules S5130S-28F-EI for power supply.
- Page 85 GE SFP Modal Central Cable Connector transceiver bandwidth transmission wavelength specifications module/cable (MHz*km) distance 9/125 µm single-mode 10 km (6.21 miles) optical fiber 50/125 µm SFP-GE-LX-SM13 1310 nm multi-mode 500/400 550 m (1804.46 ft) 10-A optical fiber 62.5/125 µm multi-mode 550 m (1804.46 ft) optical fiber 9/125 µm...
-
Page 86: Sfp+ Port
• As a best practice, use H3C SFP transceiver modules and cables for the SFP ports. • The H3C SFP transceiver modules and cables available for the SFP ports are subject to change over time. For the most up-to-date list of H3C SFP transceiver modules and cables available for the SFP ports, contact your H3C sales representative or technical support engineer. - Page 87 Table 31 10-GE SFP+ transceiver modules available for the SFP+ ports 10-GE SFP+ Modal Central transceiver Connector Fiber bandwidth transmission wavelength module (MHz*km) distance 2000 300 m (984.3 ft) 50/125 µm multi-mode 82 m (269.03 ft) optical fiber SFP-XG-SX-MM85 66 m (216.54 ft) 850 nm 62.5/125 µm 33 m (108.27 ft)
-
Page 88: Combo Interface
(2) Pull latch NOTE: • As a best practice, use H3C SFP/SFP+ transceiver modules or SFP+ cables for the SFP+ ports. • The H3C SFP/SFP+ transceiver modules and SFP+ cables available for the SFP+ ports are subject to change over time. For the most up-to-date list of H3C SFP/SFP+ transceiver modules and SFP+ cables available for the SFP+ ports, contact your H3C sales representative or technical support engineer. -
Page 89: Management Ethernet Port Led
Table 33 System status LED description LED mark Status Description Steady yellow Boot ROM booting stage. Linux kernel booting stage, or the switch has started up Steady green correctly. Software image loading and decompressing stage, or Flashing green (1 Hz) software booting stage. -
Page 90: Mode Led (Mode)
Table 36 RPS status LED description LED mark Status Description Steady green Both the RPS DC input and the AC input are normal. The RPS DC input is normal, but the AC input is disconnected or Steady yellow has failed. The RPS DC input has failed, or no RPS is connected. - Page 91 Table 39 Ethernet port LED description for PoE switch models Mode LED Ethernet port LED Description status status Steady green A link is present on the port. Steady green (Link/Active Flashing green The port is sending or receiving data. mode) No link is present on the port.
Need help?
Do you have a question about the S5130S-EI Series and is the answer not in the manual?
Questions and answers