UFactory uArm User Manual
Hide thumbs
Also See for uArm:
- User manual (50 pages) ,
- Assembly instructions manual (21 pages) ,
- Getting started manual (14 pages)

Related Manuals for UFactory uArm


Summary of Contents for UFactory uArm
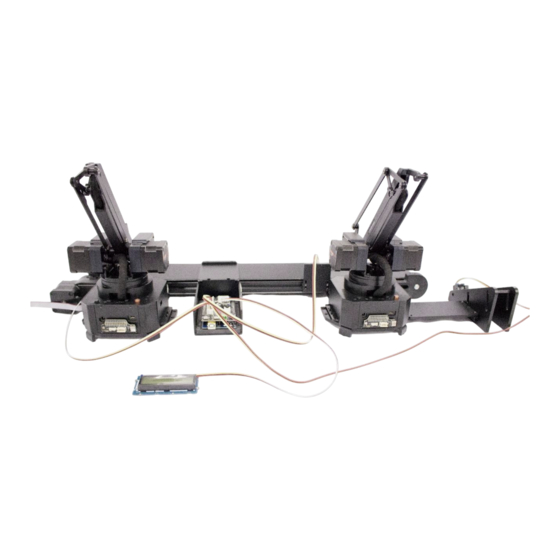
- Page 1 Conveyor User Manual V1.0.0 Part Lists Hardware: 1. Conveyor Belt * 1 2. 12V Power Adapter * 1 3. Screwdriver * 1 4. Seeed Grove Sensor Cable * 4 5. LCD * 1 6. USB Type C Cord * 2 7.
-
Page 2: Software Installation
1. Software installation 1) Download the 2) Download and extract XLoader. 3) Open XLoader and select your uArm's COM port from the drop down menu on the lower left. 4) Select the appropriate device from the dropdown list titled "Device". -
Page 3: Hardware Installation
2. Hardware installation 1) Install the uArm Stator Fix the uArm stator on the conveyor belt. - Page 4 2) Install Main Control Board Fix the control board on the base of the conveyor belt. 3) Install another uArm Stator Fix another stator on the conveyor belt.
- Page 5 4) Install the Material Slide Use the connection plate to connect the stator and material slide. 5) Connect the Ultrasonic Sensor Insert the ultrasonic sensor cable into the D10-D11 port of the control board.
- Page 6 6) Connect the Line Finder Insert the line finder cable into the D12-D13 port of the control board. 7) Connect the color sensor Insert the color sensor cable into the IIC port of the control board.
- Page 7 8) Connect the LCD Insert the LCD cable into the IIC port of the control board. 9) Connect the Conveyor Belt Insert the conveyor belt motor 8PIN cable into the motor drive port of the control board.
- Page 8 10) Install the uArm Swift Pro Place the uArm Swift Pro on the stator tightly. Place the other uArm Swift Pro the same way.
- Page 9 Connect the uArm Swift Pro to the control board with the TYPE-C cable. The TYPE-C interface on the left side of the control board is connected to the uArm Swift Pro on the left, and the TYPE-C interface on the right is connected to the uArm Swift Pro on the right.
-
Page 10: Operation
13) Overview 3. Operation 1) Press the uArm power button 2) Use 12V power adapter to power up the whole system 3) Press the reset button of the control panel to reset the system... -
Page 11: Firmware Reset
4) Place the color cube on the material slide and wait for uArm to pick it up. 4. Video https://www.youtube.com/watch?v=bnhiZaNqpz8 5. Firmware Reset In the first step, a special firmware for the conveyor belt is added to the uArm Swift Pro. - Page 12 (3) Download External libraries...
- Page 13 (4) Open firmware in the Arduino IDE and send the firmware to Arduino Mega2560 with the parameters.
Need help?
Do you have a question about the uArm and is the answer not in the manual?
Questions and answers