Table of Contents
Advertisement
Available languages
Available languages
This product conforms to ECE R44.04
Group 1,2,3 child restraint. Suitable for children from 9kg to 36kg (approx 9 months to 12
years old)
Instructions: Please read carefully and keep for future reference. Your child's safety may
be affected if you do not follow these instructions.
Ce produit répond à la norme ECE R44,04
Siège auto 1,2,3, Convient aux enfants de 9kg à 36kg (d'environ 9mois à 12 ans)
Instructions: A lire attentivement et à garder pour future référence. La sécurité de votre
enfant pourrait être affectée si vous ne respectez pas ces instructions.
V2
Stirling Car Seat
Group1,2,3 ISOFIX child car seat
En 2-26
Fr 27-51
Advertisement
Chapters
Table of Contents

Related Manuals for My Child Stirling


Summary of Contents for My Child Stirling
- Page 1 Stirling Car Seat Group1,2,3 ISOFIX child car seat En 2-26 Fr 27-51 This product conforms to ECE R44.04 Group 1,2,3 child restraint. Suitable for children from 9kg to 36kg (approx 9 months to 12 years old) Instructions: Please read carefully and keep for future reference. Your child’s safety may be affected if you do not follow these instructions.
-
Page 2: Table Of Contents
Contents Your 3 year warranty General safety information - READ FIRST Welcome Parts checklist Positioning the child restraint Headrest/harness system adjustment Seat recline adjustment Installation group 1 [9-18kg] with ISOFIX + top tether 11-13 Placing a child in the child restraint (group 1 [9-18kg]) 13-15 Removing the harness system 16-18... -
Page 3: General Safety Information - Read First
Safety NOTICES 1. This child restraint system conforms to Regulation ECE-R44/04 for three different methods of installation. a) Using an ISOFIX and Top Tether anchor system. The child restraint has been classified as “Universal” for Group1 (9-18kg), under more stringent conditions than those that were applied to earlier designs which do not carry this notice. - Page 4 Getting started Read Carefully Before Attempting to Fit the Child Car Seat Warning: NEVER leave your child unattended – your child’s safety is your responsibility. Warning: The child restraint must be fitted in accordance with the manufacturer’s instructions. Incorrect installation could be dangerous. Warning: This installation must only be performed by a competent adult.
- Page 5 EXTREME HAZARD NEVER USE IN FRONT PASSENGER SEATS EQUIPPED WITH AIRBAGS (SRS) THIS CAN INCLUDE REAR PASSENGER SEATS THAT ARE EQUIPPED WITH AIRBAGS* *Consult car manufacturer for suitability. Children’s bodies are not able to withstand the forces exerted on them by a deploying air-bag When using the child restraint Warning: Make sure that the child restraint is placed somewhere so that rigid items and plastic parts do not become trapped in doors or movable seat...
- Page 6 Warning: Do not place anything under the child restraint (e.g. a towel or cushion) as this could affect the performance of the restraint in an accident. Warning: Avoid winter clothing bundling - Bulky clothing can lead to incorrect harness tightening. In an accident, the child can slip right out of the extra padding - and thus out of the restraint.
-
Page 7: Welcome
Please read these instructions carefully before use to ensure safe and satisfactory operation of this product. The Stirling Car Seat is suitable for Group 1 (9-18kg) with the ISOFIX and Top Tether anchoring systems. The Stirling Car Seat is also suitable for Group 2 (15-25kg) and Group 3 (22-36kg) with 3-point belt, or 3-point belt and additional anchors. -
Page 8: Parts Checklist
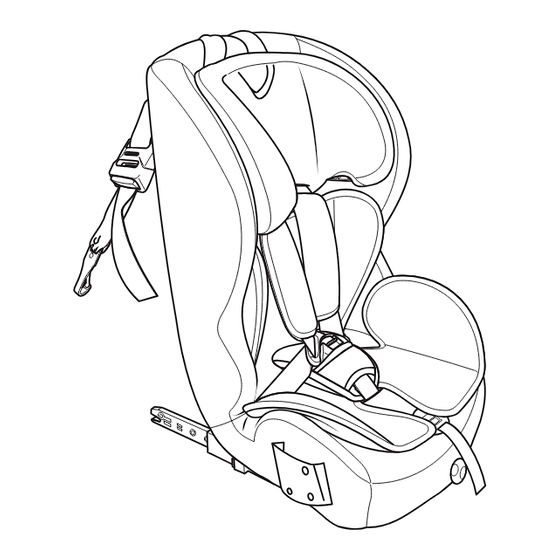
Parts checklist Top tether indicator Shoulder belt guide Top tether release button Harness Top tether strap Harness buckle Top tether hook M Insert pad IOFIX connector Harness adjuster button ISOFIX release button and indicator Harness adjuster strap Cup and cup holder Seat recline adjuster knob Headrest height adjuster ISOFIX Guides (x2) -
Page 9: Positioning The Child Restraint
Positioning the child car seat The child restraint can only be used with either an approved ISOFIX anchorage system or an automatic 3-point safety belt (i). It MUST NOT be used with a 2-point lap belt (ii). If your centre rear passenger seat is fitted with an approved ISOFIX anchorage system or a three point seatbelt system (i) then you should use it. -
Page 10: Headrest/Harness System Adjustment
Headrest/harness system adjustment The headrest has five height settings in Group 1 mode and an additional five height settings in Group 2,3 mode (once the harness system has been removed), giving a total of ten possible heights. To adjust the headrest/harness: Grip the headrest height adjuster (H) squeeze the trigger and raise or lower the headrest. -
Page 11: Installation Group1 [9-18Kg] With Isofix + Top Tether
Installation group1 [9-18kg] with ISOFIX + top tether IMPORTANT! The child restraint can ONLY be installed in group 1 mode using a vehicle’s ISOFIX system. It CANNOT be installed in group 1 mode using a vehicle seatbelt. Press the ISOFIX release buttons (F) and extend the ISOFIX connectors (E). - Page 12 Installation group1 [9-18kg] with ISOFIX + top tether (continued) Push the child restraint tight against the vehicle seat, ensuring there is no space between the back of the child restraint and the vehicle seat. Press the top tether release button (B) and extend the strap until it is long enough for the hook (D) to connect to a suitable tether anchoring point.
-
Page 13: Placing A Child In The Child Restraint (Group1 [9-18Kg])
Installation group1 [9-18kg] with ISOFIX + top tether (continued) Pull the opposite end of the tether strap to tighten the top tether. IMPORTANT: Check that the tether strap indicator (A) turns green. This will indicate that the strap is tight and correctly fitted. The child restraint is now fitted and you can go to “Placing a child in the child restraint (group1 [9-18kg])”. - Page 14 Placing a child in the child restraint (group1 [9-18kg]) (continued) Press the red harness release button (i) on the buckle and unfasten the harness. With the harness straps over the sides of the child restraint place your child in the seat. Adjust the headrest so that the integral harness is just above your child’s shoulders (i).
- Page 15 Placing a child in the child restraint (group1 [9-18kg]) (continued) With your child in the seat, match the two halves of the harness buckles together and insert them into the crotch buckle until you hear a click. Make sure the shoulder straps fit your child snugly by pulling the adjuster strap (O).
-
Page 16: Removing The Harness System
Removing the harness system The harness system can be removed for converting to a group 2 or group 3 child restraint OR in order to wash the seat covers. The harness system MUST ALWAYS be used in group 1 mode. Press the harness adjuster button (N) and pull forward on the shoulder straps (not the shoulder pads) to loosen the... - Page 17 Removing the harness system (continued) To remove the shoulder pads; adjust the headrest so that the metal rod (i) at the back of the seat is positioned in the fifth slot This slot is extra wide to allow the removal of the shoulder pads. Slide the metal rod (i) to one side and remove one of the shoulder pads from the bar.
- Page 18 Removing the harness system (continued) Turn the child restraint over and post the metal retainers (i) up through the base of the seat. Undo the 8 screws on the plastic cover (ii) and remove. Locate the crotch strap retainer (i) which is just under the plastic block (ii).
-
Page 19: Installation Groups 2-3 [15-36Kg] With Isofix
Installation groups 2-3 [15-36kg] with ISOFIX IMPORTANT! First ensure you have removed the integral 5-point harness as described in “Removing the harness system”. Press the ISOFIX release buttons (F) and extend the ISOFIX connectors (E). To check for the ISOFIX anchor points, feel between the joint of the passenger seat back and passenger seat base (i) for two... -
Page 20: Installation Groups 2-3 [15-36Kg] With 3-Point Seatbelt
Installation groups 2-3 [15-36kg] with ISOFIX (continued) Push the child restraint tight against the vehicle seat, and adjust the seat recline ensuring there is no space between the back of the child restraint and the vehicle seat. The child restraint is now fitted and you can go to “Placing a child in the child restraint (groups 2-3 [15-36kg])”. -
Page 21: Placing A Child In The Child Restraint (Groups 2-3 [15-36Kg])
Installation groups 2-3 (15-36kg) with 3-point seatbelt (continued) Push the child restraint tight against the vehicle seat, and adjust the seat recline ensuring there is no space between the back of the child restraint and the vehicle seat. The child restraint is now fitted and you can go to “Placing a child in the child restraint (groups 2-3 [15-36kg])”. -
Page 22: Removing And Fitting The Seat Covers
Removing and fitting the seat covers WARNING: Never use the child restraint without its covers. The covers are an integral safety feature. Unfasten the two press studs (i) on the back of the headrest and unzip the zip (ii) on the back of the seat cover. -
Page 23: Refitting The Harness System
Refitting the harness system Unzip the zip on the back of the seat cover (i). Adjust the headrest so that the metal rod (i) at the back of the seat is positioned in the fifth slot This slot is extra wide to allow the fitting of the shoulder pads. - Page 24 Refitting the harness system (continued) Slide the metal rod (i) back so that it sits centrally and correctly in the fifth slot. Post the crotch strap retainer (i) down through the slot in the seat cover and into the seat. IMPORTANT: Check the crotch strap is secure by giving it a sharp tug.
- Page 25 Refitting the harness system (continued) Take the two shoulder straps and match the two halves of the harness buckles together and insert them into the crotch buckle until you hear a click. Note: Fastening the harness buckle now will prevent any possible tangles and ensure each shoulder strap is on the correct side of the seat.
-
Page 26: Maintenance And Cleaning
Refitting the harness system (continued) Post the shoulder strap retainers (ii) down through the two slots in the base cover and out to the underside of the child restraint. Check the shoulder straps are secure by giving them a sharp tug. Maintenance and cleaning Storage 1) Store this child car seat in a safe place when not in use. -
Page 27: Votre Garantie 3 Ans
Siège auto Stirling Siège auto ISOFIX Groupe 1,2,3 Contenu Votre garantie 3 ans Informations générales de sécurité - A LIRE EN PREMIER 28-32 Bienvenue Liste des pièces Installer le siège-auto Repose tête/ Harnais: système d'ajustement Ajustement de l'inclinaison Installation du groupe 1 (9-18KG) avec ISOFIX+ top tether 36-38 Installer l'enfant dans le siège auto (groupe1: 9-18KG) -
Page 28: Informations Générales De Sécurité - A Lire En Premier
Sécurité NOTICES 1. Ce siège auto est conforme à la régulation ECE-R44/04 pour trois méthodes différentes d’installation. a) En utilisant les fixations ISOFIX et le système Top tether, Le siège auto a été classifié comme “Universel” pour le groupe 1(9-19kg) sous des conditions plus strictes que celles qui s’appliquaient aux produits précédents, produits qui ne contiennent pas ce manuel. - Page 29 Pour commencer A lire attentivement avant de commencer l’installation du siège auto Attention: Ne jamais laisser votre enfant sans surveillance. La sécurité de votre enfant est votre responsabilité. Attention: Le siège auto doit être installé selon les instructions du constructeur. Une installation incorrecte pourrait être dangereuse. Attention: Cette installation peut uniquement être réalisée par un adulte compétent.
- Page 30 DANGER EXTREME NE JAMAIS UTILISER SUR UN SIEGE AVANT EQUIPPE D’AIRBAG CELA INCLUS LES SIEGES ARRIERE EQUIPES D’AIRBAG* *Consultez le fabriquant du véhicule pour évaluer la compatibilité. Les corps des enfants ne sont pas capables de resister aux forces exercées sur eux en cas de déploiement d’airbag.
- Page 31 Attention: Eviter les vêtements d’hiver trop épais, ceux ci pourraient empêcher l’ajustement correcte du harnais, Lors d’un accident, l’enfant pourrait glisser en dehors du siège à cause du rembourrgae, Laisser la voiture se réchauffer ou se raffraichir avant d’installer votre enfant, si possible. Si votre enfant a froid, vous pouvez lui mettre une couverture par dessus le harnais.
-
Page 32: Bienvenue
Merci de lire les instructions et avertissements avec attention avant utilisation, afin de vous assurer un usage sûr et satisfaisant du produit. Le siège auto Stirling convient au groupe 1 (9-18Kg) avec les systèmes de fixation ISOFIX et Top Tether. -
Page 33: Liste Des Pièces
Liste des pièces Indicateur du top tether Guide épaule pour ceinture Bouton pour relâcher le top tether Harnais sangle top tether Boucle de harnais crochet top tether Insert molletonnée Connecteurs ISOFIX Bouton ajusteur de harnais Bouton de relachement ISOFIX et Sangles de harnais d'indication gobelet et porte gobelet... -
Page 34: Installer Le Siège-Auto
Installer le siège-auto Le siège-auto peut seulement être utilisé soit avec un système d’ancrage agréé ou une ceinture de sécurité automatique 3 points (i). Il ne doit pas être utilisé avec une ceinture de sécurité 2 points (ii). Si le siège du milieu à l’arrière est équipé d’un système d’accroche ISOFIX approuvé ou d’une ceinture de sécurité... -
Page 35: Repose Tête/ Harnais: Système D'ajustement
Ajustement Repose tête/Harnais Le repose tête a 5 hauteurs differentes pour le Groupe 1 et 5 supplementaire dans le groupe 2,3 (une fois que le systeme de harnais a été enlevé.) Ce qui donne un total de 10 hauteurs possibles. Pour ajuster le repose tête/ Harnais:Appuyer sur le loquet au niveau du repose tête (H) et lever ou baisser le... -
Page 36: Installation Du Groupe 1 (9-18Kg) Avec Isofix+ Top Tether
Installation groupe 1(9-18kg) avec ISOFIX+ Top tether IMPORTANT! Le siège auto peut seulement être installé en groupe 1 en utilisant le systeme ISOFIX du vehicule. Il ne peut pas être installé en groupe 1 avec la ceinture de sécurité. Appuyer sur le bouton(F) pour agrandir les connecteurs ISOFIX (E) Pour vérifier les points d’accroches, chercher entre le dossier de... - Page 37 Installation groupe 1(9-18kg) avec ISOFIX+ Top tether (suite) Pousser le siège auto contre le siège du véhicule, assurez vous qu’il n’y ait pas d’espace entre le dossier du siège auto et le dossier du siège de voiture. Appuyer sur le bouton pour relacher les Top tether (B) et allonger la sangle jusqu’à...
-
Page 38: Installer L'enfant Dans Le Siège Auto (Groupe1: 9-18Kg)
Installation groupe 1(9-18kg) avec ISOFIX+ Top tether (suite) Tirer l’autre bout des sangles tether pour resserer les top tether. IMPORTANT: Verifier que les indicateurs des sangles tether (A) passent au vert. Cela indiquera que la sangle est serrée et correctement installée. Le siège auto est maintenant installé... - Page 39 Installer votre enfant dans le siège-auto (groupe1[9-18kg]) (suite) Appuyer sur le bouton rouge(i) sur la boucle pour ouvrir le harnais Avec les sangles du harnais ouvertes, placer l’enfant dans le siège. Ajuster le repose tête afin que le harnais soit juste au dessus des épaules de votre enfant (i).
- Page 40 Installer votre enfant dans le siège-auto (groupe1[9-18kg]) (suite) Une fois votre enfant installé, mettre les deux parties du harnais ensemble et insérer dans la boucle d’attache jusqu’à ce que vous entendiez un clic. Assurez vous que les sangles du harnais soient correctement sérré...
-
Page 41: Enlever Le Système De Harnais
Enlever le système de harnais Le système de harnais peut être enlever pour convertir le siège en groupe 2 ou en groupe 3 OU pour laver la housse du siège. Le système de harnais DOIT TOUJOURS être utilisé pour le groupe 1. Appuyer sur bouton (N) pour ajuster le harnais et tirer les sangles du harnais (pas les coussinets) pour déssérer le... - Page 42 Enlever le système de harnais (suite) Pour enlever les coussinets ajuster le repose tête pour que la barre en métal (i) soit positionné au 5ème rang (le plus large). Ce rang est plus large pour vous permettre d’enlever les coussinets, Soulevez et faites glisser la barre en métal(i) d’un coté...
- Page 43 Enlever le système de harnais (suite) Tourner le siège auto, sous le siège auto, faites passer les anneaux en métal à travers les inserts. Dévisser les 8 vis du cache en plastique(ii) et enlever le cache. Localiser l’embout en métal retenant la boucle du harnais(i) qui se trouve en dessous du bloc en plastique(ii) Si nécessaire...
-
Page 44: Installation Du Groupe 2-3 (15-36Kg) Avec Isofix
Installation du groupe 2-3 [15-36kg] avec ISOFIX IMPORTANT! Assurez vous d’abord d’avoir enlever l’integralité du harnais 5 points comme décrit dans la section:”Enlever le système de harnais”. Appuyer sur le bouton pour relacher les ISOFIX (F) et agrandissez les connecteurs ISOFIX (E). -
Page 45: Installation Du Groupe 2-3 (15-36Kg) Avec Une Ceinture 3 Points
Installation du groupe 2-3 [15-36kg] avec ISOFIX (suite) Pousser le siège auto contre le siège du véhicule, assurez vous qu’il n’y ait pas d’espace entre le dossier du siège auto et le dossier du siège de voiture. Le siège auto est maintenant installé... -
Page 46: Installer L'enfant Dans Le Siège Auto (Groupe2-3: 15-36Kg)
Installation du groupe 2-3 (15-36Kg) avec une ceinture 3 points (suite) Pousser le siège auto contre le siège du véhicule, assurez vous qu’il n’y ait pas d’espace entre le dossier du siège auto et le dossier du siège de voiture. Le siège auto est maintenant installé... -
Page 47: Enlever Et Remettre La Housse De Protection
Enlever et remettre la housse de protection Attention! Ne jamais utiliser le siège auto sans housse de protection. La housse aide à la sécurité de votre enfant. Décrocher les deux pressions (i) à l’arrière du repose tête et ouvrez la fermeture éclaire (ii) à... -
Page 48: Remettre Le Système De Harnais
Remettre le système de harnais Ouvrir la fermeture éclaire au dos de la housse(i). Ajuster le repose tête pour que la barre en métal (i) à l’arrière du siège soit positionné dans le 5ème rang du haut. Ce rang est plus large afin de pouvoir faire passer les coussinets. - Page 49 Remettre le système de harnais (suite) Faites glisser la barre en métal (i) afin qu’elle soit au centre et rentre dans le 5ème rang. Insérer la boucle du harnais (i)dans l’insert de la housse et dans le siège auto IMPORTANT: Verifier que la boucle de harnais est bien installée en tirant d’un coup sec dessus.
- Page 50 Remettre le système de harnais (suite) Prenez les deux sangles du harnais et mettez les ensemble pour les inserer en même temps dans la boucle du harnais, jusqu’à ce que vous entendiez un click. Note: Attacher le harnais maintenant empêchera les sangles de s’enrouler et aidera à...
-
Page 51: Maintenance Et Nettoyage
Remettre le système de harnais (suite) Insérer les bloqueurs de sangles (ii) à travers la housse et jusqu’en dessous du siège auto. Vérifier que les sangles du harnais sont bien attachées en tirant dessus d’un coup sec. Entretien et maintenance Rangement 1) Ranger ce siège-auto dans un endroit sûr lorsqu’il n’est pas utilisé. - Page 52 Customer service UK: Customerservice@kooltrade.co.uk Service Clients Fr: sav@kooltrade.co.uk Imported by MyChild. M34 3QA www.mychildonline.co.uk Tel: 0161 335 2508...
Need help?
Do you have a question about the Stirling and is the answer not in the manual?
Questions and answers