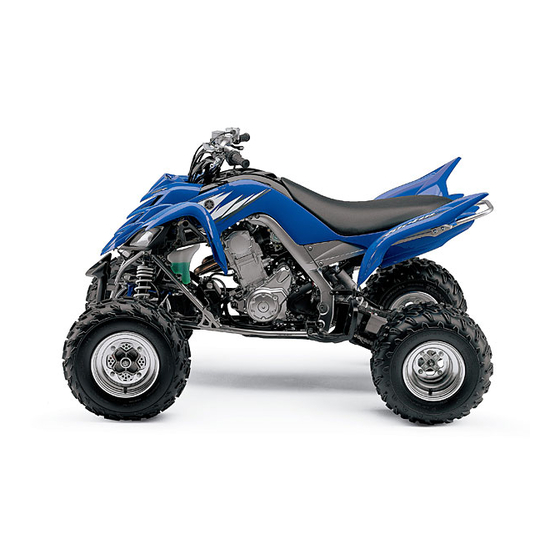
Yamaha YFM700RV Assembly Manual
Hide thumbs
Also See for YFM700RV:
- Owner's manual (183 pages) ,
- Service manual (26 pages) ,
- Owner's manual (424 pages)
Table of Contents
Advertisement
Advertisement
Table of Contents

Related Manuals for Yamaha YFM700RV


Summary of Contents for Yamaha YFM700RV
- Page 1 YFM700RV ASSEMBLY MANUAL MANUEL DE MONTAGE 1S3-28107-70...
-
Page 2: Avant-Propos
Ce Manuel de montage contient les instruc- mation required for the correct assembly tions nécessaires au montage en bonne et due of this Yamaha vehicle prior to delivery to forme de ce véhicule Yamaha avant sa livrai- the customer. Since some external parts son au client. - Page 3 EBA00005 FBA00005 SYMBOLS USED IN THE SYMBOLES UTILISÉS ASSEMBLY MANUAL DANS LE MANUEL DE MONTAGE In order to simplify descriptions in this assembly manual, the following symbols Les symboles suivants ont été adoptés en vue are used: de simplifier les explications. (1): Filling fluid (1): Liquide de remplissage (2): Lubricant...
- Page 4 EBA00006 FBA00006 PREPARATION PRÉPARATIFS To assemble the vehicle correctly, sup- Certaines fournitures (ex.: huiles, graisses et plies (e.g. oils, greases, and shop rags) essuyeurs) et un espace de travail suffisam- and sufficient working space are required. ment spacieux sont indispensables pour mon- Workshop ter correctement le véhicule.
- Page 5 EBA00008 FBA00008 UNPACKING DÉBALLAGE 1. Open the zipper (1), and then remove 1. Ouvrir la fermeture à glissière (1), puis the plastic cover. retirer l’emballage en plastique. 2. Remove the bolts (2), bolts (3), bracket 2. Déposer les vis (2), les vis (3), le support (4) and washers (handlebar holder).
- Page 6 8. Remove the nuts (15) and stays (16) 8. Déposer les écrous (15) et les supports (16) (left and right front shock absorbers). (amortisseurs avant gauche et droit). CAUTION: ATTENTION: The nuts and stays are for crating pur- Les écrous et les supports sont destinés poses only.
-
Page 7: Parts Location
EBA00009 FBA00009 PARTS LOCATION EMPLACEMENT DES PIÈCES (1) Plastic bag 1 (2) Bubble wrap pack 1 (1) Sac en plastique 1 (3) Bubble wrap pack 2 (2) Emballage de film à bulles 1 (4) Carton box 1 (3) Emballage de film à bulles 2 (5) Carton box 2 (4) Boîte en carton 1 (6) Carton box 3... - Page 8 (1) Plastic bag 1 (1) Sac en plastique 1 1. Main switch key 1. Clé de contact 2. Nut (main switch) 2. Écrou (contacteur à clé) 3. Main switch 3. Contacteur à clé (2) Bubble wrap pack 1 (2) Emballage de film à bulles 1 1.
- Page 9 EBA00010 FBA00010 (5) Carton box 2 (5) Boîte en carton 2 1. Front brake disc guards 1. Protège-disques de frein avant 2. Right foot protector 2. Protège-jambe droit 3. Left foot protector 3. Protège-jambe gauche 4. Owner’s manual 4. Manuel du propriétaire 5.
- Page 10 EBA00010 FBA00010 (6) Carton box 3 (6) Boîte en carton 3 1. Swingarm skid plate 1. Plaque de protection du bras oscillant 2. Engine skid plate 2. Plaque de protection du moteur 3. Handlebar cover 3. Cache de guidon 4. Front guard 4.
- Page 11 EBA00011 YFM700RV SETUP AND PREDELIVERY CHECKLIST NOTE: Check the following items again after setup and predelivery service have been completed. A: INSTALLATION OF THE PARTS INCLUDED IN THE CRATE à à Front shock absorbers Swingarm skid plate à à Front wheels Engine skid plate Ã...
- Page 12 D: ADJUSTMENTS à à Checking and charging the battery Adjusting the rear brake light switch à à Checking the tire pressure Adjusting the parking brake à à Checking the engine oil level Checking the brake fluid level à à Checking the coolant level Bleeding the hydraulic brake system Ã...
- Page 13 FBA00011 YFM700RV LISTE DES MONTAGES, CONTRÔLES ET ENTRETIENS À EFFECTUER AVANT LA LIVRAISON N.B.: Vérifier une nouvelle fois les points suivants une fois le montage et l’entretien avant livraison effectués. A: MONTAGE DES PIÈCES LIVRÉES DANS LA CAISSE Ã Ã...
- Page 14 D: RÉGLAGES à à Contrôle et chargement de la batterie Réglage du contacteur de feu stop sur frein arrière à à Contrôle de la pression de gonflage des pneus Réglage du frein de stationnement à à Contrôle du niveau d’huile moteur Contrôle du niveau du liquide de frein Ã...
-
Page 15: Setup Procedures
EBA00012 SETUP PROCEDURES NOTE: After opening the crate, place the vehicle on a suitable rack and follow the setup procedures. Before starting the setup, supply the specified tire pressure to the four wheels. WARNING This model is equipped with low pressure tires. Refer to “ADJUSTMENTS AND PREDELIVERY SERVICE”. Perform the setup procedures in the order indicated by the numbers. - Page 16 EBA00028 FBA00028 1. FRONT SHOCK 1. AMORTISSEURS ABSORBERS AVANT A: Install the flange bolts from A: Monter les vis à collerette par front to rear. l’avant. B: Tighten the nuts to specifica- B: Serrer les écrous au couple spéci- tion. fié.
-
Page 17: Front Brake Master Cylinder
EBA00013 FBA00013 4. HANDLEBAR 4. GUIDON A: Install the handlebar within A: Monter le guidon en veillant à ce 3.3° from the horizontal line que son inclinaison ne dévie pas shown in the illustration. de plus de 3,3° de la ligne hori- B: Install each handlebar holder zontale illustrée. - Page 18 EBA00024 FBA00024 6. CLUTCH AND PARKING 6. COMBINÉ LEVIER BRAKE LEVER D’EMBRAYAGE ET ASSEMBLY FREIN DE A: Install the clutch and parking STATIONNEMENT brake lever assembly A: Monter combiné levier shown. d’embrayage et frein de station- (a) 53 ~ 54 mm (2.09 ~ 2.13 in) nement comme illustré.
- Page 19 EBA00035 FBA00035 9. RIGHT FOOT 9. PROTÈGE-JAMBE PROTECTOR DROIT A: Tighten the bolt to specifica- A: Serrer la vis au couple spécifié. tion. Bolt 12 Nm 12 Nm (1,2 m · kg, 8,7 ft · lb) (1.2 m · kg, 8.7 ft · lb) B: Serrer l’écrou au couple spécifié.
-
Page 20: Front Guard
EBA00039 FBA00039 12. ENGINE SKID PLATE 12. PLAQUE DE A: Tighten the bolts to specifica- PROTECTION DU tion. MOTEUR A: Serrer les vis au couple spécifié. Bolt 7 Nm (0.7 m · kg, 5.1 ft · lb) 7 Nm (0,7 m · kg, 5,1 ft · lb) (6)-C (5)-V d = 6 (0.24),... -
Page 21: Owner's Tool Kit
EBA00047 FBA00047 14. BATTERY 14. BATTERIE A: Before installing the battery, A: Charger la batterie avant de la charge the battery. monter. NOTE: N.B.: Refer to “ADJUSTMENTS AND Se reporter à “RÉGLAGES ET PREDELIVERY SERVICE”. ENTRETIENS AVANT LIVRAI- SON”. B: First, connect the positive bat- tery lead (red color lead) to B: Brancher d’abord le câble positif the positive terminal. -
Page 22: Manuel Du Propriétaire
EBA00049 FBA00049 16. OWNER’S MANUAL 16. MANUEL DU A: Secure the Owner’s manual, PROPRIÉTAIRE low pressure air gauge and A: Attacher le manuel du proprié- the owner’s tool kit to the rear taire, le manomètre basse pres- fender with the band. sion et la trousse de réparation au garde-boue arrière à... - Page 23 EBA00052 FBA00052 18. REAR REFLECTORS 18. CATADIOPTRES (for CDN) ARRIÈRE (Canada) A: Tighten the bolts to specifica- A: Serrer les vis au couple spécifié. tion. Bolt 7 Nm 7 Nm (0,7 m · kg, 5,1 ft · lb) (0.7 m · kg, 5.1 ft · lb) B: Serrer l’écrou au couple spécifié.
-
Page 24: Cable Routing
EBA00100 FBA00100 CABLE ROUTING CHEMINEMENT DES CÂBLES WARNING AVERTISSEMENT Proper cable and lead routing is essential to assure safe vehi- Un cheminement correct des câbles et fils est indispensable au bon cle operation. fonctionnement du véhicule. (1) Clutch cable (1) Câble d’embrayage (2) Parking brake cable (2) Câble de frein de stationnement (3) Main switch... -
Page 25: Adjustments And Predelivery Service
EBA00101 FBA00101 ADJUSTMENTS AND PREDELIVERY RÉGLAGES ET ENTRETIENS AVANT SERVICE LIVRAISON Perform the predelivery service in the order indicated by the letters. Effectuer les entretiens avant livraison dans l’ordre indiqué par les lettres. Always follow the order as shown. Suivre obligatoirement l’ordre indiqué. –21–... -
Page 26: Checking And Charging The Battery
EBA00102 FBA00102 A. CHECKING AND CHARGING A. CONTRÔLE ET CHARGEMENT THE BATTERY DE LA BATTERIE 1. Check: 1. Contrôler: Using a digital voltmeter, the state of a On peut contrôler l’état de charge d’une discharged MF battery can be checked batterie sans entretien (MF) en mesurant la by measuring open-circuit voltage (the tension entre ses cosses en circuit ouvert... -
Page 27: Checking The Tire Pressure
EBA00105 FBA00105 B. CHECKING THE TIRE B. CONTRÔLE DE LA PRESSION PRESSURE DE GONFLAGE DES PNEUS WARNING AVERTISSEMENT This model is equipped with low pres- Ce modèle est équipé de pneus à basse pres- sure tires. Pay attention to the follow- sion. -
Page 28: Checking The Engine Oil Level
EBA00109 FBA00109 C. CHECKING THE ENGINE OIL C. CONTRÔLE DU NIVEAU LEVEL D’HUILE MOTEUR 1. Place the vehicle on a level place. 1. Placer le véhicule sur une surface de 2. Start the engine, warm it up until the niveau. engine oil has reached a normal tem- 2. -
Page 29: Checking The Coolant Level
4. Start the engine, warm it up for several 4. Mettre le moteur en marche, le faire chauf- minutes, and then turn it off. fer pendant quelques minutes, puis le cou- 5. Check the engine oil level again. per. 5. Contrôler une nouvelle fois le niveau NOTE: d’huile moteur. -
Page 30: Adjusting The Engine Idling Speed
EBA00121 FBA00121 E. ADJUSTING THE ENGINE E. RÉGLAGE DU RÉGIME DE IDLING SPEED RALENTI DU MOTEUR 1. Start the engine and let it warm up for 1. Mettre le moteur en marche et le laisser several minutes. chauffer pendant quelques minutes. 2. -
Page 31: Adjusting The Clutch Cable
d. Tighten the locknut. d. Serrer le contre-écrou. e. Push in the adjuster cover. e. Repousser le cache du dispositif de réglage. WARNING AVERTISSEMENT After adjusting the free play, turn the handlebar to right and left, and make Après le réglage de la garde, tourner le gui- sure that the engine idling speed does don dans un sens et dans l’autre pour not increase. -
Page 32: Adjusting The Rear Brake
EBA00128 FBA00128 H. ADJUSTING THE REAR BRAKE H. RÉGLAGE DU FREIN ARRIÈRE 1. Check: 1. Contrôler: brake pedal height (a) hauteur de la pédale de frein (a) Out of specification → Adjust. Hors spécifications → Régler. Brake pedal height Hauteur de pédale de frein 15.3 mm (0.60 in) 15,3 mm (0,60 in) 2. -
Page 33: Adjusting The Parking Brake
EBA00130 FBA00130 J. ADJUSTING THE PARKING J. RÉGLAGE DU FREIN DE BRAKE STATIONNEMENT 1. Check: 1. Contrôler: parking brake cable end length (a) longueur d’extrémité du câble du frein de Out of specification → Adjust. stationnement (a) Hors spécifications → Régler. Parking brake cable end length 58 ~ 60 mm (2.28 ~ 2.36 in) Longueur d’extrémité... -
Page 34: Checking The Brake Fluid Level
È EBA00131 FBA00131 K. CHECKING THE BRAKE FLUID K. CONTRÔLE DU NIVEAU DU LEVEL LIQUIDE DE FREIN 1. Place the vehicle on a level surface. 1. Placer le véhicule sur une surface de niveau. NOTE: When checking the brake fluid level, make N.B.: sure that the top of the brake fluid reser- Le sommet du réservoir de liquide de frein doit... -
Page 35: Bleeding The Hydraulic Brake System
È EBA00132 FBA00132 L. BLEEDING THE HYDRAULIC L. PURGE DU CIRCUIT DES BRAKE SYSTEM FREINS HYDRAULIQUES WARNING AVERTISSEMENT Bleed the hydraulic brake system Purger le circuit des freins hydrauliques whenever: dans les cas suivants: the system was disassembled, le circuit a été démonté, a brake hose or brake pipe was loos- une durite ou un tuyau de frein a été... - Page 36 EBA00134 FBA00134 M. ADJUSTING THE DRIVE CHAIN M. RÉGLAGE DE LA TENSION DE SLACK LA CHAÎNE DE TRANSMISSION NOTE: Before checking the drive chain slack, N.B.: rotate the rear wheels several turns and Avant de contrôler la tension de la chaîne de check the slack at several points to find transmission, faire tourner les roues arrière de the tightest point.
-
Page 37: Adjusting The Front Shock Absorbers
EBA00135 FBA00135 N. ADJUSTING THE FRONT N. RÉGLAGE DES SHOCK ABSORBERS AMORTISSEURS AVANT WARNING AVERTISSEMENT Always adjust both front shock Toujours régler la précontrainte de ressort absorber spring preload to the same des deux amortisseurs avant sur la même setting. Uneven adjustment can result valeur. - Page 38 c. Tighten the locknut to specification. c. Serrer le contre-écrou comme spécifié. Locknut Contre-écrou 42 Nm (4.2 m · kg, 30 ft · lb) 42 Nm (4,2 m · kg, 30 ft · lb) 3. Check: 3. Contrôler: rebound damping force force d’amortissement à...
-
Page 39: Adjusting The Headlight Beams
EBA00138 FBA00138 P. ADJUSTING THE HEADLIGHT P. RÉGLAGE DU FAISCEAU DES BEAMS PHARES 1. Adjust: 1. Régler: headlight beam (vertically) faisceau de phare (vertical) Turn the adjusting bolt (1) in direction Tourner la vis de réglage (1) dans un sens (a) or (b). -
Page 40: Standard Equipment
EBA00200 FBA00200 APPENDICES APPENDICE SERVICE DATA DONNÉES D’ENTRETIEN Engine idling speed: Régime de ralenti du moteur: 1,500 ~ 1,700 r/min 1.500 à 1.700 tr/mn Spark plug: Bougie(s): Type/Manufacturer Type/fabricant CR8E/NGK CR8E/NGK Écartement 0.7 ~ 0.8 mm (0.28 ~ 0.031 in) 0,7 à... -
Page 41: Tightening Torques
EBA00230 TIGHTENING TORQUES Tightening torque Part to be tightened Thread size m · kg ft · lb Engine: Spark plug Engine oil drain bolt (crankcase) Engine oil drain bolt (oil tank) Chassis: Engine upper bracket Engine mounting bolt (upper) Engine lower bracket Engine mounting bolt (middle) Engine mounting bolt (lower) Swingarm pivot shaft, engine, and frame... - Page 42 Tightening torque Part to be tightened Thread size m · kg ft · lb Rear brake caliper and brake caliper bracket Rear axle and rear wheel hub See NOTE. Rear wheel and rear wheel hub Driven sprocket and sprocket bracket Front brake caliper and brake hose Front brake pad retaining bolt Brake caliper bleed screw...
- Page 43 Tightening torque Part to be tightened Thread size m · kg ft · lb Rear reflector (for CDN and Europe) Rear reflector bracket and license plate bracket (for CDN) NOTE: 1. Apply a rust preventive lubricant to the threads on both sides of the rear axle and to the wheel hub surfaces that contact the rear axle washers.
-
Page 44: Couples De Serrage
FBA00230 COUPLES DE SERRAGE Couples de serrage Pièce à serrer Diamètre de filet m · kg ft · lb Moteur: Bougie Vis de vidange d’huile moteur (carter moteur) Vis de vidange de l’huile moteur (réservoir d’huile) Châssis: Support supérieur de moteur Vis de montage du moteur (haut) Support inférieur de moteur Vis de montage du moteur (centre) - Page 45 Couples de serrage Pièce à serrer Diamètre de filet m · kg ft · lb Roue avant et moyeu de roue avant Fusée de direction et support d’étrier de frein avant Disque de frein avant et moyeu de roue avant Étrier de frein arrière et support d’étrier Essieu arrière et moyeu de roue arrière Voir N.B.
- Page 46 Couples de serrage Pièce à serrer Diamètre de filet m · kg ft · lb Protection arrière et cadre Compartiment de batterie et capteur du coupe-circuit de sécurité de chute Support de catadioptre arrière et cadre (Canada et Europe) Catadioptre arrière (Canada et Europe) Support de catadioptre arrière et support de plaque d’identification (Canada) N.B.:...
- Page 48 YAMAHA MOTOR CO., LTD. 2500 SHINGAI IWATA SHIZUOKA JAPAN PRINTED IN THE NETHERLANDS 2005.05-2.2×1 CR (E,F)
Need help?
Do you have a question about the YFM700RV and is the answer not in the manual?
Questions and answers