Table of Contents
Advertisement
Advertisement
Table of Contents

Related Manuals for Weatherdock easyTRX2S Series


Summary of Contents for Weatherdock easyTRX2S Series
- Page 1 Manual easyTRX2S – series Class B AIS CS Transceiver Stand 2.3 Seite 1 von 68...
- Page 2 Page 2 of 68 General Warning ALL MARINE AUTOMATIC IDENTIFICATION SYSTEM (AIS) UNITS UTILIZE A SATELLITE BASED SYSTEM SUCH AS THE GLOBAL POSITIONING SATELLITE (GPS) NETWORK OR THE GLOBAL NAVIGATION SATELLITE SYSTEM (GLONASS) NETWORK TO DETERMINE POSITION. THE ACCURACY OF THESE NETWORKS IS VARIABLE AND IS AFFECTED BY FACTORS SUCH AS THE ANTENNA POSITIONING, HOW MANY SATELLITES ARE USED TO DETERMINE A POSITION AND HOW LONG SATELLITE INFORMATION HAS...
- Page 3 CAN INSTALL AND OPERATE YOUR AIS SYSTEM CORRECTLY. Information contained in this manual is liable to change without notice. Weatherdock AG disclaims any liability for consequences arising from omissions or inaccuracies in this manual and any other documentation provided with this product.
- Page 4 CORPORATION ALL TRADEMARKS MENTIONED IN THIS DOCUMENT ARE THE PROPERTY OF THEIR RESPECTIVE OWNERS. © 2010 WEATHERDOCK AG COPYING OF THIS DOCUMENT AND GIVING IT TO OTHERS AND THE USE OR COMMUNICATION OF THE CONTENTS THEREOF, IS FORBIDDEN WITHOUT EXPRESS AUTHORITY. OFFENDERS ARE LIABLE TO THE PAYMENT OF DAMAGES.
-
Page 5: Table Of Contents
Bundesamt für Seeschifffahrt und Hydrographie (BSH) Bernhard-Nocht-Strasse 78 D-20359 Hamburg System requirements The easy TRX2S programming application is designed to operate with Microsoft Windows® 2000 (SP 3), XP (SP 2), Vista and Win 7/10. Recommended minimum system requirements are: • Microsoft Windows®... - Page 6 Page 6 of 68 6.8.4 CHECKING THE CONNECTION ............40 6.8.5 RESET OF WIFI SETTINGS ..............43 SOFTWARE-UPDATE ................44 IS: INTEGRATED SPLITTER ............... 47 IGPS: INTEGRATED GPS ANTENNA ............48 IDVBT: INTEGRATED DVBT AMPLIFIER ..........49 N2K: NMEA2000 COMPATIBILITY ............50 MOUNTING ....................
-
Page 7: What Is Ais - In A Nutshell
What is AIS – In a nutshell Substantial investment over the last few years has resulted in the fact that transport safety systems in coastal waters are considered to be the most modern worldwide. The introduction of AIS technology by the International Maritime Organization (IMO) will contribute to the currently available traffic information and thus improve navigation safety. -
Page 8: Existing Ais Standards
Page 8 of 68 1.1 Existing AIS standards? The “Class A” AIS service is described in the document ITU-R M.1371-1 where R stands for „Recommendation“. This „standard document“ is valid for AIS data transfer with specifications for the so-called „Class A“ and „Class B“ Service. As mentioned previously, “Class A“... - Page 9 • Type of vessel • Rotational speed/turn rate Static information: • Call sign and name of the vessel • Length and width of the vessel • IMO-number of the vessel, if existent • Type of vehicle • Position of the GPS sensor onboard Journey-related information: •...
- Page 10 Page 10 of 68 This is a „self-organized time slot allocation for telegrams, which means that the ship listens to the radio traffic and determines the information contained in these telegrams and on which “time slot” the own transmitter may transmit without overriding other telegrams. The complex SOTDMA method is replaced by a technically simpler method CSTDMA for Class B-Transponders.
-
Page 11: Scope Of Delivery
The above-stated information does not raise a claim for completeness of contents and infallibility but rather serve as an introduction to this issue. For more information please contact the Bundesamt für Seeschifffahrt und Hydrografie (Federal Maritime and Hydrographic Agency) in Hamburg. Picture 1-AIS network 2 Scope of delivery Included in delivery are:... -
Page 12: Commissioning - Operating
Page 12 of 68 o IEC-BNC cable (only on iDVBT versions), #B035 o Optional, not included: Car radio-BNC cable, #B033 o Optional, not included: Splitter cable (PL259-Plug), #R08278 o Optional, not included: GPS antenna #A029 o Optional, not included: VHF/GPS antenna #A028 o Optional, not included: external transducer easyCPA³, #A056 •... - Page 13 • SAFETY. This LED flashes if a safety message is transmitted. • WARNING The warning LED is on if the GPS data is not received yet. • RX ONLY This LED is on if the device is in receive only mode („Silent Mode“) or does not have a GPS fix already.
-
Page 14: Connecting Suggestions
Page 14 of 68 4 Connecting suggestions Seite 14 von 68... -
Page 15: Cable Assignment
5 Cable assignment Seite 15 von 68... - Page 16 Page 16 of 68 Seite 16 von 68...
- Page 17 Seite 17 von 68...
-
Page 18: Programming
Page 18 of 68 6 Programming 6.1 Tab: Static data • Install the PC software from the CD. If you don´t have this CD anymore you also can download all necessary files from our webpage: Visit www.easyais.com Go to Information > Download > Software / Driver Go there to “Software for TRX2S and TRX2”... - Page 19 Picture 3-Static data Please keep in mind that the MMSI can only be entered once. Please contact your service partner if the MMSI was entered wrongly or if you are required to enter another MMSI. The NMEA port of the Class B Transponder is preset to 38400 baud by default.
-
Page 20: Tab: Diagnostics
Page 20 of 68 via NMEA or USB port. This is useful if your chart plotter does not have its own GPS. A minimum output of GPS data (RMC, GGA) is set as a standard feature by default. It is possible to disable the GPS output or to set it to maximum information (RMC, GGA, GSV, VTG, GLL and GSA), if the chart plotter requires. - Page 21 Picture 4-Diagnostic Seite 21 von 68...
- Page 22 Page 22 of 68 The box „TRX Status“ gives you information about: • Valid MMSI: Once a valid MMSI was entered it, "OK" Status will be shown. A valid MMSI is required for transmitting data. • "GPS position fix": If your GPS is working properly, status "OK" will be shown.
- Page 23 The values RSSI1 and RSSI2 give information, if there are any interferers on the two AIS frequencies. This may be caused by e. g. a faulty electrical device on board. If there are no interferers the status is "OK". "TX Forward Power, TX Reverse Power" are OK if the connected VHF antenna is working properly.
-
Page 24: Tab: Sent Data
Page 24 of 68 means the report disappears from the table if the error or warning message is not received once again within 1 minute. Thus the error or warning no longer exists. 6.3 Tab: Sent data The tab "Sent Data" gives information about the last AIS data sent by the easyTRX2S Transceiver. -
Page 25: Tab: Received Data
The time of last transmission already starts to count up if you start the programming tool. If you can see times higher than >3/6min please check also if you are connected successfully within the Static data page. 6.4 Tab: Received data On the tab "Received Data"... -
Page 26: Tab: Sd-Card
Page 26 of 68 6.5 Tab: SD-Card The tab "SD Card" shows the status quo of the SD recording. "Ready for Logging" is given if a well formatted SD card is inserted. Picture 7-SD card Sometimes it is necessary to click on "Format" several times as certain SD cards take more time than the easyTRX2S expects. - Page 27 The easyTRX2S (-IS) is using the FAT format. If the SD Card has got another format, you have to format it again with the easyTRX2S (-IS). It’s because the device is storing a special set of files, which enable real time storing of AIS and GPS data.
- Page 28 Page 28 of 68 Select your SD card by clicking “Open”. Select Start/End Date/Time of your Track you want to see within Google Earth™. Note: Only fields with bold fonts contain data! Seite 28 von 68...
-
Page 29: Tab: Cpa-Alarm
The picture above shows as example data on the 20 of October 2015. By clicking on the GoogleEarth™ icon we start the tool which generates a file for GoogleEarth™ and starts it. Note: Please do not select a too long Time of your Track as your PC may take also too long to work with such a huge quantity of information. - Page 30 Page 30 of 68 Picture 8-CPA alert CPA means "Closest Point of Approach" to a ship transmitting its position, bearing and speed via AIS. The easyTRX2S devices have a built-in feature which calculates the CPA with every received AIS target. You can now set a safety radius (around your ship).
-
Page 31: Tab: Anchor-Alarm
Only vessels, which do have a properly working AIS aboard, are able to trigger the CPA alert in the easyTRX2S Transceiver!! Therefore you should always watch out for other vessels which are on collision course!!! When a CPA alert occurs, two actions are starting: •... - Page 32 Page 32 of 68 no position fix because of cloud coverage, an acoustic alert is also triggered. As a result please do not choose a too small alerting radius. The hardware switch (using CPA Alarm) can set the easyTRX2S into “RX- Only”...
-
Page 33: Tab: Wlan
6.8 Tab: WLAN Available on devices with “-WiFi-“in name. You can see this window every time you connect to your TRX2S. If you don´t have WiFi you can ignore this window and go to the next chapter. All these units do have a built-in WLAN module. This creates a “hotspot” on which PC, laptop, iPad, iPhone, Android smartphones or tablets can be connected to. -
Page 34: More Wifi Connections
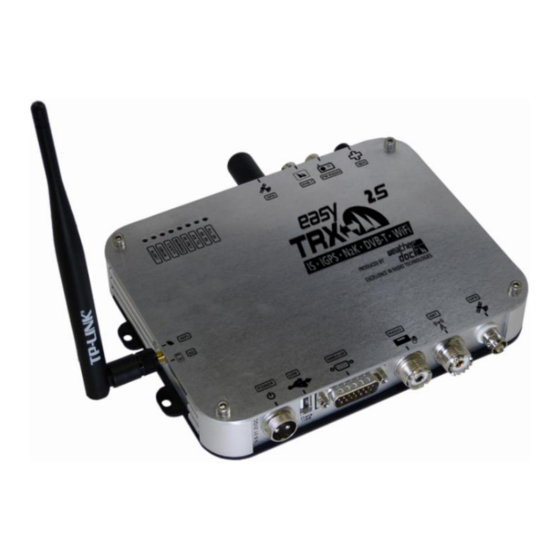
Page 34 of 68 Picture 10-WiFi antenna 6.8.2 More WiFi connections Without any necessary changes you already got this functionality out of the box. This means that up to 40 users are able to receive AIS, GPS data wireless through the own WiFi network of your easyTRX2S unit. As a result you can, for example, dial in to the WiFi network with a notebook, iPad and tablet and operate a navigation software with these devices. - Page 35 This function is absolutely necessary in some navigation software because the charts and weather information are downloaded from the Internet. In order to connect the easyTRX2S with your router, connect the easyTRX2S to the on-board electrical system. Insert the CD, which is included in delivery, into the CD drive of your PC and install the Programming Tool.
- Page 36 Page 36 of 68 Open the Programming Tool and connect via TCP / IP. In order to do that, choose "Select WiFi / LAN port” fill in IP 192.168.16.258 Port 8080 and press “Connect”. When the easyTRX2S is fully connected, a "WLAN" tab appears in the upper right corner.
- Page 37 Before changing the WiFi settings, please remove any LAN cable if you are connected with this. Select now the option "TRX2 connected to WLAN-Router“ and click on "Change Wifi Settings“. If you are doing the WiFi setup for the first time, the following window will pop up: Seite 37 von 68...
- Page 38 Page 38 of 68 Enter the name "admin" and the password "admin" and click on The next window shows all networks that are available in the proximity of the easyTRX2S. In the next step, select the name of your access point (1) and click on "Apply"(2).
- Page 39 Just enter the password of your WiFi network(1) in the next window and confirm with "Apply"(2). Please do not change any other settings on this page! After clicking on the "Apply" button, please wait (10 to 20 seconds) until the settings have been applied and until the following window pops up: Seite 39 von 68...
-
Page 40: Checking The Connection
Page 40 of 68 Next, you need to connect to your access point. This can be done via LAN or WLAN. When the connection has been installed completely, select " TRX2 connected to PC, Tablet, …" so that the IP of the easyTRX2S can be determined once again. - Page 41 After your click into the above marked area you should see the data packages coming in: Seite 41 von 68...
- Page 42 • AIVDO => The AIVDO dataset contains your own ship data (AIS data format) • AIVDM => The AIVDM dataset contains the received AIS data of another ship PWDC: Proprietary Weatherdock message used by the programming tool. Seite 42 von 68...
-
Page 43: Reset Of Wifi Settings
6.8.5 Reset of WiFi settings If you wish to connect with the easyTRX2S directly or if you do not want to have access to your access point you have the possibility to reset the WiFi settings. Connect the easyTRX2 to the on-board electrical system. Connect the easyTRX2S with the USB interface of your PC. -
Page 44: Software-Update
Page 44 of 68 Under no circumstances should you turn off the easyTRX2S and please do not disconnect the USB cable. With the progress bar you can monitor the process. The process is completed when the "progress bar" disappears and the window "WiFi Setup complete"... - Page 45 Picture 11-Information This is version number 3.3.1. After having downloaded the file, please click on "File" => "Update" and choose the update “*.wdc” file with key (1): Picture 12-Firmware update Here you can also see the existing version number as well as the new version number of the update.
- Page 46 Page 46 of 68 To start the update procedure press key (2). Please make sure that the operating voltage is still on during the update and that the PC does not switch to standby or turns itself off! Download of latest firmware ...
-
Page 47: Is: Integrated Splitter
7 IS: integrated Splitter The easy TRX2S devices with the suffix „-IS-“have an antenna splitter integrated. This splitter checks whether the output comes from the VHF device or from the Class B AIS Transmitter to the antenna. If this is the case, the other devices are disconnected very fast. -
Page 48: Igps: Integrated Gps Antenna
Page 48 of 68 8 iGPS: Integrated GPS antenna Available on devices with „-IGPS-„ in name. Picture 14-view of GPS antenna GPS antenna with integrated pre-amplifier • Type: Quadrifilar helix • Polarization: Right Hand Circular Polarized (RHCP) • 3dB beam width: min 135°... -
Page 49: Idvbt: Integrated Dvbt Amplifier
Mount the easyTRX2S with IGPS on your map table with view to the sky. We get a good reception beneath it. If you are not sure where you should fix the unit just try it before. To do this please program MMSI, ship name, call sign in the unit. -
Page 50: N2K: Nmea2000 Compatibility
Page 50 of 68 1-108MHz @ >= 13dB Compatibility to DVB-T2: As the latest standard of DVB-T2 is within 470-690MHz we are also amplifying this band. Therefore with our DVB-T add-on of the easyTRX2S you also can receive this latest standard. Please check your DVB-T receiver is it is able to receive this signal. - Page 51 Picture 16-N2K socket NMEA2000 was developed in 2000 by the National Marine Electronics Association and is used as a network system to combine about 50 devices. It is used as an easy plug and play solution. Just connect the NMEA2000 connector by cable (not included) to your NMEA2000 network aboard and your AIS data should come to your chart plotter.
-
Page 52: Mounting
Page 52 of 68 11 Mounting Please mount under deck with all plugs pointing downward. Make sure that the easyTRX2S is not exposed to direct sunlight or splash water. Please use the enclosed screws only! 11.1 Dimensions of the easyTRX2S Picture 17-Dimensions Please keep area of 10-15cm clear around the unit! 11.2 VHF Antenna... -
Page 53: Gps Antenna
If you have older AIS receiver with external VHF splitter, please do not use this splitter in combination with this AIS Class B transceiver. 11.3 GPS antenna Connector: BNC socket The connection to easyTRX2S devices requires a 5V DC feed for GPS antennas. -
Page 54: Connection To A Plotter
Page 54 of 68 • The position of the GPS antenna should provide a free view through 360° with a vertical angle of 5° to 90° above the horizon • The GPS signals are very sensitive to irradiation of radar, Inmarsat, iridium, etc. -
Page 55: Switch (Function Set By Software)
destined for this functionality. If you connect these cables with a push button (not a SWITCH) of your switchboard and close together the cables with the button, a SRM (Safety related message) is sent by the device. The preset SRM message which is transmitted is called: PAN PAN PAN. -
Page 56: Anchor Alarm
Page 56 of 68 11.5.4 Anchor alarm If you want to change the function to anchor alarm please open the programming tool – see under paragraph 6.7. You can choose one function. If the anchor alarm is active by set the switch to “1” and you drive out of range of your set position the TRX2S set the output port of CPA to high and an external buzzer e.g. -
Page 57: Troubleshooting
(brown/yellow) position 5 and 6. The sensor data is put out to the plotter and PC together with the AIS and GPS data. (Note: You cannot connect a GPS receiver as the easyTRX2S has its own GPS receiver, and only these data can be interpreted and displayed at the plotter or PC. -
Page 58: Maintenance
Page 58 of 68 port of the plotter correct? (standard value: 38400 baud!) Entering MMSI used before? The MMSI cannot be MMSI not programmed twice. The possible device must be sent back to reset the MMSI. Please ask your service partner for detailed information. -
Page 59: Technical Data
15 Technical data Parameter Value Dimensions 207mm x 150mm x 30mm 800 gram Weight (depends on TRX2S variant) Power 9,6VDC –32,1 VDC Power consumption 3,6W @12VDC Maximum current 300mA @12VDC, peak current consumption 1,9A GPS receiver (internally in AIS) IEC 61108-1 compliant Ports(SUB D 15 male plug) RS232 NMEA... - Page 60 Page 60 of 68 Parameter Value DSC channel 70 reception for AIS channel management is implemented. Transmission power 33dBm ± 1.5 dB (of 1,4W - 2,8W) Channel Bandwidth 25kHz Channel spacing 25kHz Modulation modes 25kHz GMSK (AIS, TX and RX) 25kHz AFSK (DSC, RX only) Bit rate 9600 b/s ±...
- Page 61 Parameter Value Via button for Silent mode / Anchor alert, via button for SRM, transmitting safety message or silent mode. Extra equipment Switch contact for external signal source for CPA or AIS- SART signal. (200mA max. at contiguous irregular input voltage of the easyTRX2S unit) Compass safe distance 0,8m...
- Page 62 Page 62 of 68 Parameter Value Msg.14: The safety message (SRM) sends information: "PAN PAN PAN". This is Supported AIS only possible upon activation of the messages in external button. transmission mode IMPORTANT: It is not possible to initiate other AIS messages with the easyTRX2S than the ones stated above.
-
Page 63: Contact And Support Information
You find them here: www.easyais.com/en/faqs/ Contact: Contact your local dealer for WEATHERDOCK AIS support in most cases he can help quickly and straightforwardly. Stamp of your dealer: If he cannot help you we are happy to provide help solving your problem:... -
Page 64: License Agreement
WHICH WERE PURCHASED IN ONLINE AUCTIONS. IN A WARRANTY CASE PLEASE CONTACT YOUR WEATHERDOCK DEALER. HE WILL AGREE ON THE NEXT STEPS WITH YOU. IN THE CASE OF DISPATCH PACK UP THE DEVICE PROPERLY AND SEND IT SUFFICIENTLY STAMPED TO THE ADDRESS STATED BY YOUR DEALER. - Page 65 A PROBLEM WITH YOUR DEVICE, PLEASE CONTACT YOUR EASYTRX2S-IS_WIFI DEALER. ANY ATTEMPT TO OPEN, ALTER OR MODIFY THE DEVICE WILL INVALIDATE WARRANTY AND MAY DAMAGE THE DEVICE IRREPARABLY. WARNING IT IS THE SOLE RESPONSIBILITY OF THE OWNER/OPERATOR OF THE SHIP TO COMMAND THE VESSEL SAFELY AND TO BE IN FULL CONTROL OF ALL OPERATING CONDITIONS DURING THE ENTIRE TRAVEL TIME.
-
Page 66: Notes
Page 66 of 68 19 Notes Seite 66 von 68... - Page 67 Seite 67 von 68...
- Page 68 Page 68 of 68 Weatherdock AG Emmericher Strasse 17 D-90411 Nürnberg Tel.:+49 (0) 911 37 66 38 30 Fax: +49 (0) 911 37 66 38 40 Web: www.weatherdock.com Email: support@weatherdock.de Seite 68 von 68...
Need help?
Do you have a question about the easyTRX2S Series and is the answer not in the manual?
Questions and answers