
Related Manuals for Synthes Titanium Trochanteric Fixation Nail System


Summary of Contents for Synthes Titanium Trochanteric Fixation Nail System
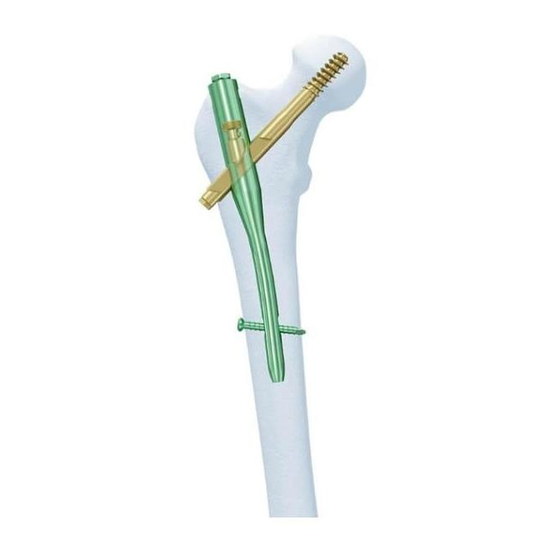
- Page 1 Titanium Trochanteric Fixation Nail System—Screw Option. For intramedullary fixation of proximal femur fractures. Technique Guide...
-
Page 3: Table Of Contents
Locking Mechanism Assembly Product Information Implants Instruments Set Lists Important: These devices have not been evaluated for safety and compatibility in the MR environment. These devices have not been tested for heating or migration in the MR environment. Image intensifier control Synthes... -
Page 4: Titanium Trochanteric Fixation Nail System-Screw Option
– Cannulated for insertion over a guide wire – 0 mm end cap sits flush with nail – 5 mm, and 10 mm end caps extend nail height if nail is overinserted – Titanium alloy* Synthes Titanium Trochanteric Fixation Nail System—Screw Option Technique Guide... - Page 5 – Titanium alloy* Distal locking – 4.9 mm locking bolts or 5.0 mm locking screws – Titanium alloy* for improved 4.9 mm locking bolt mechanical and fatigue properties – Self-cutting trocar tip 5.0 mm locking screw *Titanium-6% aluminum-7% niobium Synthes...
-
Page 6: Ao Principles
3. D. Hardy, P. Descamps, P. Krallis, et al. “Use of an Intramedullary Hip-Screw Compared with a Compression Hip-Screw with a Plate for Intertrochanteric Femoral Fractures.” The Journal of Bone and Joint Surgery, 80-A(5), pp 618-630, 1998. Synthes Titanium Trochanteric Fixation Nail System—Screw Option Technique Guide... -
Page 7: Indications
Indications The Synthes Titanium Trochanteric Fixation Nail (TFN) is intended to treat stable and unstable pertrochanteric fractures, intertrochanteric fractures, basal neck fractures, and combinations thereof. The long TFN is additionally indicated for subtrochanteric fractures, pertrochanteric fractures associated with shaft fractures, pathologic... -
Page 8: Preoperative Implant Selection
(magnification factor 1.05)* – 420/1.05 = 400 – Estimated nail length is 400 mm When selecting nail size, consider canal diameter, fracture pattern, patient anatomy, and postoperative protocol. * Magnification factor may vary Synthes Titanium Trochanteric Fixation Nail System—Screw Option Technique Guide... -
Page 9: Open Proximal Femur
3.2 mm guide wire and clamp the guide wire into one of the grooves marked 125°, 130°, or 135°. Position the ruler over the proximal femur and take an AP image. Select the an- gle that most closely matches the angle of the femoral neck. * Also available Synthes... - Page 10 Pass the reaming rod measuring device over the proximal end of the reaming rod and through the incision to the bone. Read nail length directly from the measuring device. Synthes Titanium Trochanteric Fixation Nail System—Screw Option Technique Guide...
- Page 11 Read the diameter measurement on the tab that fills the canal. Note: Take into consideration that the ruler is not at the same level as the femur. This will affect the accuracy of the measurement. Synthes...
- Page 12 The guide wire will be centered in the canal in the lateral view. The guide wire can be inserted either manually with the universal chuck with T-handle or with a power drill. Synthes Titanium Trochanteric Fixation Nail System—Screw Option Technique Guide...
- Page 13 Insert the guide wire through the protection sleeve and wire guide. Confirm guide wire placement in both the AP and lateral planes. Insert to a depth of approximately 15 cm. Remove the wire guide. Synthes...
- Page 14 Take care to remove the bone on the me- dial segment of the fracture to prepare an adequate opening for the proximal end of the nail. Synthes Titanium Trochanteric Fixation Nail System—Screw Option Technique Guide...
- Page 15 Pass the reaming rod measuring device over the proximal end of the reaming rod and through the incision to the bone. Read nail length directly from the measuring device. * Also available Synthes...
-
Page 16: Insert Nail
Important: Ensure that the connecting screw is tight to avoid misalignment when inserting the screw through the aiming arm. Do not attach the aiming arm to the handle until after the nail is fully inserted. Synthes Titanium Trochanteric Fixation Nail System—Screw Option Technique Guide... - Page 17 Under image intensification, verify fracture reduction and insert the nail as far as possible by hand. Use the insertion assembly to manipulate the nail across the fracture. When inserting a short nail, no hammer blows should be required. Synthes...
- Page 18 For long nails, insertion can be aided by light hammer blows. When using a hammer, monitor the tip of the nail using image intensification. Verify that there is no evidence of impingement distally. Synthes Titanium Trochanteric Fixation Nail System—Screw Option Technique Guide...
- Page 19 8 mm hex and 11 mm ratchet wrench may be used to retighten the connecting screw over the reaming rod as needed. If a reaming rod has been used, it should be removed once the nail has crossed the fracture site. Synthes...
-
Page 20: Proximal Locking
Take a lateral image of the proximal femur to verify nail rotation and ensure that the screw will be aimed toward the center of the femoral head. Synthes Titanium Trochanteric Fixation Nail System—Screw Option Technique Guide... - Page 21 Technique tip: When assembling the buttress/compression nut onto the blade guide sleeve, locate it approximately in the middle of the threaded portion of the blade guide sleeve for insertion into the aiming arm. Synthes...
- Page 22 Take an AP C-arm image to confirm that the blade guide sleeve is on the lateral cortex. Reconfirm fracture reduction using image intensification. Synthes Titanium Trochanteric Fixation Nail System—Screw Option Technique Guide...
- Page 23 Do not pull on the blade guide sleeve or the drill to make this adjustment as this could affect the accuracy of the aiming assembly. Synthes...
- Page 24 Do not pull on the blade guide sleeve or the drill to make this adjustment as this could affect the accuracy of the aiming assembly. Synthes Titanium Trochanteric Fixation Nail System—Screw Option Technique Guide...
- Page 25 The guide wires will converge toward the tip of the screw, in the lateral view, but will not touch the screw. The guide wires should be used for provisional fixation only and removed once the screw has been inserted. Synthes...
- Page 26 No calculations are required. Note: If compression is desired, use a shorter lag screw to avoid protruding too far out of the lateral cortex. Synthes Titanium Trochanteric Fixation Nail System—Screw Option Technique Guide...
- Page 27 Pass the drill stop over the back end of the stepped drill bit and adjust the setting to the measured screw length. Pass the drill bit over the guide wire, through the blade guide sleeve and advance under power. Drill to the stop. Synthes...
- Page 28 – Monitor the depth under fluoroscopy. – Monitor the respective graduations on the instrument shaft in relation to the blade guide sleeve. Remove the tap/reamer by turning counterclockwise. Synthes Titanium Trochanteric Fixation Nail System—Screw Option Technique Guide...
- Page 29 Advance the screw by turning the inserter/extractor clockwise until the mark on the inserter meets the flange surface of the blade guide sleeve. At this depth the screw tip will be positioned at the tip of the guide wire. Synthes...
- Page 30 Turn clockwise to advance the locking mechanism. Advance to the stop. The screw is now locked in rotation but can still slide. (See Figures A and B on next page.) * Also available Synthes Titanium Trochanteric Fixation Nail System—Screw Option Technique Guide...
- Page 31 Use the 5.0 mm hexagonal shaft, 210 mm, in conjunction with the ratchet wrench to advance the locking mechanism. Note: If the locking mechanism is not advanced, use of an end cap is not possible. Figure A. Locking mechanism disengaged Figure B. Locking mechanism engaged Synthes...
- Page 32 5.0 mm flexible hexagonal screwdriver to loosen the connec- tion. Remove the blade guide sleeve from the aiming arm by depressing the button on the aiming arm and pulling out the blade guide sleeve. Synthes Titanium Trochanteric Fixation Nail System—Screw Option Technique Guide...
-
Page 33: Distal Locking- Short Nails
Remove the trocar and drill through both cortices using the calibrated 4.0 mm three-fluted drill bit. Read the length of the locking bolt/screw directly from the drill bit at the back of the drill sleeve. Press the drill sleeve to the bone to ensure accurate measurement. Synthes... - Page 34 Note: In order to pass the measuring hook through the protection sleeve, the sleeve of the measuring device must be removed. Synthes Titanium Trochanteric Fixation Nail System—Screw Option Technique Guide...
- Page 35 This will help in end cap selection. Remove the con- necting screw and insertion handle using the ball hexagonal screwdriver or the cannulated shaft and ratchet wrench. Note: If using SureLock, the insertion handle should remain attached to the nail. Synthes...
-
Page 36: Surelock Distal Targeting Device - Long Nails
Note: For information on distal locking technique using the SureLock device, please refer to the SureLock Distal Targeting Device Technique Guide. For more information on the SureLock System, please contact your Synthes consultant. Synthes Titanium Trochanteric Fixation Nail System—Screw Option Technique Guide... - Page 37 Align the image intensifier with the hole in the nail until a perfect circle is visible in the center of the screen. Important: Confirm that the nail is securely connected to the insertion handle, especially after hammering. Round (correct) Oblique (incorrect) * Also available Synthes...
- Page 38 Keep the drill bit oblique to the x-ray beam until the tip is centered in the locking hole. * Also available Synthes Titanium Trochanteric Fixation Nail System—Screw Option Technique Guide...
- Page 39 Hold the drill firmly in this position and drill through both cortices. Measure Instrument 357.402 Locking Bolt Measuring Device Use the locking bolt measuring device to measure for locking bolt/screw length. Read locking bolt/screw length directly from the depth gauge. Synthes...
-
Page 40: Freehand Distal Locking- Long Nails
Standard freehand technique Instrument 315.40 4.0 mm Three-Fluted Drill Bit Use the 4.0 mm three-fluted drill bit to perform freehand distal locking. Synthes Titanium Trochanteric Fixation Nail System—Screw Option Technique Guide... -
Page 41: Insert End Cap
The 5.0 mm flexible hexagonal screwdriver, the 5.0 mm hexagonal screwdriver, or the 5.0 mm hexagonal shaft and ratchet wrench may also be used to insert the end cap with- out the use of the guide wire. Synthes... -
Page 42: Implant Removal
Important: Do not attempt to extract the nail at this point. Synthes Titanium Trochanteric Fixation Nail System—Screw Option Technique Guide... - Page 43 Optional instruments 357.420 Conical Extraction Bolt 357.421 Extraction Screw Guide Use the extraction screw guide to help center the extraction screw in the top of the nail. The conical extraction bolt can be used instead of the extrac- tion screw. Synthes...
- Page 44 To remove the nail, thread the hammer guide and slide hammer assembly onto the back end of the nail extraction screw. Hold onto the extraction screw and use light hammer blows to extract the nail. Synthes Titanium Trochanteric Fixation Nail System—Screw Option Technique Guide...
- Page 45 Note: Under image intensification, verify that the hook has passed through and engaged the distant end of the nail. Extract nail Extract both nail fragments. Note: Keep the patient’s limb restrained to increase the effi- ciency of the extraction force. Synthes...
- Page 46 Note: Under image intensification, verify that the hook has passed through and engaged the distant end of the nail. Extract nail Extract both nail fragments. Note: Keep the patient’s limb restrained to increase the efficiency of the extraction force. Synthes Titanium Trochanteric Fixation Nail System—Screw Option Technique Guide...
-
Page 47: Instrument Cleaning
Clean the instruments postoperatively with the cleaning stylet and cleaning brush. Always ensure that the grooves in the blade guide sleeve are free of debris. Clean only with neutral pH detergents approved for use on anodized aluminum. Synthes... -
Page 48: Locking Mechanism Assembly
5 Back the locking mechanism off the 11.0 mm screw by turning the screwdriver counterclockwise one full turn, Locking mechanism Locking mechanism and remove the 11.0 mm screw. disengaged engaged The nail is now ready for insertion. Synthes Titanium Trochanteric Fixation Nail System—Screw Option Technique Guide... - Page 49 26 mm–60 mm (2 mm increments) 64 mm–80 mm (4 mm increments) 85 mm–100 mm (5 mm increments) – 4.3 mm core diameter – Fully threaded – Self-cutting trocar tip – 3.5 mm hexagonal drive *Titanium-6% aluminum-7% niobium alloy Synthes...
- Page 50 – Static interlocking 235 mm nail – Universal design for left and right femurs • 97.5 mm 0 mm Distal locking slot accepts 4.9 mm locking bolts or 5.0 mm locking screws Synthes Titanium Trochanteric Fixation Nail System—Screw Option Technique Guide...
- Page 51 Angle (mm) Angle 456.314S 125° 456.324S 125° 456.315S 130° 456.325S 130° 456.316S 135° 456.326S 135° 456.317S 125° 456.327S 125° 456.318S 130° 456.328S 130° 456.319S 135° 456.329S 135° 456.321S 125° 456.510S 125° 456.322S 130° 456.511S 130° 456.323S 135° 456.512S 135° Synthes...
- Page 52 – Static or dynamic interlocking with controlled dynamization of 10 mm – Anatomic 10° anteversion – Nail designs for both left and right femurs * 14 mm diameter nails are available in 130° only Synthes Titanium Trochanteric Fixation Nail System—Screw Option Technique Guide...
- Page 53 456.434S 456.435S 135° 456.376S 456.377S 135° 456.436S 456.437S 135° 456.378S 456.379S 135° 456.438S 456.439S 135° 456.380S 456.381S 135° 456.440S 456.441S 135° 456.382S 456.383S 135° 456.442S 456.443S 135° 456.384S 456.385S 135° 456.444S 456.445S 135° 456.386S 456.387S 135° 456.446S 456.447S 135° Synthes...
- Page 54 130° 456.486S 456.487S 130° 456.490S 456.491S 135° 456.492S 456.493S 135° 456.494S 456.495S 135° 456.496S 456.497S 135° 456.498S 456.499S 135° 456.500S 456.501S 135° 456.502S 456.503S 135° 456.504S 456.505S 135° 456.506S 456.507S 135° Synthes Titanium Trochanteric Fixation Nail System—Screw Option Technique Guide...
- Page 55 03.010.471 Guide Wire Aiming Device Offset Block 314.11 Holding Sleeve 314.75 Hexagonal Screwdriver 315.40 4.0 mm Three-Fluted Drill Bit, ◊ quick coupling, 195 mm ◊ Available nonsterile or sterile-packed. Add “S” to catalog number to order sterile product. Synthes...
- Page 56 Ratchet Wrench, 11 mm width across flats 321.25 Spanner Wrench 351.05 Tissue Protector 357.052 Trochanteric Fixation Nail Screw Compression Nut 357.22 Hammer Guide, for use with Slide Hammer 357.25 Slide Hammer, for use with Hammer Guide Synthes Titanium Trochanteric Fixation Nail System—Screw Option Technique Guide...
- Page 57 Fixation Nails 357.367 135° Aiming Arm, for Trochanteric Fixation Nails 357.369 Blade Guide Sleeve, for Trochanteric Fixation Nails 357.371 Buttress/Compression Nut, for use with Blade Guide Sleeve 357.377 Helical Blade Coupling Screw 357.381 11.0 mm/3.2 mm Wire Guide, 222 mm Synthes...
- Page 58 153 mm 357.387 4.0 mm Trocar, 176 mm 357.389 8.0 mm/4.0 mm Drill Sleeve, 164 mm 357.391 Radiographic Ruler, for Trochanteric Fixation Nails 357.392 17.0 mm/3.2 mm Wire Guide, 161 mm Synthes Titanium Trochanteric Fixation Nail System—Screw Option Technique Guide...
- Page 59 300 mm 357.395 Driving Cap, for use with 357.411 357.396 Extraction Screw, for Trochanteric Fixation Nails 357.397 Cannulated Connecting Screw, for Trochanteric Fixation Nails 357.398 Cannulated Shaft with 8 mm hex, 125 mm 357.399 3.2 mm Guide Wire, 400 mm Synthes...
- Page 60 Drill Stop, for use with 357.403 357.406 5.0 mm Flexible Hexagonal Screwdriver 357.407 4.0 mm Three-Fluted Drill Bit, quick coupling, 260 mm, 65 mm calibration 357.410 22.0 mm/17.0 mm Protection Sleeve Synthes Titanium Trochanteric Fixation Nail System—Screw Option Technique Guide...
- Page 61 Insertion Handle, for Trochanteric Fixation Nails 357.412 Cannulated Reverse Awl 357.413 5.6 mm/3.2 mm Drill Guide, 198 mm 357.414 11 mm Cannulated Hexagonal Socket, 180 mm 357.415 5.0 mm Hexagonal Shaft, 210 mm 357.417 5.0 mm Flexible Hexagonal Screwdriver, coated Synthes...
- Page 62 Screw, for Trochanteric Fixation Nail 357.420 Conical Extraction Bolt, for Trochanteric Fixation Nail 357.421 Extraction Screw Guide, for Trochanteric Fixation Nail 357.427 5.0 mm Hexagonal Screwdriver 357.428 Trochanteric Fixation Nail Screw Inserter/ Extractor Synthes Titanium Trochanteric Fixation Nail System—Screw Option Technique Guide...
- Page 63 Tap / Reamer for Trochanteric Fixation Nail Screw 357.515 Ball Hexagonal Screwdriver, 8 mm, for Titanium Femoral Nails 357.92 Miss-A-Nail Aiming Jig 360.253 Holding Sleeve Locking Device 360.255 Reaming Rod Measuring Device 393.10 Universal Chuck with T-Handle 399.42 Hammer, 500 grams Synthes...
- Page 64 For detailed cleaning and sterilization instructions, please refer to http://us.synthes.com/Medical+Community/Cleaning+and+Sterilization.htm or to the below listed inserts, which will be included in the shipping container: – Processing Synthes Reusable Medical Devices — Instruments, Instrument Trays and Graphic Cases — DJ1305 – Processing Non-sterile Synthes Implants — DJ1304...
- Page 65 357.404 11.0 mm Tapered Cannulated Drill Bit, large quick coupling, 280 mm 357.405 Drill Stop, for use with 357.403 357.406 5.0 mm Flexible Hexagonal Screwdriver ◊ Available nonsterile or sterile-packed. Add “S” to catalog number to order sterile product. Synthes...
- Page 66 , 2 ea. ◊ 458.930 458.958 Extension (mm) 458.932 458.960 456.311 458.934 458.964 456.312 458.936 458.968 456.313 458.938 458.972 458.940 458.976 458.942 458.980 458.944 458.985 458.946 458.990 458.948 458.995 458.950 458.999 458.952 Synthes Titanium Trochanteric Fixation Nail System—Screw Option Technique Guide...
- Page 67 Extraction Screw Guide, for Trochanteric Fixation Nail 357.427 5.0 mm Hexagonal Screwdriver 357.428 Trochanteric Fixation Nail Screw Inserter/Extractor 357.430 Tap/Reamer for Trochanteric Fixation Nail Screw ◊ Available nonsterile or sterile-packed. Add “S” to catalog number to order sterile product. Synthes...
- Page 68 950 mm, sterile 351.707S 2.5 mm Reaming Rod with ball tip and extension, 950 mm, sterile 357.417 5.0 mm Flexible Hexagonal Screwdriver, coated 394.35 Large Distractor, complete 399.43 Hammer, 700 grams Synthes Titanium Trochanteric Fixation Nail System—Screw Option Technique Guide...
- Page 72 To order: (800) 523-0322 To order: (800) 668-1119 Fax: (610) 251-9056 Fax: (905) 567-3185 www.synthes.com © 2010 Synthes, Inc. or its affiliates. All rights reserved. Synthes is a trademark of Synthes, Inc. or its affiliates. Printed in U.S.A. 12/10 J9516-C...
Need help?
Do you have a question about the Titanium Trochanteric Fixation Nail System and is the answer not in the manual?
Questions and answers