VIA Technologies Mobile360 D700 User Manual
Dual 1080p ai dash cam with can bus and 4g connectivity for fleet management
Hide thumbs
Also See for Mobile360 D700:
- Quick start manual (60 pages) ,
- User manual (36 pages) ,
- User manual (24 pages)

Related Manuals for VIA Technologies Mobile360 D700


Summary of Contents for VIA Technologies Mobile360 D700
- Page 1 USER MANUAL VIA Mobile360 D700 Dual 1080p AI Dash Cam with CAN bus and 4G connectivity for fleet management 1.01-02132020-110700...
- Page 2 VIA Technologies, Inc. reserves the right the make changes to the products described in this manual at any time without prior notice.
- Page 3 Safety Precautions • Always read the safety instructions carefully. • Keep this User’s Manual for future reference. • All cautions and warnings on the equipment should be noted. • Keep this equipment away from humidity. • Put this equipment on a reliable flat surface before setting it up. •...
- Page 4 VIA Moblie360 D700 User Manual Box Contents • 1 x Mobile360 D700 AI Dash Cam • 1 x 32GB Micro SD card • 1 x 12V DC power adaptor • 1 x Cigarette lighter power cable • 1 x OBD II power cable •...
-
Page 5: Table Of Contents
VIA Mobile360 D700 User Manual Table of Contents 1. Product Overview ......................1 Key Features ............................1 1.1.1 Dual 1080p Front Dash and Interior Cameras ................1 1.1.2 Networking Support ........................1 1.1.3 Cloud Integration ........................... 1 1.1.4 Storage Expansion ......................... 1 1.1.5... - Page 6 VIA Mobile360 D700 User Manual List of Figures Figure 1: Front panel I/O layout .......................... 4 Figure 2: Rear panel I/O layout ........................... 4 Figure 3: Left panel I/O layout..........................4 Figure 4: Right panel I/O layout .......................... 5 Figure 5: Bottom panel I/O layout ........................5 Figure 6: Dimensions of the VIA Mobile360 D700 (front view) ................6 Figure 7: Dimensions of the VIA Mobile360 D700 (top view) ................
- Page 7 VIA Mobile360 D700 User Manual List of Tables Table 1: Micro USB 2.0 port pinouts ........................7 Table 2: Micro SD card slot pinouts ........................7 Table 3: Micro SIM card slot pinouts ......................... 8 Table 4: 12-pin power connector pinouts ......................8 Table 5: Cigarette lighter power cable's connectors pinouts ................
-
Page 8: Product Overview
VIA Mobile360 D700 User Manual 1. Product Overview Boost fleet management efficiency and enhance driver safety with the VIA Mobile360 D700 commercial- grade AI Dash Cam. Combining dual 1080p front dash and interior cameras with integrated 4G LTE wireless connectivity and CAN bus support, this robust and stylish device provides a flexible and high-performance solution that can be customized to meet your specific deployment requirements. With its CAN bus support, the device enables the collection of rich vehicle usage data such as speed, distance, idle time, and fuel consumption that can be analyzed to identify opportunities for optimizing fleet efficiency and safety. Its 8V ~ 36V DC-in power supply allows in-vehicle power delivery using either a standard 12V power socket or a hard-wire installation via the vehicle’s fuse box. Other features included in this lightweight small footprint device include Cortex-A53 Dual Core SoC, 512MB DDR3L DRAM, 128MB SPI Flash Memory, a 3-Axis G-sensor, one Micro SIM card slot, one Micro SD card slot, and one Micro USB 2.0 port. -
Page 9: Product Specifications
VIA Mobile360 D700 User Manual Product Specifications Processor • 800MHz ARM Cortex-A53 dual-core SoC System Memory • 512MB DDR3L DRAM Storage • 128MB SPI Flash Memory • Micro SD Card slot Wireless Connectivity • Quectel EC25 4G LTE module with antenna • AMPAK AP6255 Wi-Fi 802.11b/g/n/ac, Bluetooth 4.2 • Ublox M8030-KT GPS receiver Camera and Video •... - Page 10 VIA Mobile360 D700 User Manual Power Supply • 8~36V DC-in Software • Device SDK including Android/iOS smartphone reference apps Cloud Certification • Microsoft IoT Plug and Play Certified • AWS Device Certified featuring AWS IoT Core and Kinesis Video Streams (KVS) support Operating System • Linux Kernel 4.1.0 Operating Temperature • -10°~70°C Mechanical Construction • PC chassis housing Dimensions • 124.52mm(W) x 41.25mm(H) x 95.60mm(D) (4.90" x 1.62" x 3.76") Weight • 0.322kg (0.71lbs) Compliance •...
-
Page 11: Layout Diagram
VIA Mobile360 D700 User Manual Layout Diagram Figure 1: Front panel I/O layout Figure 2: Rear panel I/O layout Figure 3: Left panel I/O layout... -
Page 12: Figure 4: Right Panel I/O Layout
VIA Mobile360 D700 User Manual Figure 4: Right panel I/O layout Figure 5: Bottom panel I/O layout... -
Page 13: Product Dimensions
VIA Mobile360 D700 User Manual Product Dimensions Figure 6: Dimensions of the VIA Mobile360 D700 (front view) Figure 7: Dimensions of the VIA Mobile360 D700 (top view) -
Page 14: 2. External I/O Pin Descriptions And Functionality
VIA Mobile360 D700 User Manual 2. External I/O Pin Descriptions and Functionality The VIA Mobile360 D700 AI Dash Cam has a wide selection of interfaces. It includes a selection of frequently- used ports as part of the external I/O coastline. Micro USB 2.0 Port The VIA Mobile360 D700 is equipped with one Micro USB 2.0 port located on the right panel for debugging. The pinouts of the Micro USB 2.0 port are shown below. Signal VBUS Figure 8: Micro USB 2.0 port diagram... -
Page 15: Micro Sim Card Slot
VIA Mobile360 D700 User Manual Micro SIM Card Slot The VIA Mobile360 D700 comes with a Micro SIM card slot located on the right panel that can support a 4G SIM card. The pinouts of the Micro SIM card slot are show below. Signal Figure 10: Micro SIM card slot diagram DATA Table 3: Micro SIM card slot pinouts 12-Pin Power Connector The VIA Mobile360 D700 comes with a 12-pin power connector. The 12-pin power connector is used for... -
Page 16: Led Status
VIA Mobile360 D700 User Manual LED Status The VIA Mobile360 D700 comes with a three LED indicators located on the rear panel to show the status. The three LED indicators states are shown in the diagram below. Figure 12: LED indicators states diagram Short Record / Alert Button The VIA Mobile360 D700 comes with a short record / alert button located on the rear panel which will record a 20 second video of both cameras (10 seconds before and 10 seconds after) as well as snapshots of each camera at the time the button is pushed with a short press, while it will create an alert message when pressed for more than 3 seconds. The diagram of the short record / alert button is shown below. Figure 13: Short record / alert button diagram... -
Page 17: Speaker
VIA Mobile360 D700 User Manual Speaker The VIA Mobile360 D700 comes with a speaker located on the left panel. Figure 14: Speaker diagram Microphone The VIA Mobile360 D700 comes with a microphone located on the bottom panel. The diagram of the microphone is shown below. Figure 15: Microphone diagram... -
Page 18: Accessories
VIA Mobile360 D700 User Manual 3. Accessories The following cables and mounting brackets are included with your VIA Mobile360 D700 AI dash cam. OBD II Power Cable Figure 16: OBD II power cable diagram Cigarette Lighter Power Cable Figure 17: Cigarette lighter power cable diagram Blade Fuse Holder Cables and Fuses Figure 18: Blade fuse holder cables and fuses diagram... -
Page 19: 12-Pin Power Connector To Dc Jack Combo Cable
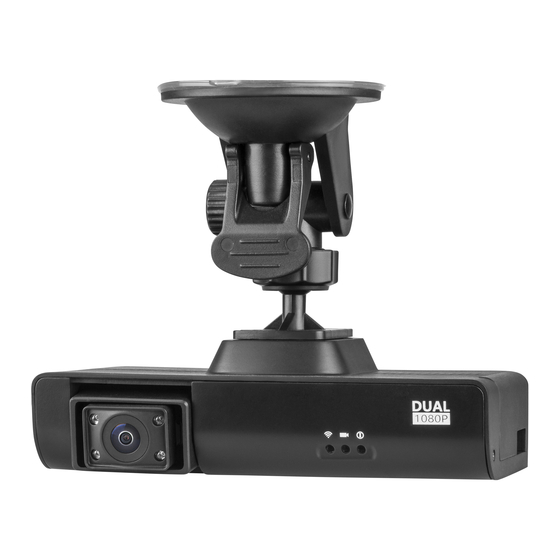
VIA Mobile360 D700 User Manual 12-Pin Power Connector to DC Jack Combo Cable Figure 19: 12-pin power cable connector to DC jack combo cable diagram 12V DC Power Adaptor and Power Cord Figure 20: 12V DC power adaptor Suction Cup and Adhesive Tape Mounting Brackets Suc�on Cap Adhesive Tape Moun�ng Bracket Moun�ng Bracket... -
Page 20: 4. Via Mobile360 D700 Installation
VIA Mobile360 D700 User Manual 4. VIA Mobile360 D700 Installation This chapter provides information about the VIA Mobile360 D700 installation procedures. Removing the Right Panel I/O Cover Step 1 Loosen the screw of the right panel I/O cover with the included allen wrench. Figure 22: Loosen the screw of the right panel I/O cover Step 2 Remove the right panel I/O cover. -
Page 21: Installing The Micro Sd Card
VIA Mobile360 D700 User Manual Installing the Micro SD Card The VIA Mobile360 D700 AI dash cam supports automatic video recording to a Micro SD card after startup, and can be played back in the VIA Mobile360 App. To use this feature, you need to insert a Micro SD card into the Micro SD card slot on the VIA Mobile360 D700. Step 1 Locate the Micro SD card slot. Figure 24: Locating the Micro SD card slot Step 2 Insert a Micro SIM card into the Micro SIM card slot. Use your fingernail to press the card into the slot. When it is fully inserted, the card will snap into the slot. Note: The Micro SD card must be formatted in a FAT32 file system format. The Micro SIM card does not supports hot plugging. Maximum storage capacity is 256GB. -
Page 22: Installing The 4G Micro Sim Card
VIA Mobile360 D700 User Manual Installing the 4G Micro SIM Card The VIA Mobile360 D700 AI dash cam can download maps through a 4G network, and can be displayed in the VIA Mobile360 App. To use this feature you need to insert a 4G Micro SIM card into the Micro SIM card slot on VIA Mobile360 D700. Step 1 Locate the Micro SIM card slot. Figure 25: Locating the Micro SIM card slot Step 2 Insert a 4G Micro SIM card into the Micro SIM card slot. Use your fingernail to press the card into the slot. When it is fully inserted, the card will snap into the slot. Notes: 1. The VIA Fleet AWS Cloud service supports the VIA Mobile360 D700 AI Dash and the VIA Mobile360 family products. 2. If do not have an active 4G Micro SIM card installed in your device, you won’t be able to connect to the VIA Fleet AWS Cloud service. -
Page 23: Installing The Cables
VIA Mobile360 D700 User Manual Installing the Cables 4.4.1 Using the Cigarette Lighter Power Cable Step 1 Remove the right panel I/O cover. For details, refer to section 3.1. Step 2 Feed the 12-pin connector cable through the hole on the right panel I/O cover, then plug-in the 12-pin connector. Figure 26: Feeding the 12-pin connector cable tthrough the hole on the I/O cover Step 3 Plug in the 12-pin connector of the Cigarette Lighter Power Cable to the power connector on the VIA Mobile360 D700. Figure 27: Plugging in the 12-pin connector of the cigarette lighter power cable... -
Page 24: Figure 28: Reinstalling The Right Panel I/O Cover
VIA Mobile360 D700 User Manual Step 5 Reinstall the right panel I/O cover. Make sure to tighten the screw. Figure 28: Reinstalling the right panel I/O cover Step 6 Attach the suction cup or the adhesive tape mounting bracket onto the VIA Mobile360 D700. For details, refer to section 3.5. Step 7 Plug in the Cigarette Lighter Power Cable's plug into the Cigarette Lighter socket in the vehicle. Figure 29: Inserting the cigarette lighter power cable to the vehicle... -
Page 25: Cigarette Lighter Cable Connections Diagram
VIA Mobile360 D700 User Manual 12-Pin Power Connector 8 10 12 Cigare�e Lighter Plug Figure 30: Cigarette lighter power cable's connectors 12-Pin Power Connector Cigarette Lighter Plug Cable AWG Signal Name Pin No. Pin No. UL Type and Color +12V 2 & 4 UL1007 22AWG Orange and Red... -
Page 26: Using The Obd Ii Power Cable
VIA Mobile360 D700 User Manual 4.4.2 Using the OBD II Power Cable Step 1 Reference the vehicle's user manual to find the location of the Fuse box and OBD II connector. Then check the ACC fuse specification on the fuse box cover. Figure 32: Vehicle's fuse box Step 2 Pull out the ACC fuse from the vehicle's fuse box. Figure 33: Extracting the ACC fuse from the fuse box... -
Page 27: Figure 34: Installing The Acc Fuses On The Blade Fuse Holder Cable
VIA Mobile360 D700 User Manual Step 3 Select the suitable Blade Fuse Holder cable. Plug in the ACC fuse that was removed from the fuse box into the Blade Fuse Holder cable, and then plug in the other ACC fuse that we provided. Figure 34: Installing the ACC fuses on the blade fuse holder cable Step 4 Plug in the Blade Fuse Holder cable into the ACC fuse slot in the fuse box. Figure 35: Connecting the blade fuse holder cable to the fuse box Step 5 Remove the right panel I/O cover. For details, refer to section 3.1. -
Page 28: Figure 36: Feeding The 12-Pin Connector Cable Through The Hole On The I/O Cover
VIA Mobile360 D700 User Manual Step 6 Feed the 12-pin connector of the OBD II Power Cable through the hole on the right panel I/O cover. Figure 36: Feeding the 12-pin connector cable through the hole on the I/O cover Step 7 Plug in the 12-pin connector to the power connector on the VIA Mobile360 D700. -
Page 29: Figure 39: Connecting The Obd Ii Power Cable To The Blade Fuse Holder Cable
VIA Mobile360 D700 User Manual Step 9 Connect the other end of the OBD II Power Cable to the Blade Fuse Holder cable as shown in the diagram below. Blade Fuse Holder Cable Vehicle’s Fuse Box OBD II Power Cable... -
Page 30: Figure 41: Obd Ii Power Cable's Connectors
VIA Mobile360 D700 User Manual 12-Pin Power Connector 8 10 12 ACC Connector OBD II Connector Figure 41: OBD II power cable's connectors 12-Pin Power ACC Connector OBD II Connector Cable AWG Connector Signal Name Pin No. Pin No. Pin No. UL Type and Color 2 &... -
Page 31: Obd Ii Power Cable Connections Diagram
VIA Mobile360 D700 User Manual 4.4.2.1 OBD II Power Cable Connections Diagram VIA Mobile360 D700 OBD II Power Cable OBD II Connector Blade Fuse Holder Cable OBD II Connector Fuse Box Figure 42: OBD II power cable connections... -
Page 32: Using 12-Pin Power Connector To Dc Jack Combo Cable
VIA Mobile360 D700 User Manual 4.4.3 Using 12-Pin Power Connector to DC Jack Combo Cable Step 1 Remove the right panel I/O cover. For details, refer to section 3.1. Step 2 Feed the 12-pin connector of the 12-Pin Power Connector to DC Jack Combo Cable through the hole on the right panel I/O cover. -
Page 33: Figure 45: Reinstalling The Right Panel I/O Cover
VIA Mobile360 D700 User Manual Step 4 Reinstall the right panel I/O cover. Make sure to tighten the screw. Figure 45: Reinstalling the right panel I/O cover Step 5 Plug in the 12V DC Power Adaptor into the 12-Pin Power Connector to DC Jack Combo Cable as shown in the diagram below. 12-Pin Power Connector to DC Jack Combo Cable 12V DC Power Adaptor Figure 46: Plugging ithe 12V DC power adaptor to the 12-pin power connector to DC jack combo cable... -
Page 34: Figure 47: 12-Pin Power Connector To Dc Jack Combo Cable's Connectors
VIA Mobile360 D700 User Manual 12-Pin Power Connector ACC Simulator Switch 8 10 12 DC Jack 12-Pin CAN bus and GPIO Connector 8 10 12 Figure 47: 12-pin power connector to DC jack combo cable's connectors 12-Pin Power DC Simulator 12-Pin CAN bus & DC Jack Cable AWG... -
Page 35: 12-Pin Power Connector To Dc Jack Combo Cable Connections Diagram
VIA Mobile360 D700 User Manual 4.4.3.1 12-Pin Power Connector to DC Jack Combo Cable Connections Diagram VIA Mobile360 D700 AC Power Plug 12V DC Power Adaptor 12-Pin Power Connector to DC Jack Combo Cable Figure 49: 12-pin power connector to DC jack combo cable connections... -
Page 36: Mounting The Via Mobile360 D700
VIA Mobile360 D700 User Manual Mounting the VIA Mobile360 D700 Step 1 Attach the suction cup or the adhesive tape mounting bracket onto the VIA Mobile360 D700. Figure 50: Installing the mounting bracket on the VIA Mobile360 D700 Step 2 Find a suitable place to install the VIA Mobile360 D700 onto the wind shield. Use alcohol to clean the glass before mounting the device. (It is recommended to install the device in the center of the windshield below the review mirror.) Figure 51: Mounting the VIA Mobile360 D700... -
Page 37: Technical Support
VIA Mobile360 D700 User Manual 5. Technical Support Technical Support and Assistance • For technical support and additional assistance, always contact your local sales representative or board distributor, or go to https://www.viatech.com/en/support/driver-support-fag/technical-support/ technical support. • For OEM clients and system integrators developing a product for long term production, other code and resources may also be made available. Please visit our website at https://www.viatech.com/en/ about/contact/ to submit a request. - Page 38 Taiwan Headquarters Taiwan Headquarters Japan Japan China China 1F, 531 Zhong-zheng Road, 940 Mission Court 3-15-7 Ebisu MT Bldg. 6F, Tsinghua Science Park Bldg. 7 Xindian Dist., New Taipei City 231 Fremont, CA 94539, Higashi, Shibuya-ku No. 1 Zongguancun East Road, Taiwan Tokyo 150-0011 Haidian Dist., Beijing, 100084...
Need help?
Do you have a question about the Mobile360 D700 and is the answer not in the manual?
Questions and answers