Advertisement
Quick Links
oh happy day
YO U' V E RECEI V ED YO U R S ID E TAB L E (S) !
You are minutes away from even more room to create! Just a few easy steps and
you'll be ready to start your next craft project. Installation will be simple and fun.
Should you need any assistance, our customer service team is the friendliest
bunch and would be delighted to help you!
customerservice@theoriginalscrapbox.com
www.theoriginalscrapbox.com
801-226-2686 M-F 9am-5pm MST
Remember to document your experience with photos or video and let us know how
we can further improve the side table accessory. Also, remember to take pictures
of your newly improved craft space. We never get tired of seeing how you create
room for yourself and what you love to do!
Side Table Installation Instructions Made in the U.S.A.
U PDATE D: A PRIL 2 019
The Original ScrapBox Team
Advertisement

Related Manuals for ScrapBox SIDE TABLE


Summary of Contents for ScrapBox SIDE TABLE
- Page 1 Remember to document your experience with photos or video and let us know how we can further improve the side table accessory. Also, remember to take pictures of your newly improved craft space. We never get tired of seeing how you create...
- Page 2 do you want to sit or stand while you craft? maybe both? This package includes hardware for both sitting and standing height options for the DreamBox and sitting height for the WorkBox. But be aware there are a few differences as to how you’ll install the table tracks depending on which furniture piece you have and which height option you want.
- Page 3 Otherwise, grab a friend! I N C L U D E D H A R D W A R E : x8 per side table 13mm Euro Screws (for table tracks) x4 per side table...
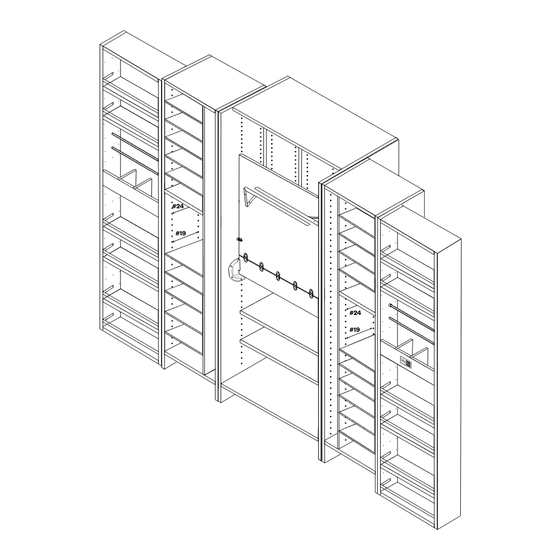
- Page 4 For the DreamBox: Make room for your Side Table (s) by removing all 13 x 13 shelves and shelf pegs from peg hole #19 through #24 in the left/right box (count up from the bottom). Also remove any notions-sized shelves and shelf pegs in peg holes #19 &...
- Page 5 Using a manual Phillips screwdriver, “start” (4) Euro screws into outer holes of (2) table tracks. Insert screws just enough to bite the plastic to prepare track for installation. With screws up, position the table tracks over shelf peg hole #19 on both sides of left/right box. Use a manual screwdriver to secure tracks.
- Page 6 Using a manual Phillips screwdriver, “start” (4) Euro screws into inner holes of (2) remaining table tracks. Insert screws just enough to bite the plastic to prepare track for installation. With screws up, position the table tracks over shelf peg hole #24 on both sides of left/right box. Use a manual screwdriver to secure tracks.
- Page 7 Install (2) Sash Locks hook side only to the underside of Side Table using the pre-drilled pilot holes as a guide. Side Table Underside Install (1) Side Table Leg to Side Table using (4) table leg screws into the pre-drilled holes. Side Table Underside...
- Page 8 3. Slide side table out of lower tracks 4. Slide side table into upper tracks 5. Extend side table legs to the top hole (standing height) 6. Secure with sash lock Proprietary, patented product and instructions. Do not copy or distribute.
- Page 9 Apply left/right side guide sticker to Left/Right Corner of the DreamBox table. Be sure sticker is up against the front outside edge of the table. Use the provided screws to attach sash lock catch with the hook near the edge using the sticker as a guide . Proprietary, patented product and instructions.
- Page 10 With Side Table Leg folded out, turn the table over. Slide left/right side table into tracks until table touches the back panel of the left/right box. With Center Box table folded down to match the height of the side table, locking the sash lock to secure table.
- Page 11 WorkBox Side Table Installation Instructions Using a manual Phillips screwdriver, “start” (4) Euro screws into inner holes of (2) table tracks. Insert screws just enough to bite the plastic to prepare track for installation. With screws down, position the table tracks over shelf peg hole #18 on both sides of left box.
- Page 12 DreamBox in the future. Install (1) Side Table Leg to Side Table using (4) table leg screws into the pre-drilled holes. Proprietary, patented product and instructions. Do not copy or distribute.
- Page 13 Apply left/right side guide sticker to UNDERSIDE of the WorkBox table in the left/right corner. Be sure sticker is up against the front outside edge of the table. FRONT underside of WorkBox Table FRONT underside of WorkBox Table Use the provided screws to attach sash lock catch with the hook near the edge using the sticker as a guide .
- Page 14 With Side Table Leg folded out, turn the table over. Slide left/right side table into tracks until table touches the back panel of the left/right box. With Center Box table folded out, lock the sash lock to secure table. Proprietary, patented product and instructions. Do not copy or distribute.
- Page 15 voila! You’ve done it. Now sit back and enjoy your newly expanded workspace, with three times as much room to dream and create. Remember to share pictures of your crafts and craft space with us on Facebook @ScrapBoxFamily Proprietary, patented product and instructions. Do not copy or distribute.
Need help?
Do you have a question about the SIDE TABLE and is the answer not in the manual?
Questions and answers