Table of Contents
Advertisement
Advertisement
Table of Contents

Subscribe to Our Youtube Channel
Related Manuals for Reflecta x10-Scan


Summary of Contents for Reflecta x10-Scan
- Page 1 User’s Manual...
-
Page 2: Table Of Contents
Table of Contents 1. Precaution ..............2 2. Preparation ..............5 Standard Accessories ..........5 Part Names ............. 6 3. Start Using Your Digital Film Scanner ....... 8 4. Place Slide / Film Into The Holder ......11 5. Image Brightness and Color Adjustment ....14 6. -
Page 3: Precaution
Improper use creates the risk of serious accident. Do not try to open the case x10-Scan or attempt to modify the device in any way. High-voltage internal components create the risk of electric shock when exposed. - Page 4 Never attempt to repair reflecta x10-Scan on your own. Use only the recommended power accessories. Use of power sources not expressly recommended for reflecta x7-Scan may lead to overheating, distortion of the equipment, fire, electrical shock or other hazards.
-
Page 5: Preparation
2. Preparation Standard Accessories Digital Film Scanner User’s Manual 135 Negative Holder 135 Slide Holder 110 Negative Holder 126 Negative Holder (Optional) (Optional) Clean Brush Adaptor USB Cable TV Cable... -
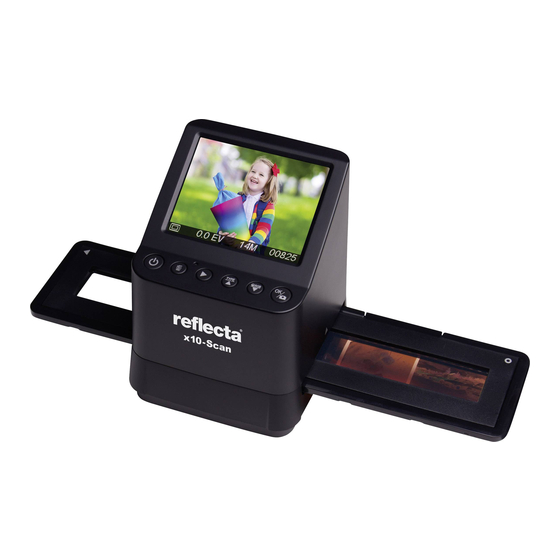
Page 6: Part Names
Part Names... - Page 7 Note: We suggest using bundled brush to insert into the scanner slot and clean the glass surface periodically to produce a clear image. Please make sure your film negatives/ mounted slides and cover trays are clean before inserting into the scanner as well.
-
Page 8: Start Using Your Digital Film Scanner
3. Start Using Your Digital Film Scanner 1. Insert the SD Card into the scanner. Insert the SD card into the SD Card Slot located at the back of the scanner, make sure that the golden pins on the card are facing downward. The card will be locked automatically if it is inserted properly. - Page 9 Connect the other larger USB terminal to the power adaptor or the USB port of your computer, Any of both devices will supply the power needed by the scanner. Press the Power Button of your scanner to turn it on. You will see a pop up screen on the LCD, Select “NO”...
- Page 10 Film Type Icons: (Shown on Lower Left Corner of LCD) 135 positive (slide) 135 negative 135 black & white 110 negative 126 negative...
-
Page 11: Place Slide / Film Into The Holder
. Place Film / Slide Into The Holder Keep the glossy surface in the upward direction. Open the negative/ positive slide holder as Illustrated. 1. Put a 135 positive slide/ negative film/ 110 negative/126 negative into holder as shown. 2. Close the holder and please make sure the holder close properly. - Page 12 . Place Slide / Film Holder Into The Scanner The Scanner supports 50X50mm transparent slide, 135 B&W, and 135/110/126 negative film. 1. Scanning 50X50mm Transparent (Positive)Slide: Insert the 135 Slide Holder into the scanner Film/Slide Holder Slot according to the triangular mark on the scanner and the holder, as shown in below diagram.
- Page 13 2. Scanning type 135, 110 and 126 negative films: Insert the 135 (110/126) negative holder into the scanner’s holder slot according to the triangular mark on the scanner and the holder, as shown in below diagram. Turn on the power of the scanner, select the type of film to be scanned by pressing the Film Type Button.
-
Page 14: Image Brightness And Color Adjustment
6. Image Brightness and Color Adjustment The brightness and color of the image are preset automatically. Normally additional adjustment is not needed. Some film brightness and color fade out and needs adjustment. Press ( ) Button and you will see the following icons display on the LCD screen for adjustment. -
Page 15: Playback And Delete Mode
7. Playback and Delete mode You may watch the previous captured images by Pressing (Playback) Button then ▲ and ▼ Button for image selection. Press the Button twice will set the captured images in a slide show mode. To delete a captured image, under the Playback mode, press the Delete Button ( ) once will allow you to delete the selected image to delete. -
Page 16: Watching The Images On A Tv Screen
8. Watching the images on a TV screen Connect your scanner and TV set by the TV Cable. Set your TV to video mode, turn on the power of the scanner and press the (Playback) Button, select the TV system of the country you locate, then press the OK/( ) Button to confirm the system you select. -
Page 17: Downloading The Images From Card To Computer
9. Downloading the images from Card to Computer Connect the Scanner to the computer via the micro USB cable. Turn on the power of your computer and scanner, you will see a pop up icon on the Scanner LCD screen as shown below. -
Page 18: Appendix
10. Appendix Specifications Image Sensor 1/2.3” 14 Mega CMOS Sensor, Preview and Review 3.5” Color LCD Display Lens Specification F/No. 3.5, 5 elements lens Color Balance Automatic Exposure Control Automatic & Manual adjustment Support Film Size 135 Negative & Slide (3:2) Auto Cropping 110 Negative (4:3) (optional) 126 Negative (1:1) (optional) -
Page 19: Icon & Indicators
Icons & Indicators Delete Brightness Selected Color Delete All Format Default Color SD Card Adjusted Value 135 Slide 135 Negative Card Film Error B/W 135 Card Full Negative Film 110 Negative Card Film Lock 126 Negative Playback Film Mode PC-SD-Card Slide Selection Show... -
Page 20: System Requirements
PC System Requirements ® Pentium P4 1.6GHz or equivalent AMD Athlon Free USB2.0 port 512MB RAM 500MB free hard disk space 1024 x 768 pixel color monitor CD-ROM drive ® Windows XP Service Pack II / Vista™, 32/64 bits Windows 7/Windows 8 / Windows 10 Mac System Requirements ... - Page 21 GmbH Merkurstraße 8 72184 Eutingen Germany www.reflecta.de -20-...
Need help?
Do you have a question about the x10-Scan and is the answer not in the manual?
Questions and answers