Table of Contents
Advertisement
Quick Links
Advertisement
Table of Contents

Related Manuals for Welbilt CREM ONE


Summary of Contents for Welbilt CREM ONE
- Page 1 Technical Manual TM_EN Part No.: 1964224_02...
-
Page 2: Table Of Contents
CONTENTS CONTENTS CONTENTS MANUAL REVISIONS TECHNICAL SPECIFICATIONS · Explanation of descriptions · Machine data · Accessories · Machine description · External dimensions ROUTINE MAINTENANCE SCHEDULE · Service intervals CHANGING THE GROUP GASKET · All versions BUTTONS AND CONTROLS · 1B Version ·... - Page 3 CONTENTS SERVICE PROGRAMMING_2B · User interface 2B · Stand-by status (OFF) · Factory preset · Service menu – Access & browsing · Programming home screen name · Enabling / Disabling ECO mode · Adjusting ECO mode temperature setting · Programming group boiler dispensing temperature offset ·...
-
Page 4: Contents
CONTENTS · Alarms and warnings TROUBLESHOOTING · Machine faults · Brewing faults · Limescale faults... -
Page 5: Manual Revisions
MANUAL REVISIONS Rev. # Date TSB# Description July 25, 2019 none Release first draft for technical review. Jan 22, 2020 none Update technical specifications and electrical diagrams... -
Page 6: Technical Specifications
TECHNICAL SPECIFICATIONS · Explanation of descriptions There are five different levels of notification intensity within this manual, as identified by the signal words DANGER, WARNING, IMPORTANT, NOTE and PRO TIP. The level of risk and importance of the notification is determined by the following definitions. Always observe the warnings to ensure safety and prevent potential injury and product damage. -
Page 7: Machine Data
TECHNICAL SPECIFICATIONS · Machine data ONE 2B Dual ONE 2B Dual ONE 1B Dual ONE 2B Dual R-GSP R-LFPP EU Compliance codes: EAEB-I91F-13AP EEEB-I91F-13AP EEEB-I91G-13AP EEEB-I94G-13AP US Compliance codes: EAJB-K91F-13BP EEJB-K91F-13BP EEJB-K91G-13BP EEJB-K94G-13BP Temperature control: PID control PID control PID control PID control Dispensing Manual Group lever... -
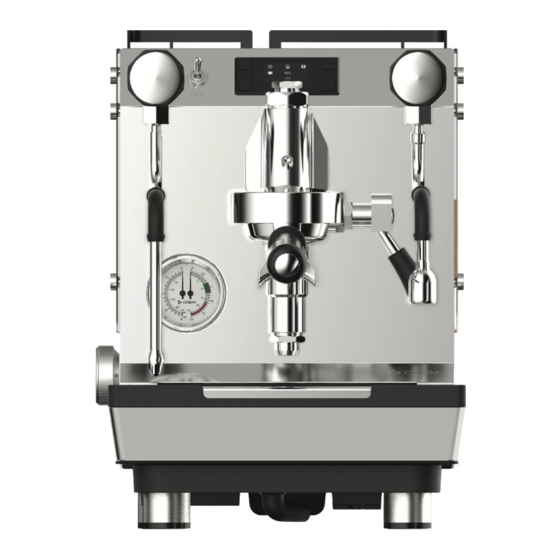
Page 8: Machine Description
TECHNICAL SPECIFICATIONS · Machine description 1B version 2B version Water tank lid Drain connection 13. OLED display Steam knob Brewing lever (2B versions) Power switch 10. Hot water tap 14. Water connection selector Steam wand 11. Hot water knob 15. Pressure profiling knob Brewing group 12. -
Page 9: Routine Maintenance Schedule
ROUTINE MAINTENANCE SCHEDULE · Service intervals Months (Cycles) Main components Part No. 12 (12500) 24 (25000) 36 (37500) 48 (50000) Boiler Vaccum valve 65000210 Check Check Check Replace 60000126 Boiler filling solenoid (230V) Replace valve 60000127 (115V) Boiler upper raccord 30000200 Check Check... -
Page 10: Changing The Group Gasket
CHANGING THE GROUP GASKET · All versions 1. To remove the porta-filter, use 2. Remove the shower and 3. Remove and discard the old a straight-blade screwdriver to gasket. gasket. Insert the new gasket release the shower by prying (chamfer and EXPOBAR logo down with medium force. -
Page 11: Buttons And Controls
BUTTONS AND CONTROLS · 1B Version ONE 1B Dual is controlled by a combination of manual control knobs, buttons and a brewing lever for dispensing. Digital display 2 buttons This machine features a group display for monitoring off: 1. Tank empty/refill signal Shot timer Temperature 2. -
Page 12: Service Programming_1B
SERVICE PROGRAMMING_1B · User interface 1B The machine is equipped a programmable interface that allows users to set or adjust the following features and parameters with guidance from the digital display. Selection buttons K2 - K3 · Factory preset To restore the machine to factory default programming settings, follow the steps below: Turn the machine off at the main power switch. -
Page 13: Boiler Filling Time-Out Alarm
SERVICE PROGRAMMING_1B · F.01 – Boiler filling time-out alarm To change the machine’s steam boiler filling time-out alarm, follow the steps below: Enter the service programming and browse through the menu (see previous instructions). When ‘F.01’ is shown on the display, enter by pressing K3. Within 5s, select with K2 and K3 the boiler filling time out. -
Page 14: Enabling/Disabling Water Tank Alarms
SERVICE PROGRAMMING_1B · A.01 – Enabling/Disabling water tank alarms To enable or disable the water tank alarms, follow the steps below: Enter the service programming and browse through the menu (see previous instructions). When ‘A.01’ is shown on the display, enter by pressing K3. Within 5s, select with K2 and K3 the select between ‘On’... -
Page 15: Temperature Units
SERVICE PROGRAMMING_1B · h.02 – Temperature units To adjust the machine’s temperature units, follow the steps below: Enter the service programming and browse through the menu (see previous instructions). When ‘h.02’ is shown on the display, enter by pressing K3. Within 5s, select with K2 and K3 the temperature units: ºC or ºF. -
Page 16: Service Programming_2B
SERVICE PROGRAMMING_2B · User interface 2B The ONE 2B machines are equipped with a programmable ’Barista’ interface that allows users to set or adjust the following features and parameters with guidance from the digital display: ECO & Stand-by mode settings (set up energy saving mode timers). Adjust the steam and group boiler temperatures. -
Page 17: Factory Preset
SERVICE PROGRAMMING_2B · Factory preset To restore the machine to factory default programming settings, follow the steps below: Turn the machine off at the main power switch. Press and hold K1+K2+K3+K4 simultaneously while turning the main power switch back on a wait 10s. -
Page 18: Programming Home Screen Name
SERVICE PROGRAMMING_2B · Programming home screen name To change the machine’s home screen name, follow the steps below: Enter the service programming and browse through the menu (see previous instructions). When home screen name icon (X) is shown on the display, select with K3 and K4 each single letter and use K2 to accept and pass to the next one. -
Page 19: Adjusting Eco Mode Temperature Setting
SERVICE PROGRAMMING_2B · Adjusting ECO mode temperature setting To change the machine’s steam and group boilers ECO mode temperatures setting, follow the steps below: Enter the service programming and browse through the menu (see previous instructions). When ECO temperature mode icon (X) is shown on the display, select with K3 and K4 buttons to choose submenus Group boiler or Steam boiler. -
Page 20: Enabling / Disabling Pressure Profiling
SERVICE PROGRAMMING_2B · Enabling / disabling Pressure Profiling To enable or disable the Pressure Profiling menus, follow the steps below: Enter the service programming and browse through the menu (see previous instructions). When Pressure Profiling icon (X) is shown on the display, select with K3 and K4 buttons to scroll between enabled or disabled. -
Page 21: Programming Filter And Service/Cleaning Alarms
SERVICE PROGRAMMING_2B · Programming filter and service/cleaning alarms To adjust the alarms for the water filter/softener change or regeneration and service/cleaning, follow the steps below: Enter the service programming and browse through the menu (see previous instructions). When service alarm icon (X) is shown on the display, select with K3 and K4 buttons to choose submenus of Liters alarms or Cycle counter alarm. -
Page 22: Enabling / Disabling Water Tank Alarms
SERVICE PROGRAMMING_2B · Enabling / disabling water tank alarms To enable or disable the water tank alarms, follow the steps below: Enter the service programming and browse through the menu (see previous instructions). When Water tank alarm icon (X) is shown on the display, select with K3 and K4 buttons to scroll between enabled or disabled. -
Page 23: Adjusting Water Tank Filling Time-Out
SERVICE PROGRAMMING_2B · Adjusting water tank filling time-out To change the machine’s water tank filling time-out alarm, follow the steps below: Enter the service programming and browse through the menu (see previous instructions). When Water tank filling time-out icon (X) is shown on the display, select with K3 and K4 buttons to adjust the setting up or down. -
Page 24: Programming Steam Boiler Level Probe Sensitivity
SERVICE PROGRAMMING_2B · Programming steam boiler level probe sensitivity To change the machine’s steam boiler water level probe sensitivity, follow the steps below: Enter the service programming and browse through the menu (see previous instructions). When level probe sensitivity icon (X) is shown on the display, select with K3 and K4 buttons to scroll between Min(_), Med (-) and Max (ˉ) . -
Page 25: Programming Service Menu Password
SERVICE PROGRAMMING_2B · Programming service menu password To change the password to access the service programming menu follow the steps below: Enter the service programming and browse through the menu (see previous instructions). When Password change icon (X) is shown on the display, select with K3 and K4 buttons to set the new password. -
Page 26: Hydraulic Diagrams
HYDRAULIC DIAGRAMS · ONE 1B PID VP Cold water Hot water Steamer Pos. Solution Pos. Solution Group Inlet Valve Steamer tap ass Inlet Hose Hot water tap ass Tank Manometer Mini switch Solenoid valve Tank Divider Vibration pump Capacitive Drain water Tank Mode Tank Distributor... -
Page 27: One 2B Pid Vp
HYDRAULIC DIAGRAMS · ONE 2B PID VP Cold water Hot water Steamer Pos. Solution Pos. Solution Group Inlet Valve Steamer tap ass Inlet Hose Hot water tap ass Tank Manometer Mini switch Solenoid valve Tank Divider Vibration pump Capacitive Drain water Coffee boiler Tank Mode Steam boiler ass... -
Page 28: One 2B Pid Rp-Gsp
HYDRAULIC DIAGRAMS · ONE 2B PID RP-GSP Cold water Hot water Steamer Pos. Solution Pos. Solution Group Inlet Valve Steamer tap ass Inlet Hose Hot water tap ass Tank Manometer Mini switch Solenoid valve Tank Divider Steam boiler ass Capacitive Drain water Coffee boiler Tank Mode... -
Page 29: One 2B Pid Rp-Lfpp
HYDRAULIC DIAGRAMS · ONE 2B PID RP-LFPP Cold water Hot water Steamer Pos. Solution Pos. Solution Group Inlet Valve Steamer tap ass Inlet Hose Hot water tap ass Tank Manometer Mini switch Solenoid valve Tank Divider Steam boiler ass Capacitive Drain water Coffee boiler Flowmeter... -
Page 30: Electrical Diagrams
ELECTRICAL DIAGRAMS · ONE 1B Dual - 240V Match line, see next page. - Page 31 ELECTRICAL DIAGRAMS · ONE 1B Dual - 240V Match line, see previous page.
-
Page 32: One 2B Dual - 240V
ELECTRICAL DIAGRAMS · ONE 2B Dual - 240V Match line, see next page. - Page 33 ELECTRICAL DIAGRAMS · ONE 2B Dual - 240V Match line, see previous page.
-
Page 34: One 2B Dual R-Gsp - 240V
ELECTRICAL DIAGRAMS · ONE 2B Dual R-GSP - 240V Match line, see next page. - Page 35 ELECTRICAL DIAGRAMS · ONE 2B Dual R-GSP - 240V Match line, see previous page.
-
Page 36: One 2B Dual R-Lfpp - 240V
ELECTRICAL DIAGRAMS · ONE 2B Dual R-LFPP - 240V Match line, see next page. - Page 37 ELECTRICAL DIAGRAMS · ONE 2B Dual R-LFPP - 240V Match line, see previous page.
-
Page 38: One 1B Dual - 110V
ELECTRICAL DIAGRAMS · ONE 1B Dual - 110V Match line, see next page. - Page 39 ELECTRICAL DIAGRAMS · ONE 1B Dual - 110V Match line, see previous page.
-
Page 40: One 2B Dual - 110V
ELECTRICAL DIAGRAMS · ONE 2B Dual - 110V Match line, see next page. - Page 41 ELECTRICAL DIAGRAMS · ONE 2B Dual - 110V Match line, see previous page.
-
Page 42: One 2B Dual R-Gsp - 110
ELECTRICAL DIAGRAMS · ONE 2B Dual R-GSP - 110 Match line, see next page. - Page 43 ELECTRICAL DIAGRAMS · ONE 2B Dual R-GSP - 110 Match line, see previous page.
-
Page 44: One 2B Dual R-Lfpp - 110
ELECTRICAL DIAGRAMS · ONE 2B Dual R-LFPP - 110 Match line, see next page. - Page 45 ELECTRICAL DIAGRAMS · ONE 2B Dual R-LFPP - 110V Match line, see previous page.
-
Page 46: Machine Alerts
MACHINE ALERTS · Alarms and warnings To alert users that routine service of the machine is due or against a situation that could possibly cause damage to the machine, ONE has the following alerts programmed into its software: 1B versions Error Warning Alarm Name... -
Page 47: Troubleshooting
TROUBLESHOOTING · Machine faults Problem Possible cause Solution The plug is not correctly Check that the plug is correctly inserted into the power inserted and that the power socket socket is operational. The machine does not start The circuit breaker and/or up when turned on Check that they are connected. - Page 48 For the warranty to be valid the conditions for maintenance must have been followed according to our instructions, proper precaution has been made and warranty claim been issued without delay. The affected equipment may not be used during awaiting service if there is any risk that the damage or defect would worsen.
Need help?
Do you have a question about the CREM ONE and is the answer not in the manual?
Questions and answers