Table of Contents
Advertisement
Quick Links
I.General Information..................................................................................3
1. Preface..................................................................................................3
2. Main Features........................................................................................3
3. For Your Safety......................................................................................4
4. General Operation of the Receiver........................................................4
5. Front Panel............................................................................................5
6. Rear Panel.............................................................................................6
7. Remote control unit...............................................................................7
8. Installation of STB.................................................................................9
II. Menu Structure......................................................................................10
1. Installation............................................................................................11
1.1 All Auto search................................................................................11
1.2 Manual search................................................................................11
1.3 Edit Channel..................................................................................12
1.4 Search setting................................................................................14
1.5 STB Information.............................................................................14
2. Program Organize...............................................................................14
3. Parent Setting......................................................................................16
4. System Setup......................................................................................17
4.1 Video Setting..................................................................................17
4.2 Audio Setting..................................................................................17
4.3 OSD Setting...................................................................................17
4.4 Language Setting...........................................................................18
1
Advertisement
Table of Contents

Related Manuals for Ferguson CF2000AT


Summary of Contents for Ferguson CF2000AT
-
Page 1: Table Of Contents
I.General Information..................3 1. Preface....................3 2. Main Features..................3 3. For Your Safety..................4 4. General Operation of the Receiver............4 5. Front Panel....................5 6. Rear Panel.....................6 7. Remote control unit................7 8. Installation of STB.................9 II. Menu Structure..................10 1. Installation....................11 1.1 All Auto search................11 1.2 Manual search................11 1.3 Edit Channel..................12 1.4 Search setting................14... - Page 2 4.5 STB Upgrade.................18 4.6 STB To STB Upgrade..............19 4.7 Time Setting...................19 4.8 Restore Default................19 5. Games....................20 6. Shortcut Key Functions...............20 6.1 Electronic Program GUIDE (EPG)..........20 6.2 Program List...................21 6.3 CH ..................21 6.4 Favorite List..................22 6.5 Audio Select...................22 6.6 Volume...................22 6.7 Information..................22 6.8 Subtitle...................23 6.9 Freeze....................23 6.10 TeleText..................23...
-
Page 3: I.general Information
I.General Information 1. Preface This receiver employs the powerful single chip processor STi5518, and is fully compliant with MPEG-2 and DVB-T standards. It receives terrestrial digital TV signals transmitted in the VHF and UHF bands between the rates of 3.7 and 23.8Ms/S at 7MHz or 8MHz channel bandwidths. -
Page 4: For Your Safety
3. For Your Safety Allow clear space around the receiver for sufficient ventilation Do not cover the receiver's ventilation slots or place it on a unit that emits heat Use a soft cloth and mild washing solution to clean the case ... -
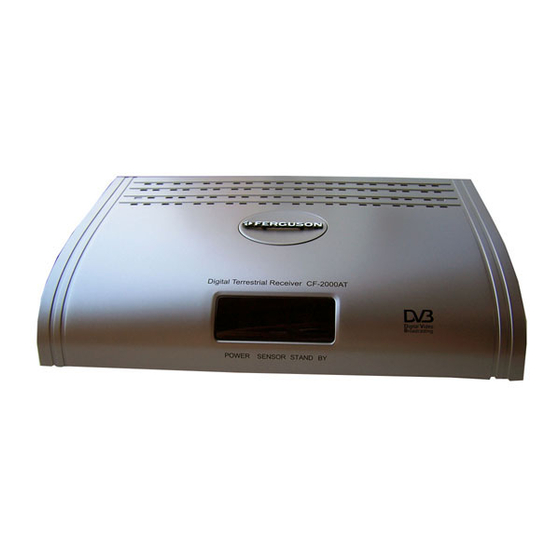
Page 5: Front Panel
5. Front Panel POWER: The light shows green when the receiver turns ON. SENSOR: To detect the red radiation from RCU STAND BY: The light shows green when the receiver runs normally and turns red when the receiver is at STAND BY mode... -
Page 6: Rear Panel
6. Rear Panel DC-12V/0.6A: Power supply ANT IN: Connect to a terrestrial antenna LOOP OUT: Connect to another receiver (IF loop through output from digital tuner) TV: Connect to the TV using Video-Scart cable VCR: Connect to VCR using Video-Scart cable S/P DIF: Connect to a Hi-Fi system RS232: Connect to a PC for software upgrade. -
Page 7: Remote Control Unit
7. Remote control unit... - Page 8 Keys specification : Press to switch between operation and standby modes 0 ~ 9: Enter number of the required menu item or select a channel number to watch RECALL: Switch back to previous channel MENU: Display the main menu : Move cursor up / left / down / right,Volume+/-,Channel up/down. P-/P+: Press to page up or down TV/RADIO: Switch between TV and Radio modes FAV: Display the favourite list...
-
Page 9: Installation Of Stb
8. Installation of STB This section explains the installation of the receiver. Refer to the manuals supplied with the equipment for the installation of outdoor equipment such as the dish antenna. When adding new equipment, be sure to refer to the related parts of the manual for the installation. -
Page 10: Menu Structure
II. Menu Structure Pressing the MENU key will display the Main Menu. This menu provides five options. Installation All Auto Search Manual Search Edit Channel Search Setting STB Information Program Organize Parent Setting ... -
Page 11: Installation
1. Installation keys to select Installation item from Main Menu and press the OK key. The Installation menu will display on the screen. 1.1 All Auto search While All Auto Search window appears on the screen, system begins to search programs referring to RF channels system has stored already. -
Page 12: Edit Channel
also be modified. You can change this value in this way. Highlight this item, then press key to active it. Use keys to select desired location. By pressing numeric keys or keys on the RCU, you can change the value of desired location. - Page 13 Add After pressing red colour key on the RCU, the Add Channel menu, which is for setting necessary parameters of the new RF channel, will be displayed on the screen. Freq: Highlight this item, then press key to active it. Select desired location. By pressing numeric keys or keys on the RCU, you can change the value of desired location.
-
Page 14: Search Setting
1.4 Search setting Select Search setting item in Installation menu and press OK key, and then you will enter into Scan Setting window. Scan Type: Press keys to select among FTA, CAS and All. If you select FTA, only free programs will be searched. - Page 15 Move(RED key) Modify(GREEN key) Delete(YELLOW key) Move After pressing red key on the RCU, the selected program will be marked with two parallel arrows. Move the program to where you want to locate by using keys and press red key to fix the location, meanwhile the mark will disappear.
-
Page 16: Parent Setting
Note: You cannot view the deleted program unless you search it again. FAV If you want to add several TV programs to FAV list. You can do as follows: When you enter Organize Program menu, default favourite list will be shown on the screen as FAV1. -
Page 17: System Setup
4. System Setup Select System Setup item under Main Menu and press OK key to engage menu. 4.1 Video Setting In System Property menu, press OK key at Video Setting item to display its sub-window. Video Mode: Press keys to select among PAL, NTSC and SECAM. -
Page 18: Language Setting
determins the displaying time of menu or window. If selec “NO”, the menu will be shown in the screen till you press EXIT key to close it. Banner Timeout: Controls the information bar’s display time. TeleText Output: press keys to select between VBI and OSD. Color Mode: The availabe options are User Mode,Movie,News and Sports Chroma(Brightness,Contrast): Select desired one. -
Page 19: Stb To Stb Upgrade
press EXIT key to escape from current window. 4.6 STB To STB Upgrade Before entering into its window, you have to use numeric keys(0~9) on the RCU to input a password. The default STB password is 7391. NOTE:7391 is the master password. 1.Power off the STB.(2 STBs) 2. -
Page 20: Games
message box will seek your confirmation. Press OK key to restore factory defaults. Note : Reset to Defaults should be used with care as all programs found will be erased and Parameters re-set to factory default using this function. 5. Games In Main Menu, move the cursor to Game and press the OK key. -
Page 21: Program List
current week shown on the top of the down list. The EPGs in down list vary with the day selection. If you want to know details about one EPG, system will pop up a bigger textbox by pessing INFO key at this EPG. -
Page 22: Favorite List
seconds. The time of this window stays active can be adjusted in Menu Time Out. The number keys on the RCU can also be used to change programs. 6.4 Favorite List Press FAV key on the RCU (whilst not in Menu mode) to display the Favorite List. -
Page 23: Subtitle
channel’s information and short EPGs, will be shown at the bottom of the screen. If you want to know details about one EPG, system will pop up a bigger textbox by pessing INFO key at this EPG. Press INFO key again , System Information will display on the screen. From here,you can know details about current channel such as values of all PIDs, hardware version, software version, released date and so on. -
Page 24: Technical Specification
III. Technical Specification TUNER Input frequency 174 ~ 860MHz UHF & VHF Bandwidth 7MHz or 8 MHz Input level -72 ~ -20 dBm Input impedance 75Ω DEMODULATION Demodulation QPSK, 16QAM, 64QAM 1/2, 2/3, 3/4, 5/6, 7/8 Mode 2K, 8K Guard 1/4, 1/8, 1/16, 1/32 DEMULTIPLEXER Standard... - Page 25 Audio output frequency 20Hz~ 20KHz Audio output Impedance Audio output level 0dBm POWER Input voltage AC100 ~ 240V, 50/60Hz Power consumption 15W max AMBIENT Operation temperature 0℃ ~ 40℃...
-
Page 26: Trouble Shooting
IV. Trouble Shooting Note : If you cannot solve the problem by re ferring to the above trouble shooting, please contact your re-seller. Problem Possible Causes What To Do The display on the Main cable is not connected. Check that the main cable is front panel does not plugged into power socket.
Need help?
Do you have a question about the CF2000AT and is the answer not in the manual?
Questions and answers