Advertisement
Available languages
Available languages
Quick Links
Instructions for Installing
Dead Level
For Pre-Sloped Trench Drains
WARNING
!
Read this Manual BEFORE using this equipment.
Failure to read and follow all safety and use information
can result in death, serious personal injury, property
damage, or damage to the equipment.
Keep this Manual for future reference.
Installation Guidelines
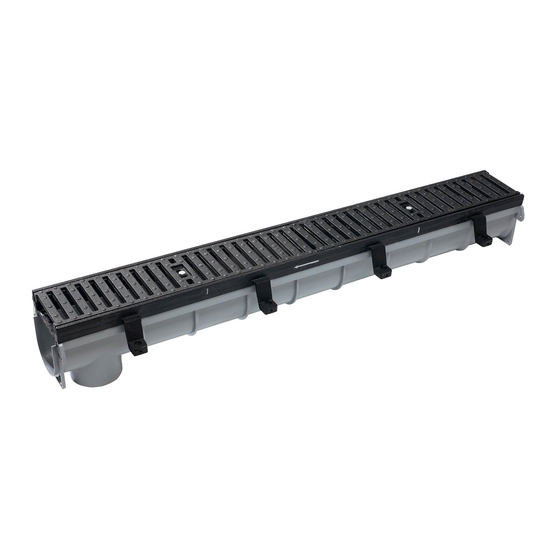
General Note: Please DO NOT separate channels from frames.
Channel and frame sections arrive to the jobsite preassembled in a specific
sequence to meet your project design requirements. They are not interchangeable
between sections and separating and reassembling them may cause installation
errors. If they accidentally become separated, please contact your Watts representative for technical
support with any questions.
1. Installation Diagram
1.1 Locate and save the installation diagram from the hardware box.
If you cannot find your installation diagram contact your Watts
representative for another copy.
2. Excavation
2.1 Excavate to allow a minimum 4" concrete pour below, and on both sides of
the trench drain and below a catch basin, if used.
Trench Drains
®
IS-WD-DL-Installation-USA
Advertisement

Related Manuals for Watts Dead Level Series


Summary of Contents for Watts Dead Level Series
-
Page 1: Installation Guidelines
They are not interchangeable between sections and separating and reassembling them may cause installation errors. If they accidentally become separated, please contact your Watts representative for technical support with any questions. 1. Installation Diagram 1.1 Locate and save the installation diagram from the hardware box. - Page 2 3. Catch Basins & Piping Connections 3.1 Catch basins, if used, should be set first. If no catch basin is used skip to step 3.6. 3.2 Using a reciprocating or hole saw, remove the circular pipe connection cutout(s) where the basin will connect to discharge piping. 3.3 Invert the catch basin on a flat surface, and butt the section(s) shown on the installation drawing against the pattern on the basin.
- Page 3 5.3 Drive a minimum of 4 pieces 1/2" #4 rebar through the frame ears to support each frame section. The rebar should reach a depth sufficient to provide stability for the system, and prevent floating during the concrete pour. Threaded steel rod may be substituted for rebar at the installers discretion.
- Page 4 6A Connecting Center Sections 6A.1 Layout sections as shown below. 6A.2 Cut the CA-M adapter to fit the bottom depth of the channel section. 6A.3 Cut the top section of the CA-M to fit the depth of the top of the channels. *Note: The CA-M is equipped with distinct grooves for ease in cutting to the correct size.
- Page 5 The CA-M will allow the two male sections to fit together securely. 6A.4 Fit the two male channel sections together using the CA-M. 6A.5 Use 4-6 #10-24 bolts and nuts to hold the two channel sections securely in place. Use 4-6 #10-24 bolts and nuts to fit the two channel sections together securely Dead Level Channel Male End View...
- Page 6 6B. Spacers 6B.1 Dead Level systems are shipped with a CA-F 3/4" spacer. These spacers are provided for filling in on long runs when heat can cause shrinkage in the channel connections. They will fit both male and female ends. 6B.2 The CA-F is equipped with indentations for cutting to fit the top of the channel.
- Page 7 7. Corners/Tees 7.1 If the system layout requires Corner/Tee Sections, follow the general installation guidelines. 7.2 Invert the Corner/Tee section on a flat surface, and use a reciprocating saw to remove the appropriate cutout(s) on the section. (Be sure to note whether the connecting channel(s) have a tongue or groove connection prior to cutting the Corner/Tee, and remove a cutout with an opposite connection type than the connecting channel).
- Page 8 7.4 Secure the channels and frames with the appropriate hardware (see 6. Connection Sections) Note: Dead Level corners or tees can also be formed with a Catch Basin (See "Catch Basins & Piping Connections"), or underground piping. To pipe under- ground terminate the trench drains a short distance from the corner joint.
- Page 9 8.2 Install grates along the length of the trench, and secure with hex head or countersunk lock bolts provided (Fig. F). Lockdown Grates FIG. F 8.3 Position Construction Covers over the grates, with the flange between the grate and frame (Fig. G). Construction Cover FIG.
- Page 10 9. Concrete Pour 9.1 Check the entire trench system for proper anchoring, alignment, and leveling, and connections prior to pouring concrete. (Although the Dead Level frame- anchored design dramatically reduces the risk of floating, a poorly anchored system can shift during the pour). 9.2 Check the excavation to be sure a minimum of 4"...
- Page 11 Notes:...
- Page 12 For more information: Watts.com/prop65 Limited Warranty: Watts Regulator CO. (the “Company”) warrants each product to be free from defects in material and workmanship under normal usage for a period of one year from the date of original shipment. In the event of such defects within the warranty period, the Company will, at its option, replace or recondition the product without charge.
- Page 13 Si se separan por accidente, comuníquese con su representante de Watts para obtener apoyo técnico con respecto a cualquier pregunta que pudiera tener.
- Page 14 3. Cuencas de recolección y conexiones de tubería 3.1 Las cuencas de recolección, si se utilizan, deben instalarse primero. Si no se usa una cuenca de recolección, pase al paso 3.6. 3.2 Con una sierra alternativa o una sierra cilíndrica, retire los recortes de la conexión del tubo circular donde la cuenca se conectará...
- Page 15 5.3 Hinque un mínimo de 4 piezas de varilla de acero n.º 4 de 1/2 pulg. (1.25 cm) a través de las orejetas del marco para soportar cada sección de marco. La varilla de acero debe alcanzar una profundidad suficiente para proporcionar estabilidad para el sistema y evitar que flote durante el vaciado de concreto.
- Page 16 6A Conexión de secciones centrales 6A.1 Coloque las secciones como se muestra a continuación. 6A.2 Corte el adaptador CA-M para ajustarlo a la profundidad del fondo de la sección de canal. 6A.3 Corte la sección superior del CA-M para ajustarla a la profundidad de la parte superior de los canales.
- Page 17 El CA-M permitirá que las dos secciones macho se ajusten entre sí firmemente. 6A.4 Una las dos secciones de canal macho utilizando el CA-M. 6A.5 Utilice de 4 a 6 pernos n.º 10-24 y tuercas para sujetar las dos secciones de canal de manera firme en su lugar.
- Page 18 6B. Espaciadores 6B.1 Los sistemas Dead Level se embarcan con un espaciador CA-F de 3/4 pulg. (1.89 cm). Estos espaciadores se suministran para rellenar corridas largas cuando el calor puede provocar encogimiento en las conexiones de canales. Se ajustan a los extremos tanto macho como hembra.
- Page 19 7. Esquinas y tes 7.1 Si el replanteo del sistema necesita secciones en esquina o en t, siga los lineamientos generales para la instalación. 7.2 Invierta la sección en esquina o en t sobre una superficie plana, y utilice una sierra alternativa para retirar los recortes adecuados en la sección.
- Page 20 7.4 Fije los canales y marcos con el herraje adecuado (consulte 6. Secciones de conexiones) Nota: Esquinas o tes Dead Level también se pueden formar con una cuenca recolectora (consulte Conexiones de cuencas recolectoras y conexiones de tubería) o con tubería subterránea. Para conectar los tubos bajo tierra, termine los drenajes para zanjas a una corta distancia de la junta de la esquina.
- Page 21 8.2 Instale las rejillas a lo largo de la zanja y fíjelas con los pernos de cabeza hexagonal o abocardadas provistos (fig. F). Sujetador Rejillas FIG. F 8.3 Coloque cubiertas para construcción sobre las rejillas, con la brida entre la rejilla y el marco (fig.
- Page 22 9. Vaciado de concreto 9.1 Revise todo el sistema de zanja para verificar el anclaje, alineamiento y pendiente y conexiones adecuados antes de vaciar el concreto. (Aunque el diseño de Dead Level con marco anclado disminuye de manera significativa el riesgo de flotación, un sistema mal anclado puede moverse durante el vaciado).
- Page 23 Notas:...
- Page 24 Watts.com/prop65 Garantía limitada: Watts Regulator Co. (la “Compañía”) garantiza que los productos no presentarán defectos en el material y la mano de obra cuando se usen en forma normal, durante un periodo de un año a partir de la fecha de envío original. En caso de que se presenten tales defectos dentro del período de garantía, la Compañía, a su discreción, reemplazará o reacondicionará el producto sin cargo.
Need help?
Do you have a question about the Dead Level Series and is the answer not in the manual?
Questions and answers