Nordmann Engineering AT4 D SPA Display Installation And Operation Manual
Hide thumbs
Also See for AT4 D SPA Display:
- Operating instructions manual (76 pages) ,
- Installation and operating instructions manual (76 pages) ,
- Service manual (36 pages)
Table of Contents
Advertisement
Quick Links
Advertisement
Table of Contents

Related Manuals for Nordmann Engineering AT4 D SPA Display


Summary of Contents for Nordmann Engineering AT4 D SPA Display
- Page 1 Nordmann AT4 D SPA Display INSTALLATION AND OPERATION MANUAL 2591890 EN 1711...
- Page 2 Nordmann Engineering AG, except to the extent required for installation or maintenance of recipient's equipment. Liability Notice Nordmann Engineering AG does not accept any liability due to incorrect installation or operation of the equipment or due to the use of parts/components/equipment that are not authorised by Nordmann Engineering AG. Copyright Notice ©...
-
Page 3: Table Of Contents
Notes on the installation and operation manual For your safety Product Overview Installation Unpacking and checking the scope of delivery Storing the unit Notes on positioning the Nordmann AT4 D SPA Display Mounting the Nordmann AT4 D SPA Display 4.4.1 Flush mounting 4.4.2 Surface mounting Connecting the SPA Display to the Nordmann AT4 D 4.6... -
Page 4: Introduction
We thank you for having purchased the Nordmann AT4 D SPA Display with touch-sensitive display. The Nordmann AT4 D SPA Display incorporates the latest technical ad van ces and meets all recognized safety standards. Nevertheless, improper use of the Nordmann AT4 D SPA Display may result in danger to the user or third parties and/or impairment of material assets. - Page 5 Please safeguard this installation and operation manual in a safe place, where it can be immediately accessed. If the steam generator with which the Nordmann AT4 D SPA Display is used changes hands, the documentation should be passed on to the new operator.
-
Page 6: For Your Safety
For safety and warranty reasons any action beyond the scope of this manuals must be carried out only by qualified technical personnel authorised by your Nordmann representative. It is assumed that all persons working with the Nordmann AT4 D SPA Display are familiar and comply with the appropriate regulations on work safety and the prevention of accidents. - Page 7 Nordmann AT4 D SPA Display is no longer operating correctly – if the connecting cable is damaged All persons working with the Nordmann AT4 D SPA Display must report any alterations to the unit that may affect safety to the owner without delay. Prohibited modifications to the unit No modifications must be undertaken on the Nordmann AT4 D SPA Display without the express written consent of the manufacturer.
-
Page 8: Product Overview
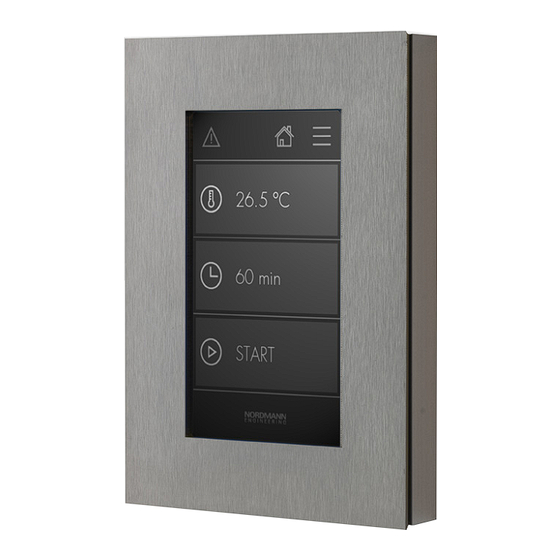
Product Overview Nordmann AT4 D SPA Display Nordmann AT4 D SPA Display flush-mounted surface-mounted Fig. 1: Front view Fig. 2: Front view Fig. 3: Back view Fig. 4: Back view Touch-sensitive display Magnets for the attachment of the decorative cover Flush-mounted housing Surface-mounted housing... -
Page 9: Installation
Packaging The original packaging of the Nordmann AT4 D SPA Display was designed for optimum safety during transportation. Please preserve the original packing material in case you once have to return the unit for some reason. -
Page 10: Notes On Positioning The Nordmann At4 D Spa Display
The Nordmann AT4 D SPA Display must not be installed in hazardous locations and in rooms where water splashes may occur. – Do not mount the Nordmann AT4 D SPA Display inside the steam bath cabin, sauna, bio sauna, etc. – If possible mount the Nordmann AT4 D SPA Display at eye level. - Page 11 2. Knock out the desired cable entry of the flush-mounted housing and insert the connecting cable (four-wire cable, 0.34 mm per wire) into the flush-mounted housing. Then, lead the cable through the wall opening to the steam generator. Fig. 6: Inserting the connecting cable 3.
- Page 12 Make sure the supply cable is not getting pinched and the that the magnets in the housing fit into the openings of the control board. Then, fix the Nordmann AT4 D SPA Display to corresponding supports of the flush-mounted housing using the four screws supplied.
- Page 13 7. If necessary loosen the screws of the display supports and adjust the display. Fig. 10: Adjusting the supports 8. Finally attach the decoration cover. The decoration cover is held by the magnets in the flush-mounted housing. Fig. 11: Attaching the decoration cover...
-
Page 14: Surface Mounting
4.4.2 Surface mounting 1. Using the aluminum surface-mounted housing as template mark the two fixing holes at the desired location, with the help of a spirit level. Then proceed as follows: – for the mounting on a stonework wall: • Drill 2 holes ø6 mm, depth 35 mm. - Page 15 Fig. 13: Cable entries 3. Connect the connecting cable to the Nordmann AT4 D SPA display control board according to the figure below. For this purpose, the individual wires have to be stripped 6 mm and appropriate cable end sleeves have to be crimped.
- Page 16 5. After function tests have been passed carefully place the Nordmann AT4 D SPA Display onto the surface-mounted housing (make sure the supply cable is not getting pinched). Then, fix the Nord- mann AT4 D SPA Display to the surface-mounted housing using the four screws supplied. Seal the cable entry at the bottom of the surface-mounted housing splash-proof using silicone sealant.
-
Page 17: Connecting The Spa Display To The Nordmann At4 D
SPA Display to the Nordmann AT4 D steam generator! DANGER! Danger of electric hazard! Before connecting the Nordmann AT4 D SPA Display to the Nordmann AT4 D steam generator set the steam generator out of operation and disconnect it from the mains! CAUTION! The electronic components inside the Nordmann AT4 D steam generator are very sensitive to elec- trostatic discharge. -
Page 18: Configuring The Nordmann At4 D For Operation With The External Nordmann At4 D Spa Display
4. Replace front panel of the control compartment of the Nordmann AT4 D. 5. Set Nordmann AT4 D into operation. If wired correctly the standby operation display is shown in the Nordmann AT4 D SPA Display (see chapter 5.1) after the Nordmann AT4 D has been started, or if the Nordmann AT4 D has not been... - Page 19 Setting the control mode Set the "Operat. Mode" parameter in the main menu to "Manual" (path: Menu > Operat. Mode): AT4D 65kg/h 400V3 Main Menu Operat.Mode Setpoint :48°C Manual Steam Bath :Standby Operat.Mode :Manual Manual Temperature :34°C Duration :45min Timer Setpoint :48°C Fragrance...
-
Page 20: Operation Of The Nordmann At4 D Spa Display
After the connection of the Nordmann AT4 D SPA display to the Nordmann AT4D and the corresponding configuration of the Nordmann AT4D, the Nordmann AT4 D SPA display is ready for use. As soon as the Nordmann AT4D steam generator is switched on, the standby operating display appears after starting the steam generator has finished initialization (see below). -
Page 21: Menu
Current value, call numeric entry by tapping on the field Gradual change of the displayed value (3) Confirm current value (3) Note: All settings are automatically synchronized between the control of the Nordmann AT4 D and the Nordmann AT4 D SPA display. -
Page 22: Steam Bath Settings
Steam bath settings Setpoint: Setting the temperature (steam bath operation) or humidity (caldar- ium operation) setpoint. Setting range humidity: 30…90 %rh Setting range temperature: 25…55 °C Session Time: Setting the bath time. Setting range: 1…1080 minutes Light 2: Turning on / off the effect light. Aroma: Setting the aroma intensity level of the fragrance pump 1 and 2. -
Page 23: Display Settings
Display settings Display Lock: With this setting you can lock the SPA display. If activated, changes to settings can only be made after entering the user code "3562". Brightness: With this setting you can adjust the brightness of the display backlight. Setting range: 20…100 % Theme: Selecting the display theme option. -
Page 24: Troubleshooting
If there is no fault, the warning triangle in the top left of the display is grey. If the warning triangle is grey, the fault history appears after pressing the warning triangle. Note: The Nordmann AT4 D SPA display does not save the fault history. However, all data is cyclically synchronized with the data of control of the Nordmann AT4 D. -
Page 25: Malfunctions Of The Nordmann At4 D Spa Display
Malfunctions of the Nordmann AT4 D SPA Display Malfunction Cause Remedy Message "Time Out" appears No data connection Check connections "D-" and "D+" in the Nordmann AT4 D SPA on the SPA display and on the Display. Nordmann AT4 D control board. -
Page 26: Taking Out Of Service/Disposal
Taking out of service/Disposal Taking out of service If the Nordmann AT4 D SPA Display must be replaced or if the Nordmann AT4 D SPA Display is not needed any more, proceed as follows: 1. Switch off the Nordmann AT4 D steam generator, separate it from the mains and secure it against inadvertent power-up. -
Page 27: Technical Data
Technical data Nordmann AT4 D SPA Display flush-mounted version surface-mounted version Touch Panel Resistive Touch Panel with 95 x 54 mm active screen Display 4,3" LCD, 272 x 480 Pixel Interface RS485 Supply voltage 24 VDC Max. rated power Admissible ambient temperature -20…70°C... -
Page 28: Spare Parts
Spare parts Pos. Description Spare part No. Flush-mounted housing (incl. mounting material) 2590178 Surface-mounted housing (incl. mounting material) 2590179 Decorative cover steel 2590183 Decorative cover glass white 2590185 Decorative cover glass black 2590186 PCB AT4D SPA Display 2590191 If you would like to use other materials for the decorative cover, the magnetic centering frame including the seal and the appropriate glueing device can be ordered separately in consultation with your Nord- mann representative: Pos. - Page 29 Notes...
- Page 30 Notes...
- Page 32 CH94/0002.01 Nordmann Engineering AG Lindenhofstrasse 28, 4052 Basel, Switzerland Phone +41 61 404 46 50, Fax +41 61 404 46 79 www.nordmann-engineering.com, info@nordmann-engineering.com...
Need help?
Do you have a question about the AT4 D SPA Display and is the answer not in the manual?
Questions and answers