
Related Manuals for Bosch BCC50


Summary of Contents for Bosch BCC50
- Page 1 Bosch Connected Control BCC50 Wi-Fi Thermostat Installation Guide and User Manual BoschHeatingAndCooling.com...
-
Page 2: Table Of Contents
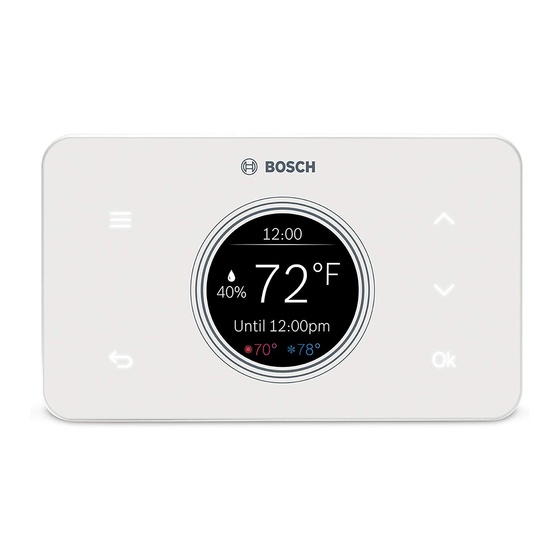
Table of Contents Installation Guide BCC50 User Manual BCC App User Manual Compatibility Main Screen Thermostat BCC App Thermostat Installation Icons App Main Screen Overview Initial Setup Temperature Setpoints Setpoint(s) on the App Advanced Settings Schedule Overview Thermostat Overview Troubleshooting... - Page 3 Meet the Bosch Connected Control (BCC50 Thermostat) The Bosch Connected Control BCC50 Thermostat is compatible with the majority of 24VAC heating and cooling equipment to help you save energy and money. Easily control your home's temperature from the intuitive interface using the 5 back-lit touch buttons, the Bosch Connected Control smartphone app or your voice with the Bosch Connected Control Alexa Smart Home Skill and your Alexa-enabled smart devices or with Google Assistant.
- Page 4 Two wire systems are not supported. If a C-wire is not readily available, we recommend you seek professional support from your local contractor. The Bosch Connected Control BCC50 Thermostat works with most 24VAC systems, including gas, oil, propane, electric, forced air, variable speed, heat pump and radiant.
-
Page 5: Installation Overview
Installation Guide and User Manual Smartphone Wire Labels (for taking pictures of the existing wiring) Bosch Connected Control smartphone app (for configuring the thermostat settings) Tools you may need Needle-Nose Pliers (for pulling wires from the wall) Drill with 7/32” Drill Bit (for mounting wall anchors) - Page 6 If you see any of these wire nuts, does not even power on, then you have successfully unfortunately the BCC50 will not work turned off the power to your system. with your system. If you are unsure or...
- Page 7 BCC50 It is recommended to use the BCC50 Wall Plate as a reference Thermostat is compatible with your system. guide to mark the mounting holes and ensure that...
- Page 8 Check if the wall plate is level and insert screws to place each wire. Be sure that you insert Make sure your new BCC50 wall plate is level and insert the each wire, one by one, and then included screws from the package and mount your new wall immediately close the terminal and confirm plate to the wall using a Phillips head screw driver.
- Page 9 R/RC R/RC BCC50 Terminal Key Step 11 Not Used Attach the BCC50 thermostat to the Not Used BCC50 wall plate C-wire (common) Not Used 1st Stage Heating HOOK...
- Page 10 Download the Bosch Connected Control app to setup your new BCC50 or circuit breaker box Your BCC50 Thermostat is not yet configured to your home’s The thermostat will power on and display a Bosch logo and HVAC system. Go to the App Store or Google Play to download loading bar.
- Page 11 BCC50. Return to your thermostat and click Ok to initiate the Initial Setup. Return to your app, and follow the on-screen instructions to connect the BCC50 Thermostat to your home’s Wi-Fi network. Note: If you skip this step, you will be required to repeat the initial setup in the future to make any changes or adjustments to the thermostat settings.
- Page 12 Initial Setup Unit Configuration If you have a dual fuel system Select your Heat Type according to the heating appliance Select Dual Fuel and click the setup button to the right located in your home. Below is a list of helpful tips that may Then follow the on-screen instructions to configure the guide you to selecting the correct option for your home.
- Page 13 None Note: In a dual fuel system, the BCC50 will stage up from heat pump to fossil fuel following the stage settings, which and then click Next.
- Page 14 Schedule if you do not wish to set up a schedule at this time, and click Next. Note: Home is the default schedule for your BCC50. If you wish to add a different schedule, click the plus (+) button in the top right hand corner of the screen.
- Page 15 Review Review your BCC50’s Initial Setup configuration and click Complete if you are happy with the setup. If you would like to change any of the settings, click on the section you would like to change to be brought back to that section of the Initial Setup.
- Page 16 In order to access the Advanced Settings of the BCC50 Thermostat, your thermostat must be connected to Wi-Fi. The Advanced Settings section is accessible from the Menu of the BCC50 smartphone app.
- Page 17 Advanced Settings Heating & Cooling To access the Heating and Cooling, click Advanced Settings, and enter the Professional Access Code Click on a setting and use the scroll wheel to modify the default value. From this menu you can adjust: TITLE Default Description...
- Page 18 Advanced Settings Installer Access To access the Installer Access,click Advanced Settings, enter the Professional Access Code and click Installer Enter any one of the Action Codes in parenthesis below to gain access to that specific setting: Humidity Calibration (HC) Ability to adjust humidity readings to improve sensor accuracy as the thermostat nears the end of its lifecycle after years of use.
- Page 19 Latching Stage Delay Stage Temp Enables staging logic that will Set the time delay between the Set the temperature delay not cycle between stages stage up logic for non-latching, between the stage up and stage until the setpoint is met. multi stage equipment.
- Page 20 Advanced Settings Device Log To access the Device Log, click Log on the Advanced Settings screen and enter the Professional Access Code. The Device Log stores up to 90 days’ worth of thermostat activity. To view historical data, select the time period you would like to view. Then select the function you would like to view: Functions Adjustment shows changes to temperature set point and hold...
- Page 21 Initial Setup Trouble connecting to your BCC50 Wi-Fi hotspot during Initial Setup? Go to your phone's Wi-Fi settings and forget the BCC50 Wi-Fi hotspot. Power cycle the thermostat and attempt the initial setup again. Trouble advancing to the Unit Configuration portion of the Initial Setup? Some devices have longer wait times to transfer from the Wi-Fi hotspot connection to the Unit Configuration.
- Page 22 What is the name of the smartphone app in the App Store and Google Play Store? The name of the app is Bosch Connected Control. Bosch Control is a different Wi-Fi thermostat app used with Bosch Boilers. How many accounts can be associated with the thermostat at once? Only one account can be associated with a given thermostat.
- Page 23 Wiring Diagrams Single Stage Heat – Furnace Example: Bosch 80% AFUE Gas Furnace - BGS80 ▶ Ensure the system has a C-wire Ensure the pre-installed jumper wire remains between RH and RC ▶ Connect the R, C, W1 and G wires from the Furnace to R/RC, C, ▶...
- Page 24 R/RC *NOTE: Bosch Greenstar boilers will require an external transformer to power the thermostat. First remove pre-installed jumper and then connect the dry contacts on the boiler to RH and W/E/AUX on the boiler and the transformer terminals...
- Page 25 Wiring Diagrams Single Stage Heat Pump Example: Bosch Inverter Ducted Split Ensure the system has a C-wire ▶ Ensure the pre-installed jumper wire remains between RH and R/RC ▶ ▶ Connect the R, C, Y1, O/B and G wires from the heat pump to R/RC, C, Y,...
-
Page 26: Two Stage Heat Pump
Wiring Diagrams Two Stage Heat Pump with One Stage Emergency Heat Ensure the system has a C-wire ▶ Ensure the pre-installed jumper wire remains between RH and R/RC ▶ ▶ Connect the R, C, W1, Y1, Y2, O/B and G wires from the heat pump to R/RC, C, W/E/AUX, Y, Y2, O/B/W2 and G terminals R/RC on the wall plate, respectively... - Page 27 Wiring Diagrams Combined Single Stage Heat Pump and Single Stage Furnace (Dual Fuel) ▶ Ensure the system has a C-wire Ensure the pre-installed jumper wire remains between RH and R/RC ▶ Connect the R, C, W1 and G wires from the Furnace to R/RC, C, ▶...
-
Page 29: User Manual
User Manual How to use your BCC50 Thermostat Use the illuminated buttons to navigate the thermostat. If you do not see the illuminated buttons, simply click on a button’s location to illuminate all the lights. Note: The screen is not a touch screen. The buttons are the only way to interact with the device. The buttons will turn off after a few seconds of no use. -
Page 30: Icons
Thermostat and App Icons Basic Icons System Modes Fan Modes Menu Heat Mode Auto Exit / Save Settings Cool Mode Back Circulation Auto Mode Schedule Emergency Heat Mode Accessory Device Settings Humidifier Heating Types System Settings Dehumidifier Fossil Fuel Advanced Setting Heat Pump Dual Fuel Electric... - Page 31 Unit Operation System Connectivity Heat Mode Schedule on Device Heating on (1st stage) & (2nd stage) Schedule on Cloud Cool Mode Cooling on (1st stage) & (2nd stage) Wi-Fi Connection Established Auto Mode Heating on (1st stage) & (2nd stage) Wi-Fi Connection Not Established Auto Mode Internet is Not Available...
-
Page 32: Temperature Setpoints
Adjusting Temperature Setpoint(s) No Schedule Schedule From the Main Screen, use the up or down arrows to change Follow the same process as above to change the setpoint, but the temperature setpoint, and then press Ok to confirm your be aware that you are only changing the setpoint until the next selection. -
Page 33: Thermostat Overview
Thermostat Overview System Use the up and down arrows to change the system mode of Use the up and down arrows to change the fan mode of your your thermostat between: Heat, Cool, Auto, Emergency Heat thermostat between: Auto: the fan will automatically turn on when there is a call (available for Heat Pumps and Dual Fuel systems only) or Off. -
Page 34: Accessory
Thermostat Overview Accessory Wi-Fi Use the up and down arrows to change the relative humidity Use the up and down arrows to Connect, Re-Connect or setpoint, and then press Ok to confirm your selection. You will Disconnect from your home’s Wi-Fi network. see a green check mark confirming your selection. -
Page 35: Schedule
Thermostat Overview Schedule Display Use the up and down arrows to change the active Schedule. Select Brightness to adjust the screen’s brightness between high, medium or low. Note: The schedule can only be programmed from the app. Select Timeout to adjust the time before the thermostat enters idle mode: 20 seconds, 1 minute or 3 minutes. -
Page 36: Device Info
Thermostat Overview Device Info Factory Reset Use the up and down arrows to scroll through the following Click Factory Reset to restore your device to its factory device information: default settings. Account ID displays the User ID associated with your Note: All settings will be lost and you will need to repeat the thermostat. - Page 37 Three Ways to Download The Connected Control App In the App Store or Google Play, search “Bosch Connected Control” or “BCC50” and then download the app. Visit www.bosch-climate.us/bcc50 or scan QR code below and click the links for the app in the Download App section.
- Page 38 App Screen Overview Back Menu Current Time Refresh / Sync Time Lock Actual Room Relative Humidity Actual Room Temperature Current Schedule Period Hold Cancel Schedule Override Cooling Setpoint Heating Setpoint System Mode Accessory...
-
Page 39: Setpoint(S) On The App
Adjusting Temperature Setpoint(s) on the App No Schedule From the Main Screen, tap Schedule the current temperature Follow the same process as and use your finger to scroll above to change the up or down to change the setpoint, but be aware that temperature setpoint. -
Page 40: Schedule Overview
Schedule Overview Schedule Add a New Period Edit an Existing Period To add a new Period to a To edit an existing Period, To add a new Schedule, use the ‘+’ button in the top right given day, click the Add click on the Starting, Heat or hand corner, name your schedule and click OK. - Page 41 Schedule Overview Delete an Existing Period Copy a Schedule Save Schedule To delete an existing period, To copy a schedule to other Use the Save button in the swipe left on the existing days of the week, click the top right hand corner of the period and click delete.
-
Page 42: App Menu Overview
App Menu Overview Mode Wi-Fi Similar to the BCC50 Thermostat, use To change the Wi-Fi Network that your thermostat uses to connect to the internet, the Mode screens to adjust remotely the follow the on-screen instructions on your app. System Mode, Fan Mode and Accessory Mode. -
Page 43: Device Messages
App Menu Overview Device Messages Device Settings System Settings Alert messages regarding your Follow the on-screen instructions to Follow the on-screen instructions to specific thermostat can be read and view and modify the thermostat screen change the temperature units, set deleted from this section of the app. -
Page 44: Additional Features
Additional Features Control Your BCC50 with Alexa Bosch offers one Smart Home Skill for integrating your BCC50 with Alexa’s voice controls. Using the Bosch Connected Control Skill from the Skills section of the Amazon Alexa App. You Can Control the BCC50 by Saying:... - Page 45 Click on the Skills section and search for “Bosch Connected Control” in the search bar at the top of the page. After you find and click on the Bosch Connected Control Skill, click on the blue Enable button. The setup process redirects you to a Bosch sign-in page where you will need to enter your BCC50 account username and password.
-
Page 46: Google Assistant
Control Your BCC50 with Google Assistant Once installed and connected to the app, Bosch offers one Smart Home link for integrating your BCC50 with Google Assistant’s voice controls. After setting up your thermostat as a new device in the Google Home app:... - Page 47 Click on Setup up device and select the link option under Works with Google. This is the last option on the page. Search for Bosch Connected Control and click add new Bosch Connected Control. The setup process redirects you to a Bosch sign-in page where you will need to enter your BCC account username and password.
- Page 48 WARRANTY COVERAGE Limited Warranty Bosch warrants that the Product will remain free from defects in material and workmanship three (3) years from the date of original installation or from the date of manufacture if proof of installation is not available, provided it is properly installed and the other conditions of this warranty are met.
- Page 49 The alleged defective Product must be returned to Bosch in accordance with Bosch procedure then in force for handling goods returned for the purpose of inspection to determine cause of failure (contact Bosch if you have questions regarding the return process).
- Page 50 Notes...
- Page 51 Notes...
- Page 52 Bosch Thermotechnology Corp. Watertown, MA • Londonderry, NH • Ft. Lauderdale, FL General Inquiries: 1-800-283-3787 www.boschheatingandcooling.com 74H994001A 5/19 Copyright © 2019 Bosch Thermotechnology Corp. All rights reserved. Subject to change without notice.
Need help?
Do you have a question about the BCC50 and is the answer not in the manual?
Questions and answers