Table of Contents
Advertisement
Quick Links
12V/24V
BATTERY
STARTER/CHARGER
70549 / 70551 / 70552
Stock No.70549
Stock No.70551
Stock No.70552
These instructions accompanying the product are the original instructions. This document is part of the product,
keep it for the life of the product passing it on to any subsequent holder of the product. Read all these
instructions before assembling, operating or maintaining this product.
This manual has been compiled by Draper Tools describing the purpose for which the product has been
designed, and contains all the necessary information to ensure its correct and safe use. By following all the
general safety instructions contained in this manual, it will ensure both product and operator safety, together
with longer life of the product itself.
AlI photographs and drawings in this manual are supplied by Draper Tools to help illustrate the operation of the
product.
Whilst every effort has been made to ensure the accuracy of information contained in this manual, the Draper
Tools policy of continuous improvement determines the right to make modifications without prior warning.
Advertisement
Table of Contents

Related Manuals for Draper 70549


Summary of Contents for Draper 70549
- Page 1 AlI photographs and drawings in this manual are supplied by Draper Tools to help illustrate the operation of the product.
-
Page 2: Title Page 1.1 Introduction
Commercial copying, redistribution, hiring or lending is prohibited. No part of this publication may be stored in a retrieval system or transmitted in any other form or means without written permission from Draper Tools Limited. In all cases this copyright notice must remain intact. -
Page 3: Table Of Contents
5.5 PERSONAL PRECAUTIONS AND SAFETY..............8 5.6 CONNECTION TO THE POWER SUPPLY (CHARGER) ........... 9 TECHNICAL DESCRIPTION 6.1 IDENTIFICATION 70551 & 70552................10 6.2 IDENTIFICATION 70549 .................... 11 UNPACKING AND CHECKING 7.1 PACKAGING ......................12 PREPARING THE CORDLESS SCREWDRIVER 8.1 BEFORE CHARGING YOUR BATTERY..............13 OPERATION AND USE 9.1 BATTERY INFORMATION .................. -
Page 4: Warranty
This warranty applies in lieu of any other warranty expressed or implied and variations of its terms are not authorised. Your Draper warranty is not effective unless you can produce upon request a dated receipt or invoice to verify your proof of purchase within the warranty period. -
Page 5: Introduction
Designed for the charging and starting of petrol and diesel engines. Any application other than that it was intended for, is considered misuse. 4.2 SPECIFICATION Stock No’s..........70549 ......70551......70552 Part No’s..........BCS360T......BCS560T....BCS860T Rated Voltage ........230V~50Hz...... 230V~50Hz ..... 230V~50Hz Charging voltage ........12V/24V......12V/24V..... -
Page 6: Health And Safety Information
HEALTH AND SAFETY INFORMATION 5.1 GENERAL SAFETY INSTRUCTIONS FOR POWER TOOL USE When using any type of power tool there are steps that should be taken to make sure that you, as the user, remain safe. Common sense and a respect for the tool will help reduce the risk of injury. Read the instruction manual fully. -
Page 7: Residual Risk
HEALTH AND SAFETY INFORMATION Wait for the machine to stop. Unless the machine is fitted with a safety brake; some parts may continue to move due to momentum. Wait for all parts to stop; then unplug it from the power supply before making any adjustments, carrying out maintenance operations or just finishing using the tool. -
Page 8: Personal Precautions And Safety
HEALTH AND SAFETY INFORMATION 4. When disconnecting the battery charger, pull by the plug not by the cord. Pulling on the cord may cause damage to cord or plug. 5. Locate battery power cord so it cannot be stepped on, tripped over, or subjected to damage or stress. -
Page 9: Connection To The Power Supply (Charger)
The loss of codes for audio and security systems can be avoided by connecting a Draper Memory Saver (Part No.SMS, Stock No.22277 12V socket type or Part No.EMS, Stock No.22231 EOBD TYPE) before disconnecting the battery. Check that the battery voltage matches that of the charger. -
Page 10: Technical Description
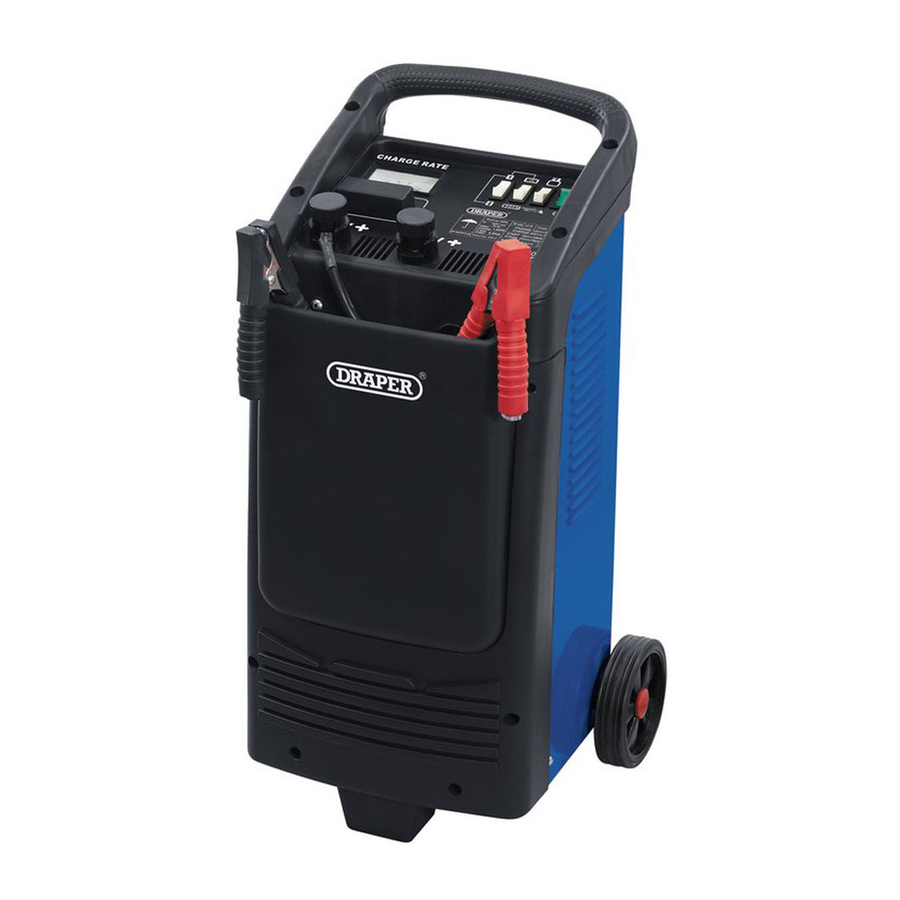
TECHNICAL DESCRIPTION 6.1 IDENTIFICATION 705551 AND 70552 IP 20 cl H Cmin 20 Ah Stock No.70552 230V~1ph CHARGE 12V 120A 50 Hz CHARGE 24V 120A P.MAX 3.0KW CHARGE START 12V 800A(1V/e) P. MAX 15KW 800A(1V/e) START 24V START EN 60335-2-29 3s ON/120s OFF-5cycle Output Fuse 150A x2 Stock No.70552 shown... -
Page 11: Identification 70549
TECHNICAL DESCRIPTION 6.1 IDENTIFICATION 70549 Stock No.70549 IP 20 cl H Cmin 20 Ah 230V~1ph CHARGE 12V 50 Hz CHARGE 24V P.MAX 1.0KW CHARGE START 12V 180A(1V/e) P. MAX 6.0KW START 24V 180A(1V/e) START EN 60335-2-29 3s ON/120s OFF-5cycle Output Fuse 100A x1 Stock No.70549 shown... -
Page 12: Unpacking And Checking
Carefully remove the product from the packaging and examine it for any sign of damage caused during shipping. Lay the contents out and check them. If any part is damaged or missing, do not attempt to use the tool and contact the Draper Helpline immediately (see back page for details). -
Page 13: Before Charging Your Battery
Loss of codes for audio and security etc, can be prevented by connecting a Draper Memory Saver – Stock No. 22277 12V socket type (Fig.1), or Stock No. 22231 EOBD 16pin diagnostic socket type (Fig.2) before disconnecting the battery. -
Page 14: Operation And Use
OPERATION AND USE 9.1 BATTERY INFORMATION Before proceeding with the charging of the battery ensure that the battery to be charged is within the recommended amperage range for the charger. Always follow your battery manufacturers instructions during charging. If the battery amperage rating is not stated or you are unsure about the rating please see the table below for some typical readings. -
Page 15: Preparing To Charge
OPERATION AND USE PREPARING TO CHARGE - FIGS 3 - 5 1. Make sure you have either a 12 volt or a 24 volt lead-acid battery and select battery charger switch accordingly. 12V SERIES DIAGRAM 12V (2 X 6V SERIES) DIAGRAM - NOTE: These chargers can only recharge 6V batteries... -
Page 16: Battery Types
OPERATION AND USE PERCENT OF CHARGE The percent of charge scale in intended as a visual aid to help simplify reading the state of charge. BATTERY TYPES Three basic types of lead-acid batteries can be given a charge with this charger: (1) Conventional and Low Maintenance, (2) Maintenance Free, (3) Deep Cycle. - Page 17 OPERATION AND USE Note: Attach clips to battery post and twist or rock back an forth several times to make a good connection. This tends to keep clips from slipping off terminals and helps to reduce risk of sparking. POSITIVE GROUNDED POST 5B.
-
Page 18: Chargeing 70549
Negative end of cable, and, remove clip from Positive battery post, in that order. 11. Clean and store battery charger. 70549 - FIG 8 Output voltage selection is achieved by connecting the positive (+) red clamp cable to... -
Page 19: Chargeing 70551 & 70552
OPERATION AND USE IP 20 cl H Cmin 20 Ah Stock No.70552 230V~1ph CHARGE 12V 120A 50 Hz CHARGE 24V 120A P.MAX 3.0KW CHARGE START 12V 800A(1V/e) P. MAX 15KW 800A(1V/e) START 24V START EN 60335-2-29 3s ON/120s OFF-5cycle Output Fuse 150A x2 Stock No.70552 shown FIG.9 70551 &... -
Page 20: Maintenance
Re-tighten the two nuts and replace the cover before attempting to repeat the required task. If the fuse blows again, double check the set-up/connections and if unable to detect the problem Stock No.70549 shown contact the service agent. FIG.10 - 20 -... -
Page 21: Troubleshooting
11. TROUBLESHOOTING WARNING: For your safety always turn the main switch on the machine "off" and remove the plug from the power supply before carrying out any maintenance or trouble shooting. Problem Cause Remedy No meter reading. 1. Connections are reversed. 1. -
Page 22: Disposal
12. DISPOSAL 12.1 DISPOSAL – At the end of the machine’s working life, or when it can no longer be repaired, ensure that it is disposed of according to national regulations. – Contact your local authority for details of collection schemes in your area. In all circumstances: ●... -
Page 23: Explanation Of Symbols
13. EXPLANATION OF SYMBOLS 13.1 EXPLANATION OF SYMBOLS Class 1 appliance (must be earthed). Read the instruction manual. WEEE – Waste Electrical & Do not abandon into the Electronic Equipment. environment. Do not dispose of Waste Electrical & Electronic Equipment in with domestic rubbish. - Page 24 ©Published by Draper Tools Limited. No part of this publication may be reproduced, stored in a retrieval system or transmitted in any form or by any means, electronic, mechanical photocopying, recording or otherwise without prior permission in writing from Draper Tools Ltd.
Need help?
Do you have a question about the 70549 and is the answer not in the manual?
Questions and answers