
Related Manuals for SereneLife SLRWMC60


Summary of Contents for SereneLife SLRWMC60
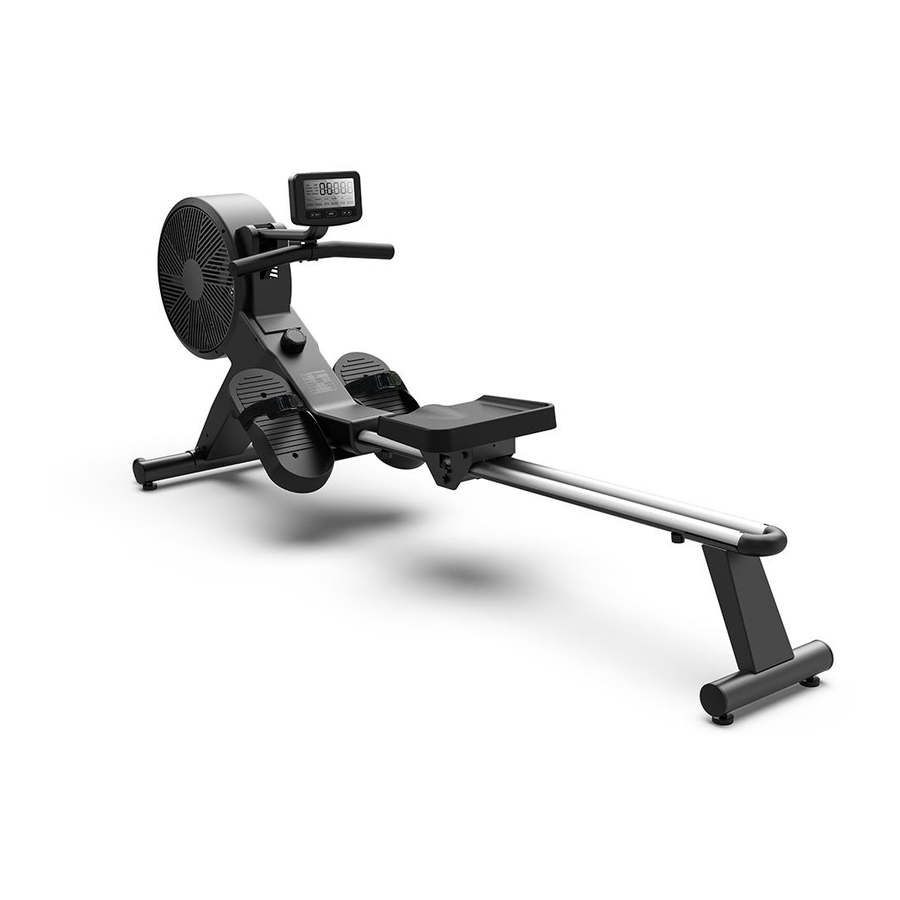
- Page 1 SLRWMC60 Smart Rowing Machine Sports Training Row Machine with Smartphone Fitness Monitoring App, Portable Folding Style...
- Page 2 IMPORTANT! Please retain owner’s manual for maintenance and adjustment instructions. IMPORTANT SAFETY INFORMATION To ensure your safety and health, please use this equipment correctly. It is import- ant to read this entire manual before assembling and using the equipment. Safe and e ective use can only be achieved if the equipment is assembled, maintained and used properly.
- Page 3 12. Your product is intended for use in cool, dry conditions. You should avoid storage in extreme cold, hot or damp areas as this may lead to corrosion and other related problems. 13. This equipment is designed for indoor and home use only, it is not intended for commercial use! EXPLODED DIAGRAM www.SereneLifeHome.com...
- Page 4 www.SereneLifeHome.com...
- Page 5 Hardware: www.SereneLifeHome.com...
-
Page 6: Parts List
Parts List Description Description Bolt M8*42*15*S6 Rail Transportation Wheel Limiter Washer d8*Φ16*1.5 Bolt M6*16*φ10 Nylon nut M8*H7.5*S13 Rail upper cover End cap Φ60.5*17 Rail lower cover Rear supporter Front bottom tube Nut M8 Bolt M8*16*S14 Adjustable foot pad φ52*18 Seat Bolt M8*73*20*H5 U baffle plate Arc washer d8*Φ20*2*R30... - Page 7 Spring Φ1.2*Φ15*48*N9 Axle for Mesh Belt Wheel Bushing Φ32*3.3*Φ28*16*Φ14 Volute Spring Computer post Outer PC Board Knob Φ14*81.5*M8*S6 Outer Cover for Mesh Belt Wheel Bolt M6*55*15*S10 Sensor Washer d10 Sensor holder Pulley Φ45*35 Motor Fixing Axle for Mesh Belt Tension wire Wave washer d10 Adapter Belt...
- Page 8 Take out the bolts(9), arc washers(10), spring washers(11) and cap nuts(12) from main frame(27) by wrench(B), then attach front bottom tube(6) to main frame(27) with bolts(9), arc washers(10), spring washers(11) and cap nuts(12) by wrench(B). Step 2: www.SereneLifeHome.com...
- Page 9 a. Take out bolts(31) from rail(33) by wrench(B); b. Insert seat(40) into rail(33); c. Secure rail piece(32) in the rail(33) with bolt(31) by wrench(B); d. Secure limiter(34) in the rail(33) with bolts(35) by wrench(B). Step 3: www.SereneLifeHome.com...
- Page 10 a. Take out screw(25) from rail upper and lower cover(36&37) by wrench(B); b. Secure rail upper and lower cover(36&37) on the rail(33) with screw(25) by wrench(B); c. Secure rear supporter(38) on the bottom of rail(33) with washers(3), spring washers(11) and bolts(24) by spanner(A). Step 4: a.
- Page 11 Step 5: a. Take out spring washers(11), bolts(22) and washers(23) from main frame(27) by wrench(B); b. Secure pedal plate(30) to main frame(27) with spring washers(11), bolts(22) and washers(23) by wrench(B); c. Secure pedal(29) in the pedal plate(30) with bolts(24) by spanner(A); Attention: The pedal strap(28) should be put in the long groove which is at the bottom of pedal(29), and the pedal(29) must not press the pedal strap(28), so that the pedal strap(29) could be free to pull up and down.
- Page 12 Step 6: a. Pull out the trunk wire(16a/16b/16c) from computer post(67), then connect them with computer wires(15a/15b/15c), then put these wires into the computer post(67) by return; b. Put the computer(15) on the iPad holder(99); c. Secure computer(15) and iPad holder(99) on the computer post(67) with bolts(15) by wrench(B) ;...
- Page 13 ADJUSTMENTS GUIDE 1. MOVING THE MACHINE To move the machine, lift up the Rear supporter (38) until the transportation wheels on the Front bottom tube(6) touch the ground. With the wheels on the ground, you can transport the bike to the desired location with ease.
- Page 14 Quick Start Guide STRETCH EXERCISE No matter how you do sports, please do some stretch at rst, The warm muscle will extend easily, so warm up yourself with 5-10minutes, Then We suggest the following stretch exercise, ve times.10counts for each time or longer do these exercise again after sports.
- Page 15 EXERCISE MONITOR INSTRUCTION MANUAL DISPLAY INFORMATION 1. In the main display area with motion status: a. Scan mode: Display change according to the next items every 6 seconds, TIME→DISTANCE→PLUSE→SPM(/WATT)→CALORIE→STROKES(/TOTAL STROKES); b: Press “Display-ALT” key lets you to select and lock on to a particular function you want;...
- Page 16 FUNCTION DESCRIPTION MANUAL MODE .PRORGAM 1: The resistance value level by manual adjustment ; PROGRAM MODE .PROGRAM2~11 : The motion mode by auto adjustment with preset value; BODY FAT .PROGRAM 12: Body fat percentage and body mass index and basal metabolic rate; WATT MODE .PROGRAM 13:The motion mode by watt target controlled ;...
- Page 17 3. Press “UP” or “DOWN” key to upward or downward adjusted, and press “ENTER” key to next item; 4. Automatically exits the setting status when all operations are complete, or press “START/STOP” key in the setting status to start directly. 5.
- Page 18 BODY FAT ( PROGRAM 13) 1. Press “ENTER” key into setting mode; 2. In setting status, press “ENTER” key to choose setting items with relevant ashing window for GENDER→HEIGHT→ WEIGHT→AGE; 3. Press “UP” or “DOWN” key to upward or downward adjusted, and press “ENTER” key to next item;...
- Page 19 WATT MODE (PROGRAM 14) 1. Press “ENTER” key into setting mode; 2. In setting status, press “ENTER” key to choose setting items with relevant ashing window for TIME→DISTANCE→WATT; 3. Press “UP” or “DOWN” key to upward or downward adjusted, and press “ENTER” key to next item;...
- Page 20 3. In setting status, press “ENTER” key to choose setting items with relevant ashing window for TIME→DISTANCE→CALORIE→STROKES→AGE (only PROGRAM15 -17) → T.H.R (only PROGRAM18); 4. Press “UP” or “DOWN” key to upward or downward adjusted, and press “ENTER” key to next item; 5.
- Page 21 7. If TIME, DISTANCE, CALORIES, STROKES or any of these are setting, the corresponding value will be inverted in motion status. When any of setting value count to 0, the motion will be STOP and “DI DI” Voice Prompt; 8. Press “START/STOP” key to STOP the motion, in the motion status; RECOVERY MODE In exercising status, rst test your pulse as above mentioned.
- Page 22 WIRELESS PULSE ( Optional) Supports the standard 5.3Khz wearing heart rate detector 1. Please wet the two electrodes of the heart rate detector 2. Wear the heart rate detector on your chest; Note: 1. This monitor uses a 9V/1A power adapter。 2.
- Page 23 The ‘Fitshow’ App: • Train Smarter & Connect with Your Favorite Devices • Record, Collect and Review Exercise Data • Put Your Training Stats on Display & Challenge Friends • Ability to Share Health & Fitness Data via Social Media •...
- Page 24 Questions? Issues? We are here to help! Phone: (1) 718-535-1800 Email: support@pyleusa.com...
Need help?
Do you have a question about the SLRWMC60 and is the answer not in the manual?
Questions and answers