Table of Contents
Advertisement
Advertisement
Table of Contents

Related Manuals for FIBARO SMART IMPLANT FGBS-222

Summary of Contents for FIBARO SMART IMPLANT FGBS-222
- Page 1 O P E R A T I N G M A N U A L FIBARO SMART IMPLANT FGBS-222 v1.0...
-
Page 3: Table Of Contents
Table of contents 1: Important safety information 2: Description and features 2.1: Description 2.2: Main features 3: Specifications 4: Installation 4.1: Before installation 4.2: Connection with alarm line 4.3: Connection with DS18B20 4.4: Connection with DHT22 4.5: Connection with 2-wire 0-10V sensor 4.6: Connection with 3-wire 0-10V sensor 4.7: Connection with binary sensor 4.8: Connection with button 4.9: Connection with gate opener 5: Adding to Z-Wave network... -
Page 4: 1: Important Safety Information
1: Important safety information Read this manual before attempting to install the device! Failure to observe recommendations included in this manual may be dangerous or cause a violation of the law. The manu- facturer, Fibar Group S.A. will not be held responsible for any loss or damage resulting from not following the instructions of operating manual. -
Page 5: 2: Description And Features
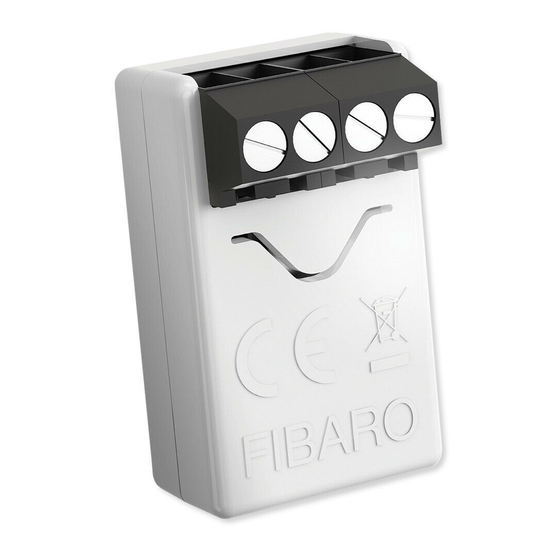
2: Description and features 2.1: Description FIBARO Smart Implant allows to enhance the functionality of wired sensors and other devices by adding Z-Wave network communication. You can connect binary sensors, analog sensors, DS18B20 temper- ature sensors or DHT22 humidity and temperature sensor to report their readings to the Z-Wave controller. -
Page 6: 3: Specifications
3: Specifications Power supply 9-30V DC ±10% Inputs 2 0-10V or digital inputs 1 serial 1-wire input Outputs 2 potential-free outputs Supported digital sensors 6 DS18B20 or 1 DHT22 Maximum current on outputs 150mA Maximum voltage on outputs 30V DC / 20V AC ±5% Built-in temperature sensor -55°C–126°C measurement range... -
Page 7: 4: Installation
4: Installation 4.1: Before installation Connecting the device in a manner inconsistent with this manual may cause risk to health, life or material damage. • Connect only in accordance with one of the diagrams, • The device is powered with secure voltage; nevertheless, the user should be extra careful or should commission the installation to a qualified person, Do not connect devices which are not compliant with the... - Page 8 Notes for diagrams: OUT2 OUT1 ANT (black) – antenna GND (blue) – ground conductor SD (white)– signal conductor for DS18B20 or DHT22 sensor SP (brown) – power supply conductor for DS18B20 or DHT22 sensor (3.3V) IN2 (green) – input no. 2 IN1 (yellow) –...
-
Page 9: Connection With Alarm Line
4.2: Connection with alarm line 1. Turn off the alarm system. 2. Connect with one of the diagrams below: TMP TMP COM 12V AUX COM Z1 Z2 Diagram 1: Example connection with regular alarm line (1 – alarm sensor, 2 – alarm system hub) TMP TMP COM 12V COM AUX... -
Page 10: Connection With Ds18B20
4.3: Connection with DS18B20 The DS18B20 sensor may easily be installed wherever very precise temperature measurements are required. If proper protective meas- ures are undertaken, the sensor may be used in humid environments or under water, it may be embedded in concrete or placed under the floor. -
Page 11: Connection With 2-Wire 0-10V Sensor
3. Verify correctness of connection. 4. Power the device. 5. Add the device to the Z-Wave network. 4.5: Connection with 2-wire 0-10V sensor The 2-wire analog sensor requires pull-up resistor. You can connect up to 2 analog sensors to IN1/IN2 terminals. The 12V supply is required for these type of sensors. -
Page 12: Connection With Binary Sensor
3. Verify correctness of connection. 4. Power the device. 5. Add the device to the Z-Wave network. 6. Change values of parameters: • Connected to IN1: change parameter 20 to 4 • Connected to IN2: change parameter 21 to 4 4.7: Connection with binary sensor You connect normally opened or normally binary sensors to IN1/IN2 terminals. -
Page 13: Connection With Button
4.8: Connection with button You can connect monostable or bistable switches to IN1/IN2 termi- nals to activate scenes. 1. Disconnect power. 2. Connect with the diagram below: GND 9-30V Diagram 8: Example connection with 2 buttons (1,2 – button) 3. Verify correctness of connection. 4. -
Page 14: Connection With Gate Opener
4.9: Connection with gate opener Smart Implant can be connected to different devices to control them. In this example it is connected to gate opener with im- pulse input (every impulse will start and stop the gate motor, alternately opening/closing) 1. Disconnect power. 2. -
Page 15: 5: Adding To Z-Wave Network
5: Adding to Z-Wave network Adding (Inclusion) – Z-Wave device learning mode, allowing to add the device to existing Z-Wave network. 5.1: Adding manually To add the device to the Z-Wave network manually: 1. Power the device. 2. Set the main controller in (Security/non-Security Mode) add mode (see the controller’s manual). -
Page 16: 6: Removing From Z-Wave Network
6: Removing from Z-Wave network Removing (Exclusion) – Z-Wave device learning mode, allowing to remove the device from existing Z-Wave network. Removing also re- sults in resetting the device to factory defaults. To remove the device from the Z-Wave network: 1. Power the device. 2. -
Page 17: 7: Operating The Device
7: Operating the device 7.1: Visual indications The built-in LED light shows current device status. After powering the device: • Green – device added to a Z-Wave network (without Security S2 Authenticated) • Magenta – device added to a Z-Wave network (with Security S2 Authenticated) •... -
Page 18: Resetting To Factory Defaults
7.3: Resetting to factory defaults Reset procedure allows to restore the device back to its factory set- tings, which means all information about the Z-Wave controller and user configuration will be deleted. Resetting the device is not the recommended way of removing the device from the Z-Wave network. -
Page 19: 8: Z-Wave Range Test
8: Z-Wave range test The device has a built in Z-Wave network main controller’s range tester. To make Z-Wave range test possible, the device must be added to the Z-Wave controller. Testing may stress the network, so it is recommended to perform the test only in special cases. -
Page 20: 9: Activating Scenes
9: Activating scenes The device can activate scenes in the Z-Wave controller by sending scene ID and attribute of a specific action using Central Scene Com- mand Class. In order for this functionality to work connect monostable or bistable switch to the IN1 or IN2 input and set parameter 20 (IN1) or 21 (IN2) to 2 or 3. -
Page 21: 10: Configuration
The settings can be adjusted via Z-Wave controller to which the de- vice is added. The way of adjusting them might differ depending on the controller. In the FIBARO interface parameters are presented as simple options in Advanced Settings of the device. Parameters dependency... - Page 22 Parame- No. 41 No. 52 No. 54 No. 151 No. 153 No. 63 No. 64 ter 21 0 or 1 2 or 3 4 or 5 Available parameters: Input 1 - operating mode This parameter allows to choose mode of 1st input (IN1). Change it depending on connected device.
- Page 23 Inputs orientation This parameter allows reversing operation of IN1 and IN2 inputs without changing the wiring. Use in case of incorrect wiring. Parameter size 1B Default value 0 (default) 0 – default (IN1 - 1st input, IN2 - 2nd input) Available values 1 –...
- Page 24 Input 1 - value sent to 2nd association group when activated This parameter defines value sent to devices in 2nd association group when IN1 input is triggered (using Basic Command Class). Parameter size 2B Default value Available 0-255 values Input 1 - value sent to 2nd association group when deactivated This parameter defines value sent to devices in 2nd association group when IN1 input is deactivated (using Basic Command Class).
- Page 25 150. Input 1 - sensitivity This parameter defines the inertia time of IN1 input in alarm modes. Adjust this parameter to prevent bouncing or signal dis- ruptions. Parameter is relevant only if parameter 20 is set to 0 or 1 (alarm mode).
- Page 26 154. Output 1 - logic of operation This parameter defines logic of OUT1 output operation. Parameter size 1B Default value 0 (NO) 0 – contacts normally open / closed when active Available values 1 – contacts normally closed / open when active 155.
- Page 27 Analog inputs - periodical reports This parameter defines reporting period of analog inputs value. Periodical reports are independent from changes in value (param- eter 63). Parameter is relevant only for analog inputs (parameter 20 or 21 set to 4 or 5). Parameter size 2B Default value 0 (periodical reports disabled)
- Page 28 External sensors - periodical reports This parameter defines reporting period of analog inputs value. Periodical reports are independent from changes in value (pa- rameter 67). Parameter is relevant only for connected DS18B20 or DHT22 sensors. Parameter size 2B Default value 0 (periodical reports disabled) 0 –...
-
Page 29: 11: Z-Wave Specification
11: Z-Wave specification Supported Command Classes: Command Class Version Secure 1. COMMAND_CLASS_ZWAVEPLUS_INFO [0x5E] 2. COMMAND_CLASS_SWITCH_BINARY [0x25] 3. COMMAND_CLASS_ASSOCIATION [0x85] COMMAND_CLASS_MULTI_CHANNEL_ASSOCIA- TION [0x8E] COMMAND_CLASS_ASSOCIATION_GRP_INFO [0x59] 6. COMMAND_CLASS_TRANSPORT_SERVICE [0x55] 7. COMMAND_CLASS_VERSION [0x86] COMMAND_CLASS_MANUFACTURER_SPECIFIC [0x72] COMMAND_CLASS_DEVICE_RESET_LOCALLY [0x5A] 10. COMMAND_CLASS_POWERLEVEL [0x73] 11. COMMAND_CLASS_SECURITY [0x98] 12. COMMAND_CLASS_SECURITY_2 [0x9F] 13. - Page 30 Multichannel Command Class: MULTICHANNEL CC ROOT (Endpoint 1) Generic Device GENERIC_TYPE_SENSOR_NOTIFICATION Class Specific Device SPECIFIC_TYPE_NOTIFICATION_SENSOR Class COMMAND_CLASS_ZWAVEPLUS_INFO [0x5E] COMMAND_CLASS_ASSOCIATION [0x85] COMMAND_CLASS_MULTI_CHANNEL_ASSOCIA- TION [0x8E] COMMAND_CLASS_ASSOCIATION_GRP_INFO [0x59] Command COMMAND_CLASS_NOTIFICATION [0x71] Classes COMMAND_CLASS_SUPERVISION [0x6C] COMMAND_CLASS_APPLICATION_STATUS [0x22] COMMAND_CLASS_SECURITY [0x98] COMMAND_CLASS_SECURITY_2 [0x9F] Description Input 1 – Notification Endpoint 2 Generic Device GENERIC_TYPE_SENSOR_NOTIFICATION...
- Page 31 Endpoint 3 Generic Device GENERIC_TYPE_SENSOR_MULTILEVEL Class Specific Device SPECIFIC_TYPE_ROUTING_SENSOR_MULTILEVEL Class COMMAND_CLASS_ZWAVEPLUS_INFO [0x5E] COMMAND_CLASS_ASSOCIATION [0x85] COMMAND_CLASS_MULTI_CHANNEL_ASSOCIA- TION [0x8E] COMMAND_CLASS_ASSOCIATION_GRP_INFO [0x59] Command COMMAND_CLASS_SENSOR_MULTILEVEL [0x31] Classes COMMAND_CLASS_SUPERVISION [0x6C] COMMAND_CLASS_APPLICATION_STATUS [0x22] COMMAND_CLASS_SECURITY [0x98] COMMAND_CLASS_SECURITY_2 [0x9F] Description Analog Input 1 – Voltage Level Endpoint 4 Generic Device GENERIC_TYPE_SENSOR_MULTILEVEL Class...
- Page 32 Endpoint 5 Generic Device GENERIC_TYPE_SWITCH_BINARY Class Specific Device SPECIFIC_TYPE_POWER_SWITCH_BINARY Class COMMAND_CLASS_ZWAVEPLUS_INFO [0x5E] COMMAND_CLASS_SWITCH_BINARY [0x25] COMMAND_CLASS_ASSOCIATION [0x85] COMMAND_CLASS_MULTI_CHANNEL_ASSOCIA- TION [0x8E] Command COMMAND_CLASS_ASSOCIATION_GRP_INFO [0x59] Classes COMMAND_CLASS_PROTECTION [0x75] COMMAND_CLASS_SUPERVISION [0x6C] COMMAND_CLASS_APPLICATION_STATUS [0x22] COMMAND_CLASS_SECURITY [0x98] COMMAND_CLASS_SECURITY_2 [0x9F] Description Output 1 Endpoint 6 Generic Device GENERIC_TYPE_SWITCH_BINARY Class Specific Device...
- Page 33 Endpoint 7 Generic Device GENERIC_TYPE_SENSOR_MULTILEVEL Class Specific Device SPECIFIC_TYPE_ROUTING_SENSOR_MULTILEVEL Class COMMAND_CLASS_ZWAVEPLUS_INFO [0x5E] COMMAND_CLASS_ASSOCIATION [0x85] COMMAND_CLASS_MULTI_CHANNEL_ASSOCIA- TION [0x8E] COMMAND_CLASS_ASSOCIATION_GRP_INFO [0x59] Command COMMAND_CLASS_SENSOR_MULTILEVEL [0x31] Classes COMMAND_CLASS_SUPERVISION [0x6C] COMMAND_CLASS_APPLICATION_STATUS [0x22] COMMAND_CLASS_SECURITY [0x98] COMMAND_CLASS_SECURITY_2 [0x9F] Description Temperature – internal sensor Endpoint 8-13 (when DS18S20 sensors connected) Generic Device GENERIC_TYPE_SENSOR_MULTILEVEL Class...
- Page 34 Endpoint 8 (when DHT22 sensor connected) Generic Device GENERIC_TYPE_SENSOR_MULTILEVEL Class Specific Device SPECIFIC_TYPE_ROUTING_SENSOR_MULTILEVEL Class COMMAND_CLASS_ZWAVEPLUS_INFO [0x5E] COMMAND_CLASS_ASSOCIATION [0x85] COMMAND_CLASS_MULTI_CHANNEL_ASSOCIA- TION [0x8E] COMMAND_CLASS_ASSOCIATION_GRP_INFO [0x59] Command COMMAND_CLASS_SENSOR_MULTILEVEL [0x31] Classes COMMAND_CLASS_SUPERVISION [0x6C] COMMAND_CLASS_APPLICATION_STATUS [0x22] COMMAND_CLASS_SECURITY [0x98] COMMAND_CLASS_SECURITY_2 [0x9F] Description Temperature – external sensor DHT22 Endpoint 9 (when DHT22 sensor connected) Generic Device GENERIC_TYPE_SENSOR_MULTILEVEL...
- Page 35 Notification Command Class: The device uses Notification Command Class to report different events to the controller (“Lifeline” group). ROOT (Endpoint 1) Notification Type Event Home Security [0x07] Intrusion Unknown Location [0x02] Endpoint 2 Notification Type Event Home Security [0x07] Intrusion Unknown Location [0x02] Endpoint 7 Event /State Notification Type...
- Page 36 Assocation groups mapping Association group in Root Endpoint endpoint Association Group 2 Endpoint 1 Association Group 2 Association Group 3 Endpoint 1 Association Group 2 11: Z-WaVe specIfIcatIon...
-
Page 37: 12: Regulations
12: Regulations This device complies with Part 15 of the FCC Rules Operation is subject to the following two conditions: 1. This device may not cause harmful interference 2. This device must accept any interference received, including in- terference that may cause undesired operation. This equipment has been tested and found to comply with the limits for a Class B dig- ital device, pursuant to part 15 of the FCC Rules. - Page 38 FIBARO and Fibar Group logo are trademarks of Fibar Group S.A. All other brands and product names referred to herein are trademarks of their respective holders.
Need help?
Do you have a question about the SMART IMPLANT FGBS-222 and is the answer not in the manual?
Questions and answers