Table of Contents
Advertisement
Quick Links
Advertisement
Table of Contents

Subscribe to Our Youtube Channel
Related Manuals for HETRONIC ERGO-S


Summary of Contents for HETRONIC ERGO-S
- Page 1 USER’S MANUAL ERGO-S USER’S OPERATION MANUAL 10/2019 www.hetronic.com...
-
Page 2: Table Of Contents
1.5 Possible Sources of Danger ................................4 1.6 Protective Features .................................... 5 1.7 STOP in case of EMERGENCY ................................ 5 1.8 Caring for your ERGO-S ..................................5 2. Introduction and Functional Description ..............................6 2.1 Production and System Numbers ..............................6 2.2 Before Operating Your Wireless Control Unit ........................... - Page 3 USER’S MANUAL | ERGO-S List of Figures Figure 1. Blank Rating Plate ................................6 Figure 2. ERGO-S Transmitter (Right, Front, Left) ..........................8 Figure 3. Status and Feedback LEDs ..............................8 Figure 4. Stop Screen ..................................10 Figure 5. Pages 1 and 2 of the Device Settings menu ........................12 Figure 6.
-
Page 4: Safety
Your radio remote control is designed for remote operation of machines and systems using safe wireless communications technology. Any modification, reconstruction or extension of the systems without a written agreement of Hetronic may lead to the loss of your warranty and guarantee claims. -
Page 5: Protective Features
Do not keep your ERGO-S stored in a closed container for extended periods of time unless it is powered off and the battery is removed from the unit. Charging the ERGO-S in a closed container is a potential fire hazard and may shorten its lifespan. Lithium-Ion batteries give off heat when charging and when discharging. -
Page 6: Introduction And Functional Description
Functional Description We congratulate you on the purchase of your new Hetronic ERGO-S push button transmitter. You have chosen a high quality product. Familiarise yourself with the unit before using it for the first time. In addition please carefully refer to the operating instructions and the safety advise given in this manual. -
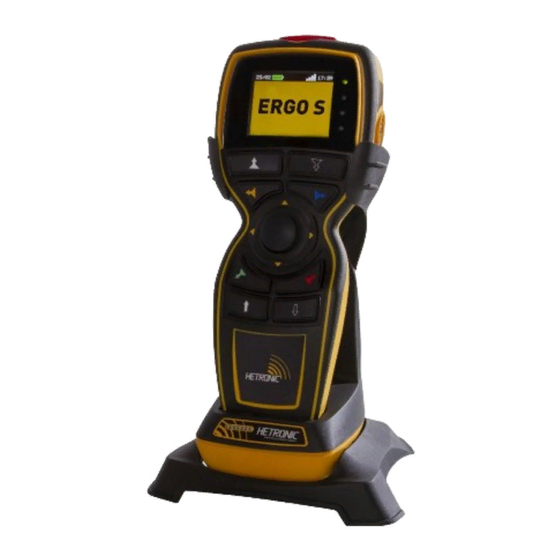
Page 7: Your Ergo-S Transmitter
ERGO-S Transmitter 3.1 General Description The ERGO-S is an ergonomically designed, programmable wireless industrial transmitter for remote machine control. Your transmitter is encased in a rugged IP65 rated housing, is battery-powered, and comes equipped with built-in low battery detection. -
Page 8: Figure 2. Ergo-S Transmitter (Right, Front, Left)
Figure 2. ERGO-S Transmitter (Right, Front, Left) An optional 2.4” 240x320 TFT screen provides real-time visual information during operation of the ERGO-S transmitter. It is used to change configuration settings, provide two-way feedback and display transmitter diagnostic information such as battery life, signal strength and button status. -
Page 9: Operating Your Transmitter
1. Confirm that all safety measures required by the equipment manufacturer have been followed. 2. Insert a fully charged battery into the battery compartment of the transmitter. 3. Insert the USB key supplied with the transmitter in the ERGO-S port (#16) and press Power (#12) button to power ON the transmitter unit. -
Page 10: Led Behaviour And Meanings
USER’S MANUAL | ERGO-S Figure 4. Stop Screen 2. Press the Start button (#12) and the Shut Down Delay timer starts. The transmitter shuts off once the delay timer is over. This is normally set to 2 seconds by default but can be programmed differently (refer to Programming and Service Manual). The OFF state of the LED indicates that the transmitter has switched off. -
Page 11: Magnetic Belt Clip (If Equipped)
4.9 Magnetic Belt Clip (if equipped) The practical magnetic belt clip allows the user to hang the ERGO-S transmitter to any steel surface and continue operation hands free or store the transmitter hung vertically when not in use and have easy access to it. -
Page 12: Configuring Your Ergo-S
1. Make sure STOP switch (#15) on transmitter is activated. 2. Switch on ERGO-S by pressing the Start button (#12) and then keeping the side switches (#9 and #12) pressed until the splash screen disappears and the ‘Device Settings’ screen appears. -
Page 13: Figure 7. Button Diagnostic Page On Transmitter
Transmitter Baud Rate The allowable baud rates of the control telegram that may be configured are 4800 or 9600bits/second for the Hetronic standard 4xx-8xx MHz radio modules. The standard baud rate of 115200bits/second is used for Hetronic standard 2.4GHz radio modules. To change the TX Baud Rate when the transmitter is in Service Mode one has to: 1. -
Page 14: Figure 8. Options Found Under General Settings Menu
USER’S MANUAL | ERGO-S 5.2.3. General Settings The following settings may be accessed and adjusted from their respective menus as outlined below: Figure 8. Options found under General Settings menu ▪ TFT Brightness TFT brightness can be adjusted between setting 1 and setting 8, with 8 being the brightest. -
Page 15: Figure 11. Information Provided In The 'About' Screen
▪ Time Time displayed on the status bar of your ERGO-S transmitter can only be in 24hrs format. To update the time from the transmitter: 1. Press button #3 to enter General Settings menu. 2. Press button #4 to go to next page of General Settings menu. -
Page 16: Theory Of Operation
Operation Your ERGO-S transmitter works with a receiving device to transfer machine control commands via radio frequency to your machine. The transmitter electronically generates a carrier frequency that allows it to communicate with the receiver without the use of cables or wires. -
Page 17: Ergo S Battery
7. E rgo S battery You may power your transmitter with a Hetronic Ergo S rechargeable battery inserted into the bottom of the transmitter. Follow the instructions below to ensure best performance of your ERGO-S transmitter and prolonged battery lifetime. -
Page 18: Charging Unit
USER’S MANUAL | ERGO-S 7.2 Charging Unit The charger docking station base can be dismantled from the bench-top state to obtain a wall-mount charger instead. Figure 14. Bench-top or wall-mount variations 7.2.1 Removing the grippers In order to obtain the wall-mount version and mount it to a wall/panel, the grippers must be removed by following the below steps: 1. -
Page 19: Battery Disposal
Hetronic dealer or service center. Standard Hetronic rechargeable batteries are the Lithium –Ion type. These batteries have no “memory effect” when charging a battery that is not fully discharged. -
Page 20: Troubleshooting
ERGO-S 8. T roubleshooting If your ERGO-S does not operate after normal start-up, follow the recommended troubleshooting sequence to help isolate the cause and determine corrective action. If you need more information, contact your nearest Hetronic dealer. PROBLEM PROBABLE CAUSE... -
Page 21: Specifications
Humidity Range 95% IEC 60068-2-78 Response Time Less than 100 msec. Fully programmable via Hetronic PC-Link USB (Type A) Interface with 4Gb Memory key for configuration settings Status LED for std/adv. low battery detection and Feedback LEDs Standard Features STOP Button EN 60204-1, ISO 13850, IEC60947 Compliant... -
Page 22: Warranty, Service, Repairs And Maintenance
Hetronic may replace the product or faulty parts. Work under guarantee/warranty must be carried out by Hetronic, or by an authorized service centre specified by Hetronic. Any modification, reconstruction or extension of the systems without a written agreement of Hetronic may lead to the loss of your warranty and guarantee claims. -
Page 23: Regulatory Information
RoHS Compliance As a designer and manufacturer of electrical and electronic products covered by RoHS and RoHS2, Hetronic confirms that to the best of its knowledge at the date of this statement, none of the products supplied by it contain any of the hazardous substances in exces s of permitted levels referred to in the Directive 2002/95/EC. -
Page 24: Industry Canada (Ic/Ised) Statement
Technical information subject to change without notice. Hetronic reserves the right to discontinue, make changes to, and add improvements upon its products at any time without public notice or obligation. Hetronic disclaims liability for any claims or damages, whether regarding property, personal injury or death arising out of the use... -
Page 25: Definition Of Terms
USER’S MANUAL | ERGO-S Appendix A Definition of terms The following terms are used throughout the ERGO-S User Manual and may be unfamiliar to some operators. Term Definition baud rate The transmitting speed measured in bits per second. hamming distance A measurement of data transmission safety. -
Page 26: Operator Safety Basics
▪ Instructions, manuals, and safety warnings of the manufacturers of the equipment where Hetronic products are used, ▪ Plant safety rules and procedures of the employers and the owners of the facilities where the Hetronic products are being used, ▪... -
Page 27: Ergo S Variants And Current Rating
Full Duplex With SS The table on the following page shows how the item number of an Ergo-S unit is broken down and explains what each digit refers to with regards to different features available on the Ergo-S. Note: The suffix ‘.A’ denotes version number, ‘JS’ refers to ‘Joystick’ and ‘SS’ denotes ‘Selector Switch’. - Page 28 ✓ ✓ ✓ 130mA W/O TFT 71692020.A- ERGO-S V2 ✓ ✓ ✓ ✓ 130mA W/O TFT 71692110.A- ERGO-S V1 W. ✓ ✓ ✓ ✓ 200mA 71692111.A- ERGO-S V1 W. ✓ ✓ ✓ ✓ 220mA TFT + JS ERGO-S V1 W.
-
Page 29: Spare Parts List
Always contact your nearest Hetronic dealer or service center for service and maintenance work on the product. Below is a list of spare parts, together with their part number, which by time may need to be replaced due to wear and tear:...
Need help?
Do you have a question about the ERGO-S and is the answer not in the manual?
Questions and answers