Honeywell Tuxedo Touch User Manual
Hide thumbs
Also See for Tuxedo Touch:
- User manual (48 pages) ,
- User manual (48 pages) ,
- Manual (20 pages)
Table of Contents
Advertisement
Advertisement
Table of Contents

Related Manuals for Honeywell Tuxedo Touch


Summary of Contents for Honeywell Tuxedo Touch
- Page 1 Tuxedo Touch™ Wi-Fi ® Home Automation System User Guide 800-16573V2 8/15 Rev. A...
- Page 2 Z-Wave devices are identified by the Z-Wave logo and can be purchased from your local retailer. ® Z-Wave is a registered trademark Sigma Designs, Inc. and/or its subsidiaries.
-
Page 3: Table Of Contents
Table of Contents ABOUT THE SYSTEM Introduction ................................. 1 Home Page ................................. 3 Multi-Media Options ............................. 3 Data Entry Keyboard ............................4 Navigation Icon Descriptions ..........................4 LED Operation ..............................5 Screen Blackout (EN50131 Display) ........................5 Messages ................................6 Operating Modes .............................. -
Page 5: About The System
About the System Introduction Congratulations on your ownership of a Honeywell Tuxedo Touch™ Home Automation System which combines home- ® ® automation and home security. Equipped with Wi-Fi capability and built-in Z-Wave technology, Tuxedo can be retrofitted into home electronic devices and systems without interference from common household wireless electronics. - Page 6 Extended Additional control panel functions can be accessed through the console emulation mode Functionality which emulates a standard alpha keypad on your Tuxedo touch-screen. Setup Menus If needed, various system settings can be programmed including time and date, remote access, display and audio features, language selection, etc.
-
Page 7: Home Page
In everyday handling, memory cards can become susceptible to malfunction and/or failure due to electrostatic discharges and the information on the card may be lost. In some extreme cases, the Tuxedo may need to be reset. NOTE: Honeywell is not responsible for any loss of personal information (files, videos, photos, etc.) Memory Card Insertion Insert the memory card (SD/SDHC Card) as shown. -
Page 8: Data Entry Keyboard
About the System (cont'd) Data Entry Keyboard Throughout this document, the user is required to enter information on the Tuxedo keypad (i.e., password, device names, etc.) Use the Data Entry Keyboard to enter all required information. • Press the Up Arrow to switch to upper case characters. •... -
Page 9: Led Operation
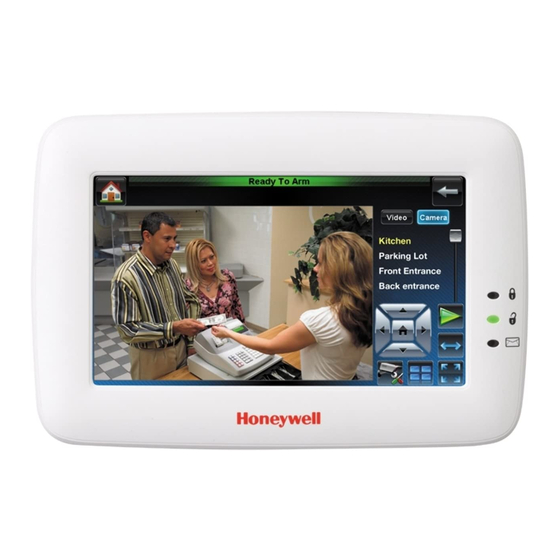
About the System (cont'd) Displays Emergency Record and retrieve “Panic” "Message” functions (as Voice Messages. programmed by the installer). Press to access “Camera” camera settings. Note: This icon is displayed and active on all screens except while in the Clean Screen mode, during an LCD Press to access video “Event View”... -
Page 10: Messages
About the System (cont'd) Messages The Tuxedo can record voice messages for others on the premises. The number of messages is not limited; however, the total time of all messages added together cannot exceed 120 seconds. Note: The voice messages are stored in the memory and all messages are lost if the keypad loses power or if it is reset. Recording/Retrieving Messages Press Multimedia and Message... - Page 11 About the System (cont'd) Residential Mode To enter Residential Mode (automation), from the “Home” screen press the following: Setup > System Setup > CS Setup . Enter your authorized code and press Options ; the “OPTIONS and OPERATING MODES” screen is displayed. Highlight the Automation Mode check box to enable the option.
- Page 12 About the System (cont'd) Note that this is a limited mode of operation. While in this mode: • You can use Security to access the Console Emulation Mode of operation to try to clear your faults, disarm the system, or enter additional Alpha Keypad commands specified in your panel User Guide. You can perform almost all functions that you can perform from a standard non-graphic alpha keypad.
-
Page 13: Using Pictures, Cameras And Videos (Multi-Media)
Using Pictures, Cameras and Videos (Multi-Media) Picture Setup Tuxedo can display your personal photo(s) on the Home screen as wallpaper or in a slide show format. To set up a slide show of pictures, do the following: Insert your personal media SD card (with stored picture files). Formats supported are .bmp, png or .jpg files. Slide Show Setup Press Multimedia >... -
Page 14: Video Functionality
Using Pictures, Cameras and Videos (cont'd) Video Functionality Video Converter is required to convert videos for proper playback on the Tuxedo. Use an Internet search engine to locate and download a Video Converter, then follow the steps in the Video Converter Instructions (provided in the carton). Press Product/Training Video (located on the Home screen) and view the “SD Card Video Playback”... -
Page 15: Camera Configuration And Viewing
Using Pictures, Cameras and Videos (cont'd) Camera Configuration and Viewing Cameras can be viewed locally from the Tuxedo keypad. To setup and view cameras for use with Wi-Fi enabled devices and Total Connect, refer to the Remote Access section later in this document. Camera functionality is supplementary only and has not been evaluated for agency compliant applications. -
Page 16: Adding Cameras To The System
Using Pictures, Cameras and Videos (cont'd) Adding Cameras to the System Note: Before adding cameras, the Tuxedo must be connected to the home network via the same router as the camera Initial camera setup cannot be performed over a wireless connection. Add Camera from the Tuxedo The Camera feature allows you to enroll up to 32 cameras and view up to four cameras at one time using the quadrant view feature. - Page 17 Select iPCAM-WI, iPCAM-WI2, iPCAM-WI2B (black), iPCAM-WO or iPCAM- PT, WVC210, iPCAM-ACU, iPCAM-WL, ONVIF, Trendnet, and others. NOTE: Only the Honeywell AlarmNet IP cameras will work with Total Connect Remote Services. Refer to HTTPS://mywebtech.honeywell.com or www.tuxedotouchtoolkit.com for the “Camera Compatibility” documentation.
- Page 18 Using Pictures, Cameras and Videos (cont'd) 6. If using Wi-Fi, after all cameras have been added, press Camera WIFI to enter the camera wireless settings information from your router. The screen displays: “INFO: Camera Wi-Fi setup is applicable only for discovered cameras”...
- Page 19 Using Pictures, Cameras and Videos (cont'd) Advanced Camera Settings All features below can be changed based on the settings required. Press Camera Settings to access the following settings. NOTES: • Press Save! after each selection • Fixed Quality is not an option on the Camera Settings home screen. Video Feature MPEG-4, MJPEG and H.264 Settings...
-
Page 20: Video Recording
Using Pictures, Cameras and Videos (cont'd) Removing Cameras 1. To delete all cameras, press DELETE ALL. A confirmation window displays: “Do you want to delete all cameras?” Yes or No. If Yes is selected, all camera are removed. 2. To delete a single camera, highlight the camera name and press DELETE. A confirmation window displays: “Select “YES”... - Page 21 Use Delete to remove the event video. Using Third Party Camera’s The Tuxedo keypad can support cameras by multiple manufacturers. For a complete list visit MyWebTech.honeywell.com or tuxedotouchtoolkit.com and refer to the IP Camera Compatibility List for supported cameras. General Notes: •...
-
Page 22: Z-Wave Devices, Scenes & Total Connect (Automation) Using Z-Wave Devices
Z-Wave Devices, Scenes & Total Connect (Automation) Using Z-Wave ® Devices Before a Z-Wave device will work in the home control network, it must be added (also called included) into the network. View the “Programming of Z-Wave Devices” training video and follow the instructions below to add and control devices in a home control network. -
Page 23: Z-Wave Home Page Icons
Using Z-Wave Devices and Scenes (cont'd) Device Type Keypad View Multi-Level Switch Binary Switch Water Valve Thermostat Door Lock Garage Door All Switches NOTES • Binary, Multi-level Switches and Water Valves have the ability to change the icon, see the Device Setup Section. •... -
Page 24: Z-Wave Device Management Buttons
Using Z-Wave Devices and Scenes (cont'd) Z-Wave Device Management Buttons Pressing Z-Wave Setup reveals the Z-Wave Device Management screen with several icons across the bottom. This icon is for including or adding a new device to the network. NOTE: Refer to the Add Device devices installation instructions for the Add and Remove procedure. -
Page 25: Adding And Deleting Z-Wave Devices
Using Z-Wave Devices and Scenes (cont'd) Adding and Deleting Z-Wave Devices Adding and Deleting Z-Wave devices on the Tuxedo keypad depend on the icon pressed. For adding a device press Add Device , for removing devices press the Remove Device . - Page 26 2. Press Z-Wave Add Device 3. On the Honeywell thermostat select Thermostat; set the “Time/Date” and follow the instructions in the thermostat Installation Guide for “Z-Wave enrollment/inclusion.” 4. Wait a few seconds for the enrollment to finish and the on-screen message “Device added successfully” appears.
-
Page 27: Z-Wave Device Setup
Using Z-Wave Devices and Scenes (cont'd) Z-Wave Device Setup Changing the Name To change the Z-Wave device icons, do the following: 1. Press Automation > Z-Wave Setup to display the “Z-Wave Device Management” screen. 2. Press Z-Wave device to be edited. 3. -
Page 28: Z-Wave Network Update
Using Z-Wave Devices and Scenes (cont'd) Z-Wave Network Update After all Z-Wave devices have been successfully enrolled, you can perform a Z-wave network update to individual devices or the whole network. Individual Device Update 1. Press the device, and then press Search Devices 2. -
Page 29: Creating Scenes
Using Z-Wave Devices and Scenes (cont'd) Creating Scenes The system can automatically activate devices when certain triggered events occur. When a programmed trigger/condition occurs, the defined device(s) activates. The programming of these triggers and actions is called Scenes. A scene consists of a trigger, an optional condition, and up to five actions. Up to 30 local (20 more using Total Connect Remote Services) scenes can be defined. - Page 30 Using Z-Wave Devices and Scenes (cont'd) Defining Scenes The system can automatically activate various devices when certain events occur based on predefined Scenes. Trigger Defines the event that triggers the programmed action(s). Triggers include the following categories: Time Security Thermostat Door Garage Door Water Valve...
- Page 31 Using Z-Wave Devices and Scenes (cont'd) Scene Setup Options Defines the event that triggers the programmed action. Trigger Triggers include the following categories: Choose the time option the action should begin: • Repeated (choose the days of the week) • Once (enter the date) Time •...
- Page 32 Using Z-Wave Devices and Scenes (cont'd) Action Defines the desired device action(s) when the trigger event occurs. Actions include the following categories: Choose the action which activates upon the trigger event: Disarm Away Stay Night (Arms Instant) Disarm with Code Enter User Code Security NOTE: A valid user code is required for the system to perform any of the actions...
- Page 33 Using Z-Wave Devices and Scenes (cont'd) Voice Input Command Review the “Tuxedo Touch Voice Command Training Video” before the initial trigger assignment. The Voice Input Command is configured in “Scene Setup.” Voice Commands are accessed by pressing “Voice Input Command,” which provides a drop down window revealing the following commands.
- Page 34 Using Z-Wave Devices and Scenes (cont'd) Detailed Scene Configuration Scenes must have at least 1 trigger, 1 action (up to 5) and the event to trigger. The Condition section is optional. Time Set the TIME: In the Trigger/Condition box, press Add > TIME > Set the occurrence. If ONCE >...
-
Page 35: Group Setup
Using Z-Wave Devices and Scenes (cont'd) Door Set the Door Locks: In the Trigger box, press Add > DOOR > Door Device from the drop-down menu. Select LOCKED, UNLOCKED or CODE UNLOCKED for the Action. In the Condition box select LOCKED or UNLOCKED. Next, an action must be programmed. -
Page 36: Room Setup
Using Z-Wave Devices and Scenes (cont'd) Room Setup A room is a defined collection of different types of Z-Wave devices, which can be used to organize a large number of Z- Wave devices into smaller, more manageable device lists. Up to 50 rooms can be created with no limitation to the number of devices in each room. -
Page 37: Integrating Total Connect Remote Services
Using Z-Wave Devices and Scenes (cont'd) • The Secondary Tuxedo displays: “Device Upload in Process.” Once devices have been uploaded “Devices Uploaded Successfully” is displayed. • The Primary Tuxedo displays: “Device Added Successfully.” NOTES: • If the device status is failed, remove and enroll Tuxedo as the secondary controller again and then reboot the system;... - Page 38 Using Z-Wave Devices and Scenes (cont'd) NOTE: Some devices may need to be enabled after a software upgrade. 4. Press Save when done. 5. After devices have been enabled for Total Connect, follow the Total Connect prompts to synchronize the data with Tuxedo.
-
Page 39: Using The Security System
Using the Security System Security System Operation You can arm your system in one of three arming modes: Away, Stay, and Night. The following table lists the three different arming modes and the results of each. Consult your security panel’s user guide for more information. Arming Mode FUNCTION AWAY... - Page 40 Using the Security System (cont’d) How to Arm the System Arming the system in any mode is performed in the same way, as described below. Note: Close all perimeter windows and doors before arming and make sure the system says “Ready to Arm” on the keypad.
-
Page 41: How To Disarm The System
Using the Security System (cont’d) How to Bypass Zones The Bypass function is used when you want to arm your system with one or more zones left open. Bypassed zones are unprotected and do not cause an alarm when violated while your system is armed. •... - Page 42 Using the Security System (cont’d) To disarm the system when already in the premises To disarm Multi-Partitions do the following Press Security > Arm Multi-Partition > Disarm ; enter your 4-digit user code. Highlight the partition(s) to disarm and press OK, or press ALL to disarm all partitions. How to Check the Status of Other Partitions This system supports between one and eight Partitions (depending on the system.) Partitioning enables a single physical alarm system to control up to eight areas of protection (partitions) depending on the system you have purchased.
-
Page 43: User Codes
Using the Security System (cont’d) User Codes Each user must be assigned a name with a corresponding 4-digit user code in order to gain access to various features and functions. Tuxedo can hold the identity for 10 Users in its memory. If additional Users are needed, define the additional Users using the Console Emulation Mode. - Page 44 Using the Security System (cont’d) How to Add a User Your installer set up users at the time of installation. To add more users, do the following: Press Setup > System Setup > USER SETUP > ADD USER Enter your Authorized Code. Press the box next to Enter User Name and type in the user name (max. 6 characters; no spaces between characters);...
-
Page 45: Fire And Carbon Monoxide Alarm Operation
Using the Security System (cont’d) Fire and Carbon Monoxide Alarm Operation Your fire alarm system and carbon monoxide detector (if installed) is on 24 hours a day, providing continuous protection. In the event of an emergency, the installed smoke, heat, carbon monoxide detectors automatically send signals to your Control/Communicator, triggering a loud interrupted sound from the keypad. -
Page 46: Output Setup Function
Using the Security System (cont’d) Output Setup Function Tuxedo can activate/deactivate up to 18 pre-defined control panel output functions (if programmed in the control panel). The Output Setup screen displays Output selections. Control these output functions by enabling/disabling as follows: Press Setup >... - Page 47 Using the Security System (cont’d) How to View the Event Log Your system has the ability to record various events in a history log wherein each event is recorded with the time and date of its occurrence. The control panel must be programmed to record various system events in the installer programming mode.
-
Page 48: Brightness And Volume Control
Setup Menus Your installer has already set up your system, however, if changes are needed, you can change the settings as described below. Brightness and Volume Control From the "Home" screen, press Setup . Move the Brightness/Volume slide bar up or down to increase or decrease settings. -
Page 49: Weather Setup
Setup Menus (cont'd) Weather Setup The Weather forecast is displayed on the “Home” screen. To set the weather forecast for a specific location, press the current “Weather” Select USA, Canada or Other. Select Zip Code/Postal Code or press Country/City. Weather conditions for that location are displayed. To select the temperature unit, see below. -
Page 50: Routine Care
Setup Menus (cont'd) Routine Care • Treat the components of your security system as you would any other electrical equipment. Do not slam sensor- protected doors or windows. • Keep dust from accumulating on the keypad and all protective sensors, particularly on motion sensors and smoke detectors. -
Page 51: E-Mail Setup
Setup Menus (cont'd) Power Mode Setup Power Mode allows you to reduce power consumption in the event of a system trouble such as AC Loss or Panel Low Battery. Select Power Save Mode to enable; then choose Turn-off Network, or Override Display Settings. Press Apply to save settings. - Page 52 Setup Menus (cont'd) Defining Event Types To receive email notification when specific events occur, the “event type” must be defined. Scenes can be set to trigger based on the status of these settings. From “System Events Notification” screen, set the following event types: For each event 1-4, choose the conditions that will trigger notification: Event Type Conditions that Trigger Notification...
-
Page 53: Ip Setup
Setup Menus (cont'd) IP Setup This section allows you do an initial connection to the Wi-Fi network, or if network change has occurred (i.e. SSID change, Security Mode, or Passphrase/Shared Key). LAN Setup Setting up a LAN (non-Wi-Fi) connection in DHCP mode will automatically populate the required network information (IP Address, Subnet Mask, Default Gateway and DNS Server). -
Page 54: Remote Access Log In Setup (Account Setup)
Remote Access Remote Access Log In Setup (Account Setup) Remote Access is not for UL applications. The home router must first be configured for port forwarding for both HTTP and HTTPS ports. Refer to the router’s instructions for details on port forwarding. You can assign up to five user logins. A password is required if logging in from a remote location (not using the premises network). - Page 55 Remote Access (cont'd) Local Access Tuxedo’s remote access option offers built-in web hosting capability to access your system via any web enabled device. The Tuxedo can connect to a network router via Ethernet cable (LAN network) or Wi-Fi depending on the installation preference.
- Page 56 Remote Access (cont'd) Automation Z-Wave device management Setup Account setup Emergency icon Disp. & Audio setup Rooms IP setup Remote scenes System setup Email setup General Weather Voice setup Training videos Remote firmware upgrade Local Web Server URL Access In cases where the Tuxedo is set for DHCP, there is the possibility the IP address can change upon a router reset. This can block the users attempt to access the Web Server locally.
-
Page 57: Software Updates
Remote Access (cont'd) Remote Access using Port Forwarding Tuxedo offers built-in web hosting capability to access your system via any web enabled device. The Tuxedo IP Address is used on a standard web browser to control user functions. The home router must first be configured for port forwarding for both HTTP and HTTPS ports. -
Page 58: Enabling Devices For Total Connect
Remote Access (cont'd) Integrating Total Connect Remote Services The Tuxedo supports Remote Services for controlling Z-Wave devices and scenes remotely from an associated Total Connect account. LAN or Wi-Fi MUST be enabled for proper integration with Total Connect. Synchronizing is required before the enabled devices will display in Total Connect. -
Page 59: Creating Scenes In Total Connect
Remote Access (cont'd) Creating Scenes in Total Connect The following table summarizes the relationships between Total Connect scenes and Tuxedo scenes: Controlling Scenes created in Total Connect Scenes created in Tuxedo Device View Edit Scenes View Edit Scenes Total Connect Tuxedo Note: For troubleshooting purposes, Total Connect server information (including IP addresses) can be viewed on the Total Connect Server Setup screen by pressing TC Server Info. -
Page 60: Notes
Z-Wave devices may vary; follow the instructions in the User’s Guide for your specific device when adding and deleting devices into the Z- Wave network. Visit https://mywebtech.honeywell.com/ or http://www.tuxedotouchtoolkit.com/ for a complete list of compatible Z-Wave devices. Refer to the document titled “Z-Wave Compatibility Chart.”... -
Page 61: System Troubles
System Troubles The “Security” screen also displays an icon(s) if a system trouble(s) occurs. If a Trouble icon is shown, contact your alarm company. The following icons may be shown as applicable to your system: ICON FUNCTION AC Loss – The system is not receiving AC power. Bell Failure –... - Page 62 (2) Cet appareil doit accepter toute interférence reçue y compris les interférences causant une réception indésirable. USE OF THESE PRODUCTS IN COMBINATION WITH NON-HONEYWELL PRODUCTS IN A WIRELESS MESH NETWORK, OR TO ACCESS, MONITOR OR CONTROL DEVICES IN A WIRELESS MESH NETWORK VIA THE INTERNET OR ANOTHER EXTERNAL WIDE AREA NETWORK, MAY REQUIRE A SEPARATE LICENSE FROM SIPCO, LLC.
- Page 63 TWO YEAR LIMITED WARRANTY Honeywell International Inc., acting through its Security & Communications business (“Seller”), 2 Corporate Center Drive, Melville, New York 11747 warrants its products to be free from defects in materials and workmanship under normal use and service, normal wear and tear excepted, for 24 months from the manufacture date code;...
- Page 64 2 Corporate Center Drive, Suite 100 Ê800-16573V2eŠ P.O. Box 9040, Melville, NY 11747 Copyright © 2014 Honeywell International 800-16573V2 8/15 Rev. A www.honeywell.com/security...
Need help?
Do you have a question about the Tuxedo Touch and is the answer not in the manual?
Questions and answers