PowerVision PowerEgg X User Manual
Hide thumbs
Also See for PowerEgg X:
- Quick start manual (56 pages) ,
- Quick start manual (84 pages) ,
- Quick start manual (46 pages)
Table of Contents
Advertisement
Advertisement
Table of Contents

Related Manuals for PowerVision PowerEgg X


Summary of Contents for PowerVision PowerEgg X
- Page 1 PowerEgg User Manual V1.1 PowerVision...
-
Page 2: Table Of Contents
Contents Product Pro le .........................1 Before Flight......................1 Download App and Watch the Tutorial Video............1 About PowerEgg X....................1 Smart Battery......................5 User Sign Up......................6 Activation........................9 Firmware Update.......................11 AI Camera Mode ......................16 Prepare the AI Camera....................16 Introduction to Vision+ 2 App................18 Photos........................20 Videos........................21 Slow Motion......................22... -
Page 3: Product Pro Le
• AI Camera Mode You can enter the AI Camera Mode by connecting your phone to the PowerEgg X’s Wi-Fi. Use the Vision+ 2 App to control the AI camera and view your creations in real time. The maximum battery life is 3.5 hours. - Page 4 • Drone Mode With a forward vision system, a downward vision system, and ultrasonic sensors , PowerEgg X can hover stably indoors and outdoors, return to home ② autonomously, sense obstacles, and y in Smart Flight modes. The High Precision Steady Gimbal Camera can record ultra-clear 4K 60fps videos smoothly.
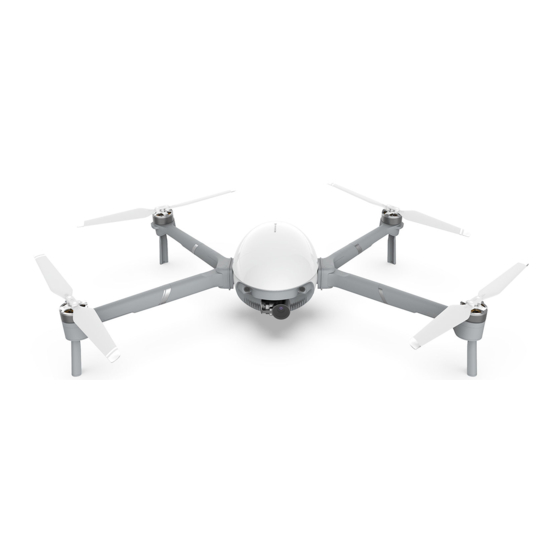
- Page 5 ◆ Diagram of PowerEgg X Parts • Drone Diagram 1. Forward Vision System 8. Battery Cover 16. Wristband 2. Gimbalized camera 9. Battery Level LEDs 17. Smart Battery 3. Mode indicator (headlight) 10. Power Button 18. Tripod Adapter 19. Arm Groove 4.
- Page 6 • Remote Controller Diagaram 1. Mobile Device Holder 9. Return to Home 2. Antenna 10. Customizable Button 3. Joystick 11. Power Button 4. Flight Mode Switch 12. Charging Port (Micro USB) 5. P Mode (Professional) 13. Photo Button 6. N Mode (Normal) 14.
-
Page 7: Smart Battery
The battery level LEDs go off when the drone is powered off. • Charge the smart battery Use the power adapter provided by the PowerEgg X for charging. 1. Connect the power adapter to an AC power supply (100V~240V, 50/60Hz). Use a power socket converter if necessary. -
Page 8: User Sign Up
been turned off. 3. The LEDs on the smart battery will blink in cycles to display the battery level during charging. 4. The LEDs on the smart battery will be turned off after the battery is fully charged, disconnect the battery after charging is completed. Example of charging The charging port on the The charging port on the... - Page 9 ④ After the veri cation, set your password. The password is required to be 8-20 characters, with both numbers and letters; ⑤ We will show you the quality service that PowerVision provides for you, as well as the corresponding service terms and policies. Read carefully before you move on to the next step.
- Page 10 • Sign in with veri cation code a. To use your email address as the account ① Fill your email address correctly in the input box, and click the “Send Veri cation Code” button; ② Enter the 6-digit veri cation code you received in the input box and wait for veri cation;...
-
Page 11: Activation
Activate PowerEgg X on Vision+ 2 App before the rst use. • Operating Steps 1. Power on the PowerEgg X, setup the device in either AI camera mode or drone mode. 2. In AI camera mode: Connect your mobile device to PowerEgg X’s Wi-Fi: EggX_xxxxxx. - Page 12 A fail notice will be shown on the App if the activation is not successful. Tap ”Activate” again until the drone is activated successfully. Activate the Drone Activation failed. Please re-activate the Drone. Cancel Activate Activate the Drone Caution: DO NOT power off the drone during the activation process.
-
Page 13: Firmware Update
Firmware Update The rmware of PowerEgg X needs to be updated in each modes. In drone mode, the rmware for the drone and the remote controller will be updated. In the AI camera mode, only the drone rmware will be updated. In the drone mode, if... - Page 14 After you choose “Download”, the download progress is displayed in real-time. Once you choose “‘Download”, DO NOT close the current page, DO NOT power off the PowerEgg X (the drone and the remote controller), and please keep the drone connected to the Internet when downloading. You will...
- Page 15 4. When the download is complete, the rmware transmission will automatically start. Then you need to con rm the update again. If the network is interrupted due to exceptions, you do not need to download the rmware again when entering the rmware update next time.
- Page 16 5. After selecting “Update”, you will enter the rmware transmission process. During this process, the downloaded rmware is transmitted from the mobile device to the PowerEgg X (the drone and the remote controller). The progress will be displayed in real-time. DO NOT interrupt the transmission.
- Page 17 7. When the installation is complete, there is a prompt indicating that the rmware update is full. Tap “Finish” to automatically skip to the shooting interface. Cautions: 1. In either drone mode or AI camera mode, before you update the rmware, make sure that you have powered on the drone, run the Vision+ 2 App and connected your phone to the Internet.
-
Page 18: Ai Camera Mode
AI Camera Mode Prepare the AI Camera 1. Remove the protective shell of the device Pull the buckles of the protective shell and remove the shell upwards. 2. Remove the gimbal protector Press the buckles on both sides of the protector, and pull it downwards. 3. - Page 19 Press the power button once, then press and hold for 2 sec to turn on/off the drone. 8. Connect to PowerEgg X’s Wi-Fi Connect your mobile device to PowerEgg X’s Wi-Fi: EggX_xxxxxx. The default password is 12345678. 9. Run the Vision+ 2 App on your phone and enter the AI camera mode ①.
-
Page 20: Introduction To Vision+ 2 App
2. Connection: Indicating the connection type and connection status between the App and PowerEgg X. 3. Battery level: Indicating the battery level of PowerEgg X. 4. Microphone switch: Turn on/off the microphone during the video mode. 5. More settings: Including live streaming , gimbal settings and general settings. - Page 21 10. Gimbal settings: Quickly switch the working mode of the gimbal. 11. Media library: With the App, you can view the pictures or videos that you have shot in PowerEgg X. And you can download any of those les at any time.
-
Page 22: Photos
Photos Self-timer PowerEgg X supports single shot, HDR, continuous shot and AEB continuous shot. Select a shooting mode. The corresponding icon will be displayed on the top of the image. -
Page 23: Videos
Microphone switch Before shooting In shooting PowerEgg X supports 4K 60fps video shooting, which allows you to create ultra-clear footage. 1. Microphone switch: Tap the switch to turn on or off the microphone. When it is on, the sound collected by the receiver on your mobile device will be synchronized with the footage captured by the PowerEgg X. -
Page 24: Slow Motion
Slow Motion Video format Before shooting In shooting PowerEgg X supports both FHD 120 FPS for slow-motion. You can easily switch the shooting mode with the button on the upper right. -
Page 25: Time-Lapse
Please note the maximum generated video duration is 15s. Then, you can start your shooting by slightly tapping the “Photo” button after you secure the PowerEgg X into place and adjust the camera lens properly. You can observe the remaining duration of shooting and the current shooting schedule in the process. -
Page 26: Autonomous Personal Ai Camera
① Aim the lens towards the target person or vehicle; ② After double-tapping or drawing a box (after long-pressing) around the person or the vehicle, PowerEgg X will swing the gimbal camera make sure that the target object is always in the picture;... -
Page 27: Gesture Control
( nish) recording videos. Gimbal Settings PowerEgg X has three gimbal modes: Follow Mode, Lock Mode and FPV Mode. You can tap “Gimbal Mode” button to switch modes. Follow Mode: In Follow mode, the camera follows user’s motion in the pan and pitch axes. -
Page 28: Live Streaming
Live Streaming In addition to shooting great videos with PowerEgg X, you can also share the beautiful moments to your family, friends and others via live stream. PowerEgg X currently supports live broadcasting on Weibo Live Streaming Platform. Stay tuned for other mainstream live streaming platforms coming soon! How to make live streams? ①... -
Page 29: Drone Mode
Drone Mode Preparing the Drone Before using it in drone mode, please follow the instructions to install and unfold the drone as illustrated below: 1. Remove the protective Shell of the drone and the gimbal holder. Remove the protective shell from the device by pulling the handle. Remove the gimbal holder by pressing and pulling the holder from both sides. - Page 30 Insert the arms into the slots on the left and right sides of the drone. If a Micro-SD card is needed, please insert the card into the slot rst. Put the battery into the battery compartment. Buckle up the battery cover and secure the battery compartment into place.
- Page 31 Make sure the gimbal holder is removed and all arms and stands are unfolded before powering on the drone. Caution: When storing and shipping the PowerEgg X, make sure the arms and the drone body are stored separately. Make sure the protective case of drone and gimbal are well installed.
- Page 32 2. Follow this sequence and place the mobile device holder into a comfortable position. 3. Put your mobile device onto the holder and adjust the holder's angle. 4. Use a cable to connect your mobile device and the remote controller.
-
Page 33: Remote Controller
Remote Controller PowerEgg X comes with a remote controller, which can send pilot’s control commands to the drone, at the same time, the remote controller receives signal from designated data link and transmit real time high resolution video back to your mobile device via Vision+ 2 App. - Page 34 • Operating the Remote Controller Piloting Mode: There are three piloting modes, i.e., Right-hand Throttle Mode (Mode 1), Left-hand Throttle Mode (Mode 2) and Chinese Throttle Control Mode (Mode 3). You can also customize your mode in the Vision+ 2 App. For beginners, Mode 2 is recommended.
- Page 35 • Controlling the Drone 1. Throttle Stick Moving the throttle stick up or down changes the drone’s climb rate. Pushingthe stick up to ascend and down to descend. Altitude of the drone remains unchanged when the stick is in the center position. When the drone begins to take off, you must push the stick up and cross the center position to lift the drone from the ground.
- Page 36 Moving the pitch stick up and down changes the drone’s pitch. Push the stick up to y forward and down to y backwards. The drone remains horizontal when the stick is in the center position. The amount of stick controls the speed of the drone.
- Page 37 • Customizable Button The button can be assigned to customized functions by using the Vision+ 2 App. • Power saving hibernation Remote controller beeps after 5 minutes of standing by, and you can toggle any stick to get the controller back to normal. The remote controller will automatically shut down after over 10 minutes of inactivity.
- Page 38 Linking the Remote Controller 1. Long press the power button of the remote controller for three seconds and release the button after you hear the start prompt tone to power on the remote controller. 2. Unfold the antennas and stands. 3.
-
Page 39: Introduction Of Drone
Flight Status Indicator The mode status indicators, located at the front of the drone, indicate whether PowerEgg X has been con gured to the drone mode. In drone mode, the indicators will always be solid red. Flight status indicator of the drone indicates the status of the drone’s ight control system. - Page 40 • Cautions for use 1. Propeller blades are sharp. Handle carefully when attaching and detaching them. 2. Please only use the propellers provided by Powervision. 3. Propellers are consumables. Please purchase the propeller separately if necessary. 4. Make sure that propellers are attached accurately and securely before each ight.
- Page 41 ◆ Vision System Equipped with forward facing and downward facing stereo vision cameras, vision systems, PowerEgg X can observe the surroundings to help with understanding its positions, as well as perceives the obstacles in those directions. The forward and downward vision systems are located at the nose and the bottom of the drone.
- Page 42 • Detecting Range 40° 60° • Using the Vision System 1. When GPS is unavailable or weak, the positioning function of the Downward Vision System starts to help navigating the drone. Downward Vision System works best when the drone is at an altitude from 0.5 to 6 meters above the surface.
- Page 43 Cautions: • The vision systems please be aware that the vision systems only plays as a supporting role in ight safety and they cannot replace pilot’s decision making and control. You should always pay attention to the surrounding environment and warnings from the Vision+ 2 App during the ight, please maintainfull control of the drone and take responsibility for ight operations.
- Page 44 • Please check the camera lens of vision system before take-off: a) Remove the covers/ stickers and make the lens clear; b) If there is any water droplet, ngerprint or dirt on the surface, please wipe with lint-free wipers before ight. DO NOT use alcohol or other organic solvents. c) For any damage to the vision systems, please contact our customer support for repair.
- Page 45 RTH, you can regain control of the drone. • Smart Low Battery RTH PowerEgg X will intelligently estimate whether the current battery level is suf cient based on current location. If the current battery level is only enough to complete the return process, the Vision+ 2 App will ask if you need to perform the RTH function.
- Page 46 • Precise landing During the landing phase of a automatic return, the drone will match the terrain features after arriving at the home point. Once the match is successful, the drone will adjust its landing location to accurately return to the take-off point. Be aware that precise landing has a few prerequisite conditions, be cautious with the status of the drone all the time.
-
Page 47: Smart Flight Mode
Smart Flight Mode Before starting this mode, please make sure the drone is fully charged, the GPS signal is good, and the remote control is in N mode. Click the from the Vision+ 2 App to enter the Smart Flight Mode menu. ◆... - Page 48 The drone can autonomously y around a target, the user can control the radius and speed while take photos/ videos. • De ne the Point of Interest 1. Enter the PowerVision Vision+ 2 App, select the Point of Interest and enter the control interface.
- Page 49 ight trajectory, or use the stick to change the ight trajectory. 6. When the pilot hit the pause button, the drone will stop and hover, click again to resume the following. Cautions: 1. Please stop the orbital ight immediately when the battery is low and start returning to home before the battery becomes critically low.
- Page 50 2. Enter the Vision+ 2 App, click on the AI Function, quickshot, and select shooting mode you need. 3. Click the pre-recognized target or draw a box on your target. 4. Adjust the ight parameters on the screen and click Start .
-
Page 51: Drone Flight
1. DO NOT operate in the weather such as rain, fog, snow, thunder and lightning, wind (wind speed at 10 meters per second or above). 2. It is recommended to purchase a waterproof protective case for PowerEgg X when ying on rainy days and make sure the drone ies within the visual range. - Page 52 2. The user must not use an drone in the event of an accident (such as collision, tipping or falling) or an abnormal ight condition. An drone suffering an accident must not y until it has been Inspected or repaired by PowerVision...
- Page 53 5. DO NOT infringe the privacy rights of others with the drone. ◆ Pre- ight Inspection 1. Please make sure that PowerEgg X is correctly assembled with both arms are in place, and the battery and its cover are securely installed.
- Page 54 1. Open the Vision+ 2 App, select and open the PowerEgg X user interface. 2. Check the drone according to the self-check list. 3. Click the Auto Takeoff button , read the conditions and slide to unlock the takeoff function.
- Page 55 • Disarm the motors Method 1: After the drone touches the ground, pull the throttle stick to the lowest position and hold it for 3 seconds, the motors will stop. Method 2: After the drone touches the ground, pull the throttle stick to the lowest position.
- Page 56 4. Wait until the cycling LEDs of the remote controller change to a state where only the power light is on. 5. Run PowerVision Vision+ 2 App to enter the control interface. 6. When the drone tail status indicator blinks green slowly, the motor can be armed.
-
Page 57: Fly In The Rain & Takeoff/Landing On The Water
A PowerEgg X drone with a waterproof protective case can be own in the rain. The waterproof protective case creates a barrier along the contract surface between itself and the arms with rubber sealing strip to ensure that the PowerEgg X can generally work in humid, rainy environments and other environments where water may splash, and to prevent damage to the body from water ingress. - Page 58 Cautions: Failure to properly perform the instructions mentioned above of using the PowerEgg X and the waterproof protective case may result in the breakdown of the case. In this situation, water may get ingets in and then damage the drone and battery, which may cause an explosion or re. The product warranty...
- Page 59 • PwerEgg X Waterproof Case Installation 1. Assemble the PowerEggX. 2. Open the waterproof case, and insert the rear end of the drone into the case. Cautions: When inserting, please make sure that the O-ring at the root of the machine arm is in full contact with the sealing rubber strip and the O-ring is embedded in the groove of the sealing rubber strip.
- Page 60 ◆ Flight in Rain & Takeover/Landing on Water • Buoyancy Accessories In the drone mode, the PowerEgg X can be equipped with a waterproof protective case and oating accessories to achieve water surface take-off and landing, as well as to oat on the water.
- Page 61 • Caution: 1. After installing the oating accessories, you need to check and con rm that the oating accessories and the four tripods are rmly xed. It is forbidden to take off the drone when the buoyancy ttings are installed incompletely or loosely.
- Page 62 away from the remote controller. • Takeoff and Landing on a Boat 1. DO NOT calibrate the drone on a shaking or moving boat. 2. Make sure that the drone has enough space to take off onboard. Otherwise, it shall take off on the water surface or ground. 3.
-
Page 63: Appendix
Appendix Vision System Calibration Vision system calibration is recommended in the following situations: 1. Use times reached 50 times; 2. Storage or operating environment temperature exceeds the range of -10~40 ℃; 3. Severe collision; 4. When the Vision+ 2 App prompt out reminders like "The stereo vision system parameters are abnormal. - Page 64 3. Power on the device. 4. Access to the network: search for the wireless network through your computer according to the SSID identi ed by the QR code on the device body, enter the default password 12345678 to access to the connection. •...
- Page 65 After the acquisition is completed, it will automatically jump to the “downward calibration”. 2. Start the downward calibration Cautions before calibration: 1). Please point the downward facing stereo cameras at the calibration target on the screen, as shown below: Error message prompt Preview box Help information...
- Page 66 Calibrating, please wait...(40%) 4. Calibration result query After the successful calibration, click the OK button to restart the drone automatically to make sure that the newly set parameters take effect. The user can also view them in the Log folder under the software installation directory. •...
-
Page 67: Compass Calibration
Please calibrate the compass in any of the following situations: 1. Fly more than 50km from after the compass was last successfully calibrated. 2. PowerEgg X has not been used for more than 30 days. 3. The App reminds the user about compass interference, and the ight status indicator blinks red and yellow alternately. - Page 68 Vertical calibration...
-
Page 69: Technical Speci Cations
Technical Speci cations 522g Weight 165×100×100 mm Size 4 Hours Battery Lifev Working Environment Temperature 0℃~40℃ AI Camera FCC/IC: 2412~2462MHz CE: 2412~2472MHz Working Frequency SRRC: 2412~2472MHz MIC: 2412~2472MHz CE(EIRP):≤18.2dBm FCC:≤21dBm IC:≤21dBm MIC:≤10mw/MHz Transmitting Power (AI Camera Mode) SRRC(EIRP):≤20dBm Takeoff Weight 862g Maximum Battery Life 30mins... -
Page 70: Warranty
Warranty Please visit the PowerVision of cial website https://www.powervision.me for the latest after-sales warranty information. Contents are subject to change without notice. Please check at the of cial PowerVision website www.powervision.me. PowerEgg and PowerVision are Trademarks owned by PowerVision Tech Icn.
Need help?
Do you have a question about the PowerEgg X and is the answer not in the manual?
Questions and answers